Enhancing Applications with Application Services
Workshop
1. Prerequisites
To complete the workshop, the following is required from participants:
-
Access to an OpenShift cluster on which the workshop components and applications have been deployed (see Provisioning)
The workshop does not require a separate cluster for each participant, but can be delivered on a shared cluster where each participant has access to his own namespace with the workshop applications.
-
A Red Hat account to access the Developer Sandbox for OpenShift API Management and the Streams for Apache Kafka managed service.
A Red Hat account can be created by navigating to console.redhat.com and following the Register for a Red Hat account link.
-
(Optional) the
ocOpenShift CLI installed on the participants workstation. The version ofocshould match the version of the OpenShift cluster.
TheocCLI can be obtained from the command line tools page of the OpenShift cluster or from the OpenShift Container Platform downloads page on the Red Hat Customer Portal. -
(Optional) the
rhoas(Red Hat OpenShift Application Services) CLI installed on the participants workstation.
The latest release of therhoasCLI can be obtained from the Red Hat OpenShift Application Services CLI releases page on GitHub.
2. Provisioning the workshop environment
|
The provisioning instructions assume that each participant uses a separate OpenShift cluster. The provisioning Ansible workbook needs to be run for each OpenShift cluster. Adapting the Ansible playbook for a shared OpenShift cluster is work in progress. |
-
Clone the Ansible playbook project from Github to your local workstation.
-
Copy the
inventories/inventory.templatefile toinventories/inventory. -
Review the
inventories/inventoryfile, and adapt where needed. In most cases, the file can be used as such. It assumes a trial version of OpenShift Streams for Apache Kafka will be used. -
Using
oc, login as cluster admin into the OpenShift cluster. -
Run the provisioning playbook
ansible-playbook -i inventories/inventory playbooks/install.ymlThe playbook installs the following components:
-
The Red Hat OpenShift Application Services (RHOAS) operator in the
openshift-operatorsnamespace. -
The Service Binding operator in the
openshift-operatorsnamespace. -
The Globex Coolstuff application in the
globexnamespace.
3. Introduction
3.1. Workshop scenario
|
The workshop described in this paragraph is part of a larger workshop around application modernization and cloud-adoption. The complete workshop can be found here. The narrative of the workshop evolves around a fictitious company, Globex, which recently embarked on a cloud adoption and application modernization journey for their flagship retail e-commerce application. The described in the following chapters start when the first phase of this modernization journey has been successfully delivered. |
The retail application has been modernized and refactored for running on the hybrid cloud. The original monolith application has been decomposed in a number of smaller microservices.
In Phase 2 of the modernization effort, the customer would like to enhance their modernized application to include new requirements and features.
-
Track how visitors engage with their website, derive intelligence out of user activity streams.
-
Process and analyze this user activity stream to showcase Featured Products based on products with the most customer interest leading to a more personalized experience.
-
Introduce a multi-channel approach to build a mobile app as a new channel of access - mobile development is most likely to be outsourced
3.2. Common Challenges
There are however a number of challenges with the new requirements:
-
Adding new channels remains difficult, with a high risk of tight coupling to the existing services, which would slow down development productivity and time to market.
-
The existing services need to be managed and secured to allow access for external partners and development teams. Governance remains a challenge.
-
Adoption of new technologies such as event streaming requires time and new skills, which are not readily available inside the company.
In order to cope with these challenges, the development team decides for a new approach.
3.3. Development approach
Adoption of Apache Kafka as a streaming platform to ingest and process user activity event streams.
API First approach: the API contract is formalized in an OpenAPI spec document before development commences. The API design phase is done collaboratively with all stakeholders. The first version of the OpenAPI spec document is pushed and managed in a schema registry, which acts as the system of truth. Mocks are created for the API.
Parallel Development: adopting an API first approach enables parallel development streams. - UI development teams and other API consumers start their development against the mocked APIs. - Backend development teams can implement the APIs using modern cloud-native frameworks and test the implementation against the OpenAPI spec to ensure that the implementation does not break the contract.
Manage and Secure the APIs: Adoption of an API management platform to expose the APIs in a secure and managed way for access by the mobile app and other 3rd party applications.
Managed cloud services as the preferred for easy and rapid adoption of new middleware components like the API Management platform and the streaming platform; this allows the teams to focus on the business requirements, without the need to invest in skills and infrastructure to deploy and maintain these complex components.
3.4. Workshop goals
The primary goal of the workshop is to guide the user through
-
Adding Event Streaming capabilities to an application to allow tracking user activity.
-
Adding API management capabilities to an application to manage and secure the APIs for external access.
4. Adding Event Streaming capabilities to the application
4.1. Introduction
To support the business requirement of capturing and processing user activity on the Globex Coolstuff application, two new services have been developed:
-
Activity Tracking service: This service exposes a REST endpoint. User activities on the Coolstuff website (such as opening a product page, liking a product etc..) generates an activity payload which is sent to the Activity tracking REST endpoint. The service transforms this payload into a Kafka message which is sent to a topic on the Kafka broker.
-
Recommendation Engine: This service consumes and processes the events produced by the Activity Tracking service. The service uses the Kafka Streams library to continuously determine the top featured products (the products which generate the most activities). The service also exposes a REST endpoint to expose the list of featured products.
Both services are developed using Quarkus and the Quarkus extensions for reactive messaging and Kafka Streams. The development of the services is outside the scope of this workshop, but you are encouraged to examine the source code of the applications on GitHub: Activity Tracking Service and Recommendation Engine
For the Kafka platform, the workshop uses Red Hat AMQ Streams for Apache Kafka. AMQ Streams includes an Operator to make it easy to run a Kafka service on Red Hat OpenShift. The service can be very easily consumed and used by developers.
4.2. Activities
In this part of the workshop you will:
-
Provision and configure an AMQ Streams instance for Apache Kafka.
4.3. Environment and prerequisites
The Globex Coolstuff application is deployed on an OpenShift cluster in a separate namespace. All activities in this part of the workshop can be done in the OpenShift console and do not require any tools to be installed on your workstation.
Prerequisites:
-
A Red Hat Account
-
Optional:
ocCLI installed on your workstation.
4.4. Step-By-Step Instructions
4.4.1. Explore the environment
-
In a browser window, navigate to the console of your OpenShift cluster. Open the Developer perspective in the globex namespace.
-
In the Developer perspective, open the Topology view. Expect to see something like this (rearrange the topology as you see fit):
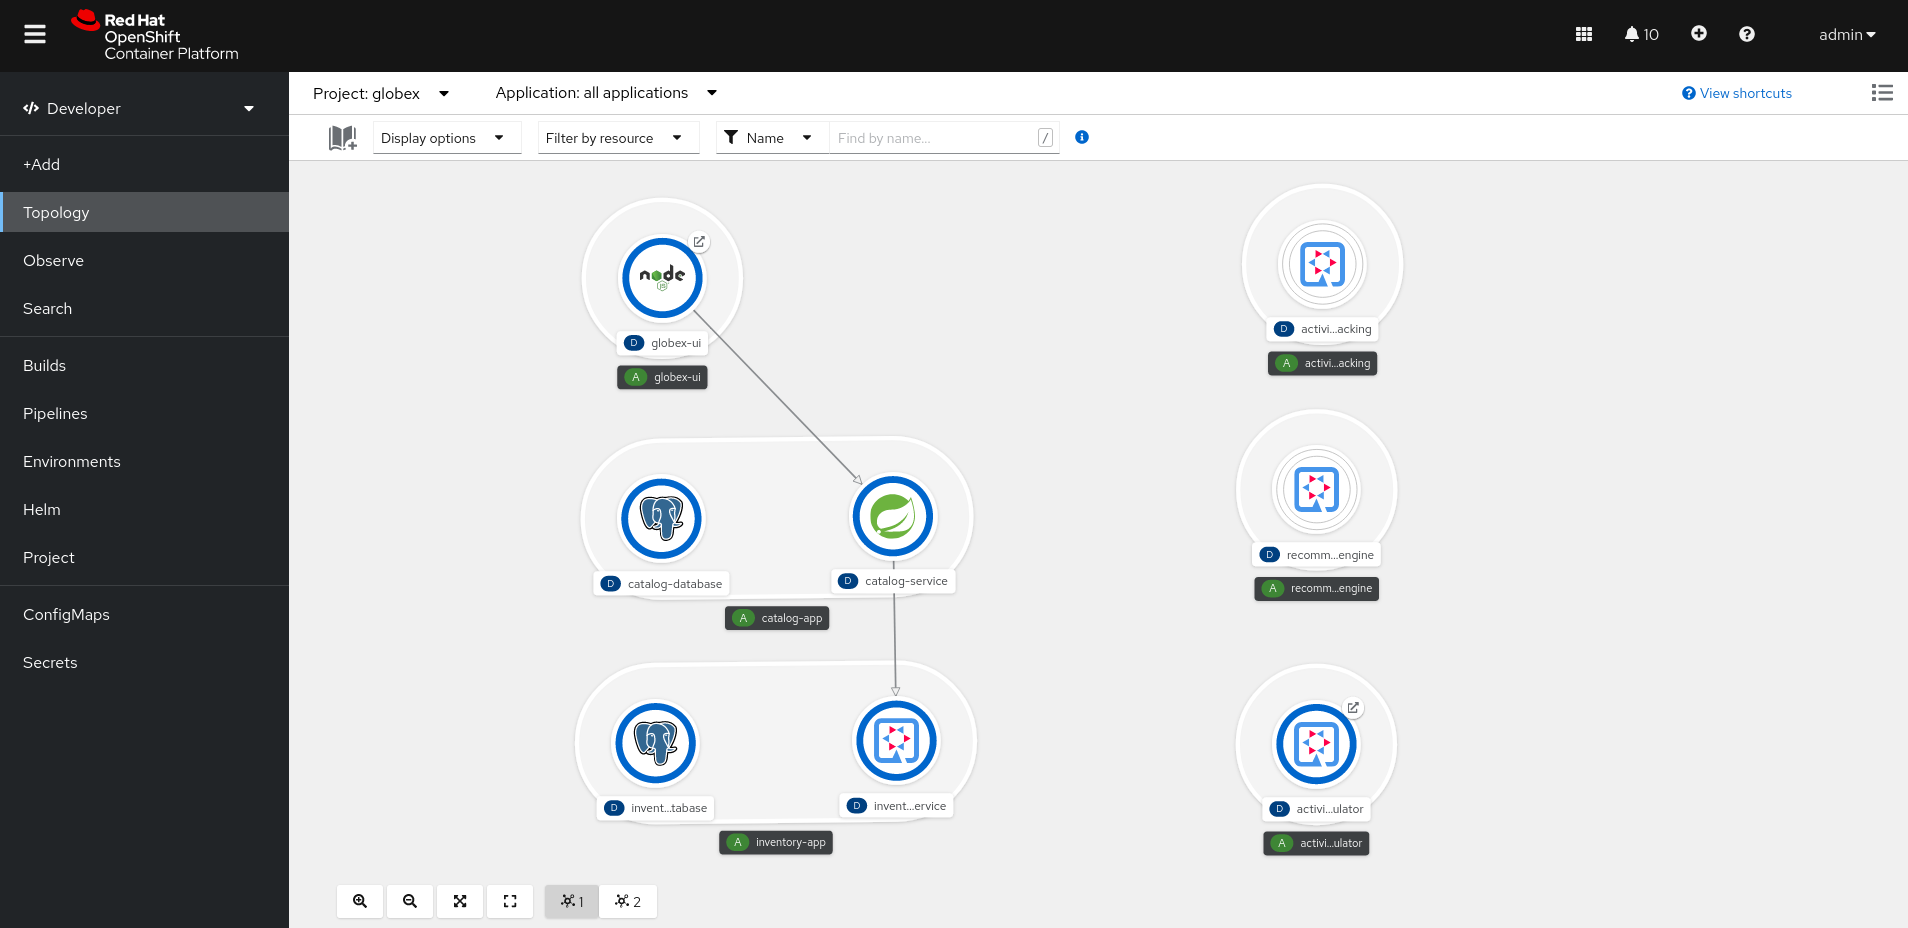
The deployed topology consists of:
-
globex-ui: The Globex Coolstuff web application (Node.js/Angular). -
catalog-app: The Globex Coolstuff catalog service, consisting of the catalog database and the Spring Boot catalog microservice. -
inventory-app: The Globex Coolstuff inventory service, consisting of the inventory database and the Quarkus inventory microservice. -
activity-tracking: The Activity Tracking service. Notice that the deployment of the service is scaled to zero. The service will be scaled up once the connection to the Kafka broker is set up. -
recommendation-engine: The Recommendation Engine service. Notice that the deployment of the service is scaled to zero. The service will be scaled up once the connection to the Kafka broker is set up. -
activity-tracking-simulator: A Quarkus service that simulates user activity events and sends them to the Activity Tracking service.
-
-
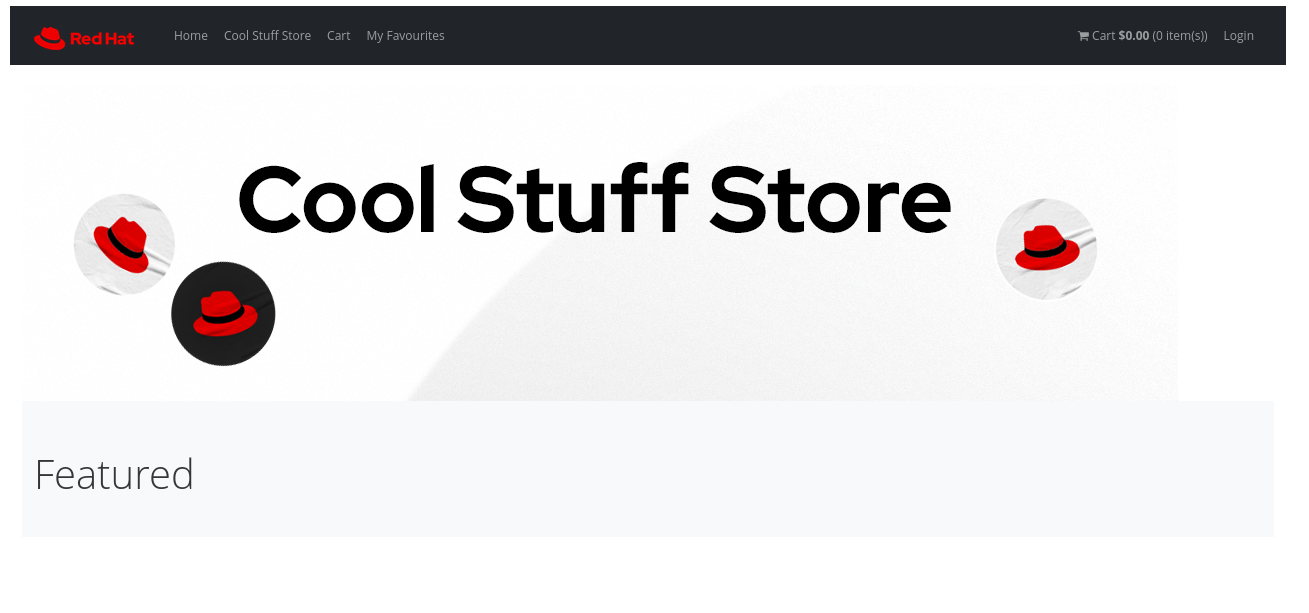
Find the route to the Globex UI application and open the URL in your browser.. Expect to see the home page of the Globex Coolstuff web application:
Click on Cool Stuff Store in the top menu to see a paginated list of products:
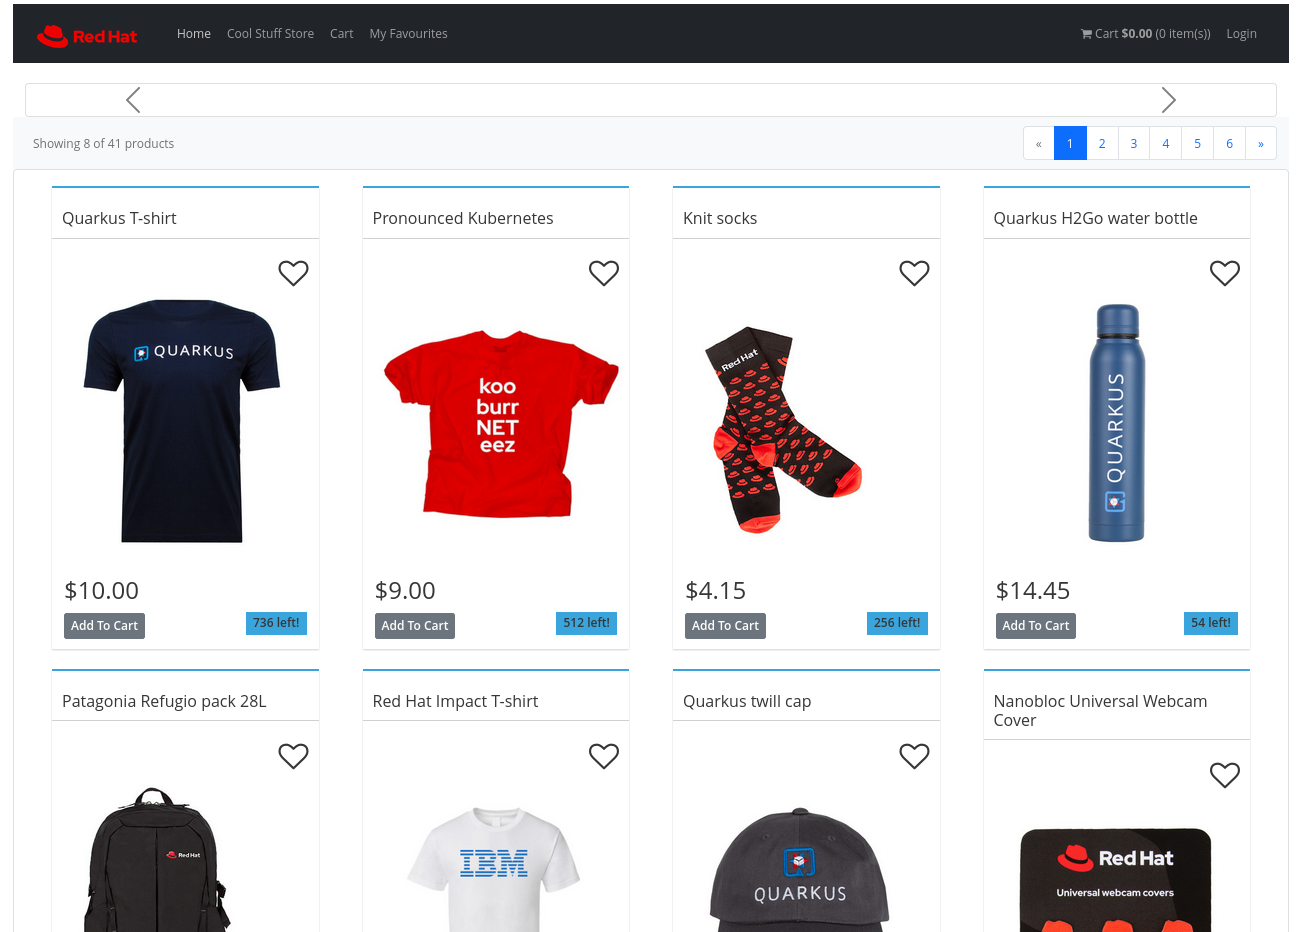
Note the Featured pane on the home page, which is empty at the moment. Also the product list page has an empty bar above the product list. These elements will be populated once the recommendation engine is up and running.
4.4.2. Provision and configure an AMQ Streams for Apache Kafka instance
TBD
Create a Kafka Topic in AMQ Streams for Apache Kafka
TBD
5. Adding API Management capabilities to the application
5.1. Introduction
To support the business requirement of managing and securing access to the services, Red Hat® OpenShift API Management will be used as the API management platform.
Red Hat OpenShift API Management is a hosted and managed API management service delivered as an add-on product to Red Hat OpenShift Dedicated, a fully managed service of enterprise Kubernetes platform Red Hat OpenShift, and also on Red Hat OpenShift Service on AWS (ROSA)
5.2. Activities
In this part of the workshop you will:
-
Setup a Red Hat OpenShift API Management sandbox environment
-
Manage and secure the already deployed Product catalog service.
5.3. Environment and prerequisites
The Product catalog API is already deployed on the OpenShift cluster in the namespace you’ve been using for this portion of the workshop. You will use the Red Hat OpenShift API management sandbox to manage this API. All activities in this part of the workshop can be done in the Red Hat OpenShift API Management sandbox console and do not require any tools to be installed on your workstation.
Prerequisites:
-
A Red Hat account
5.4. Step-By-Step Instructions
5.4.1. Signup and launch Red Hat OpenShift API Management sandbox
Register for a Red Hat OpenShift API Management sandbox by clicking on the red button in the Developer Sandbox use case activities page.
You will be asked to confirm the request through an email sent to your inbox. Once you launch the sandbox, follow these steps to setup a Red Hat OpenShift API Management sandbox tenant
-
From the Projects dropdown on the top of the page, set the project namespace as <username>-dev from the projects that have been already created for you.
-
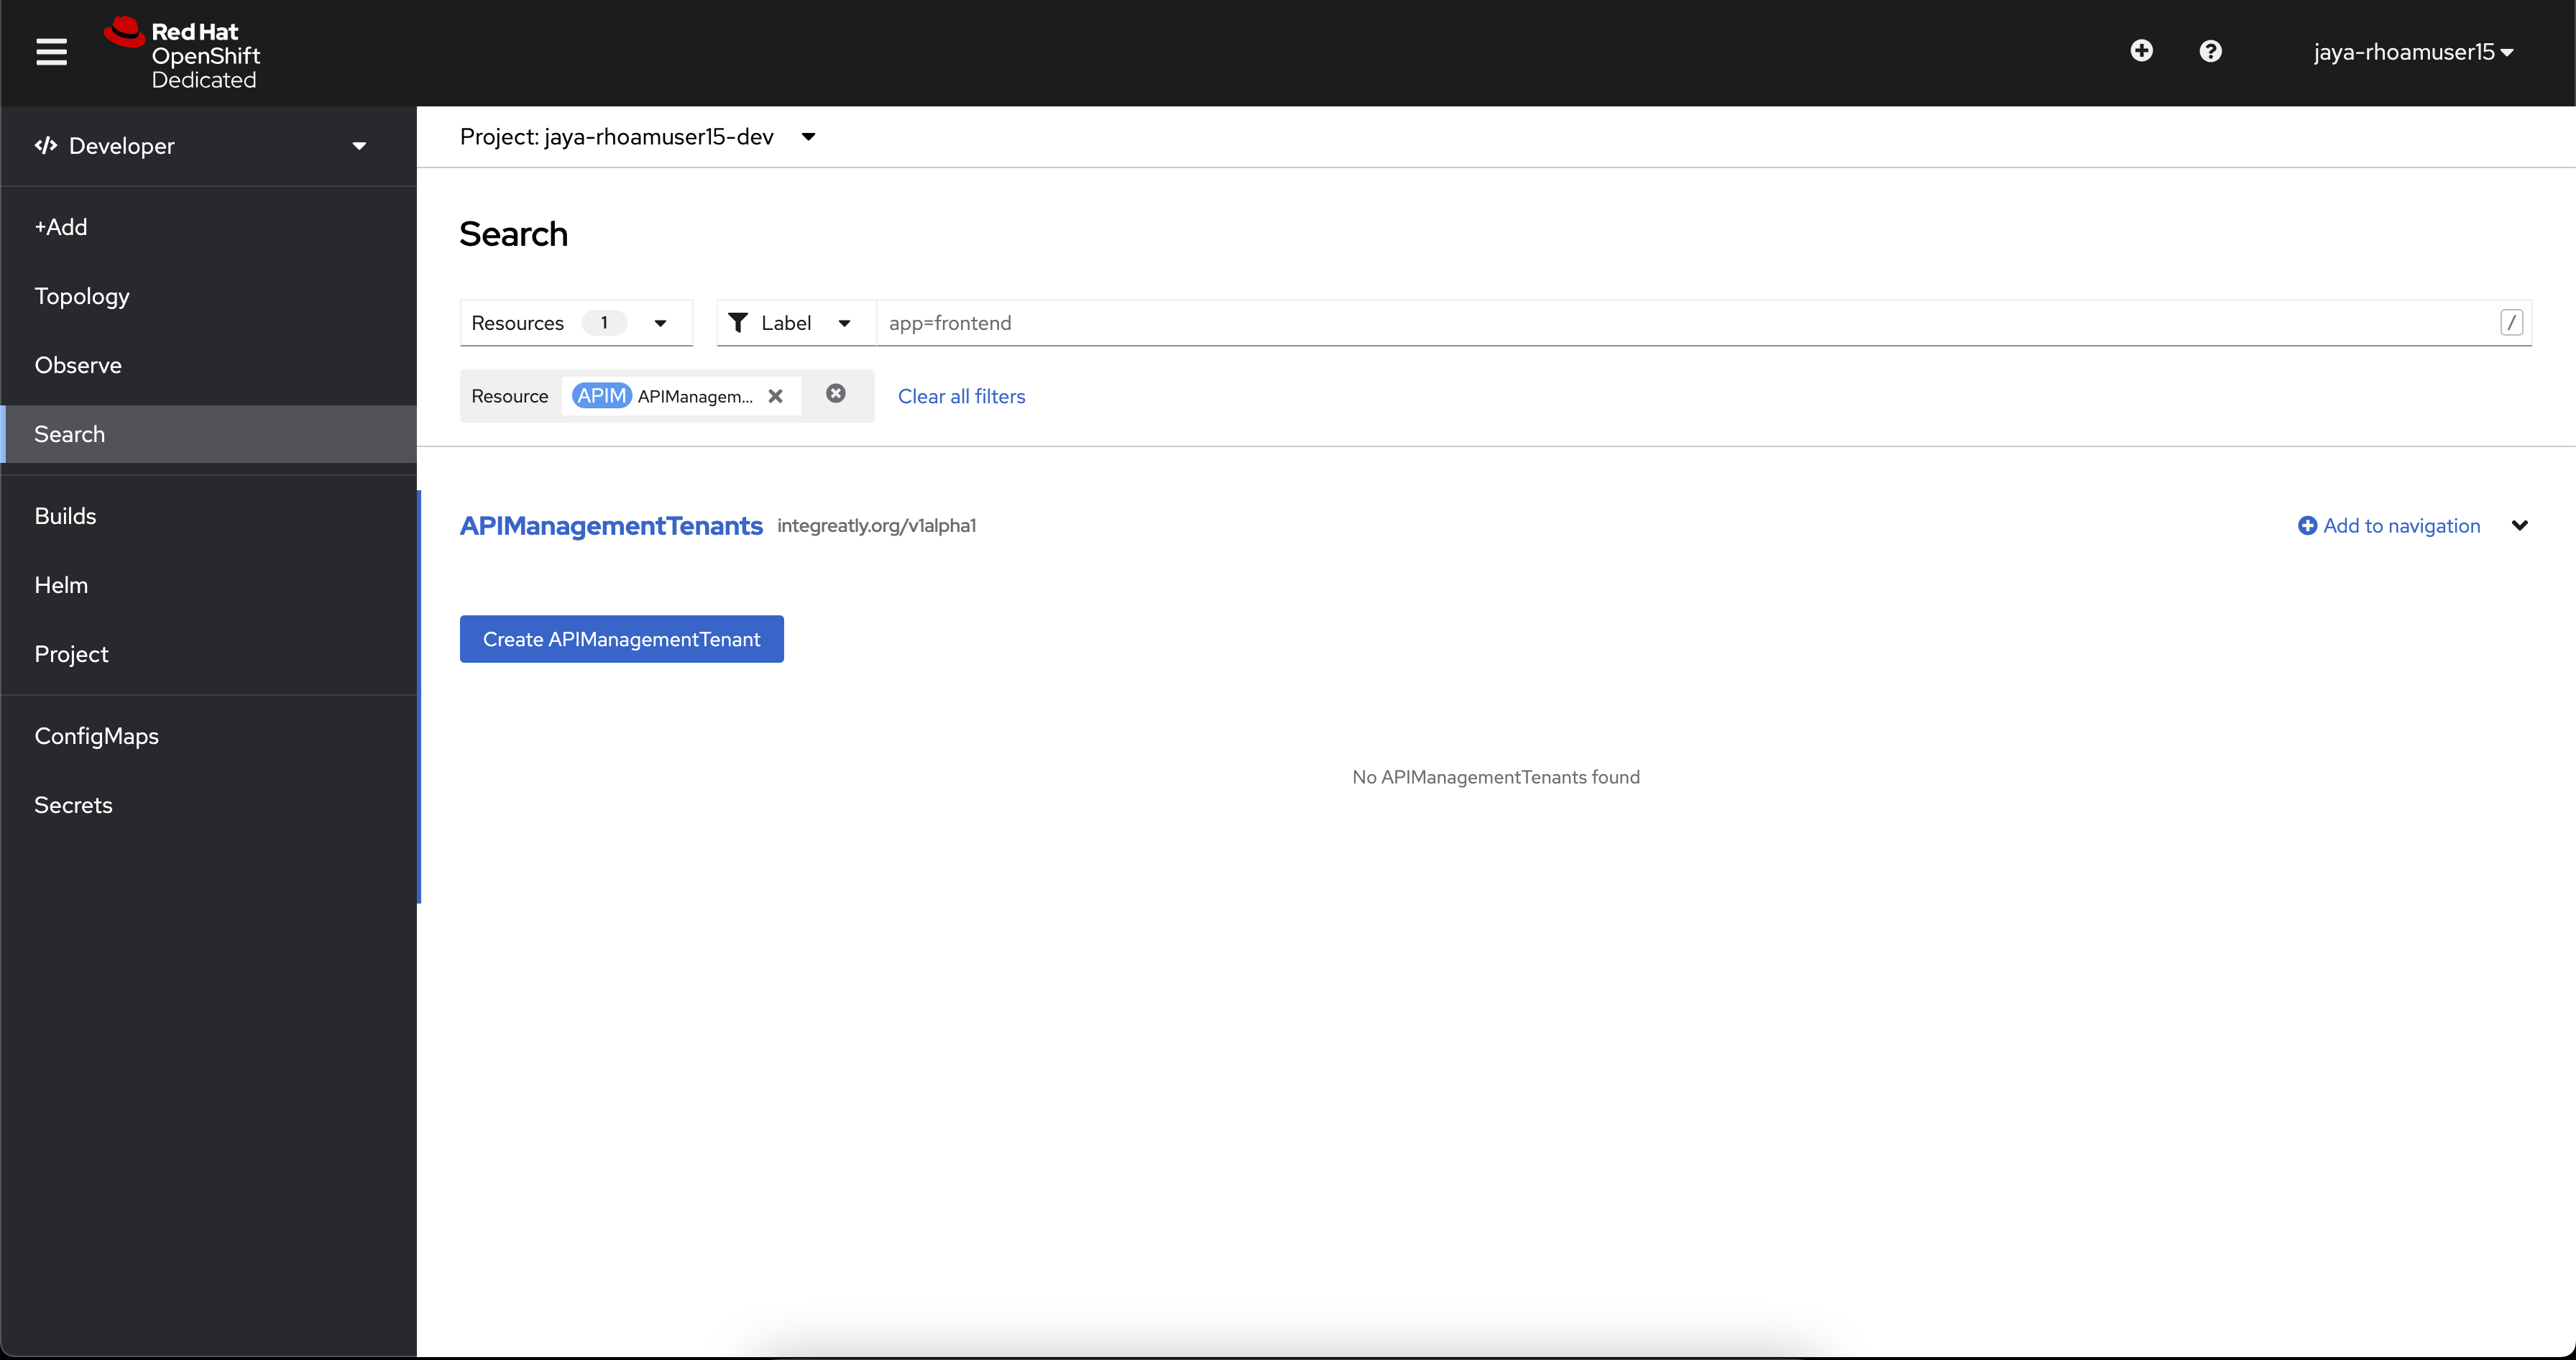
Click on Search from the left navigation
-
Click on Resources to search for
APIManagementTenantand select it.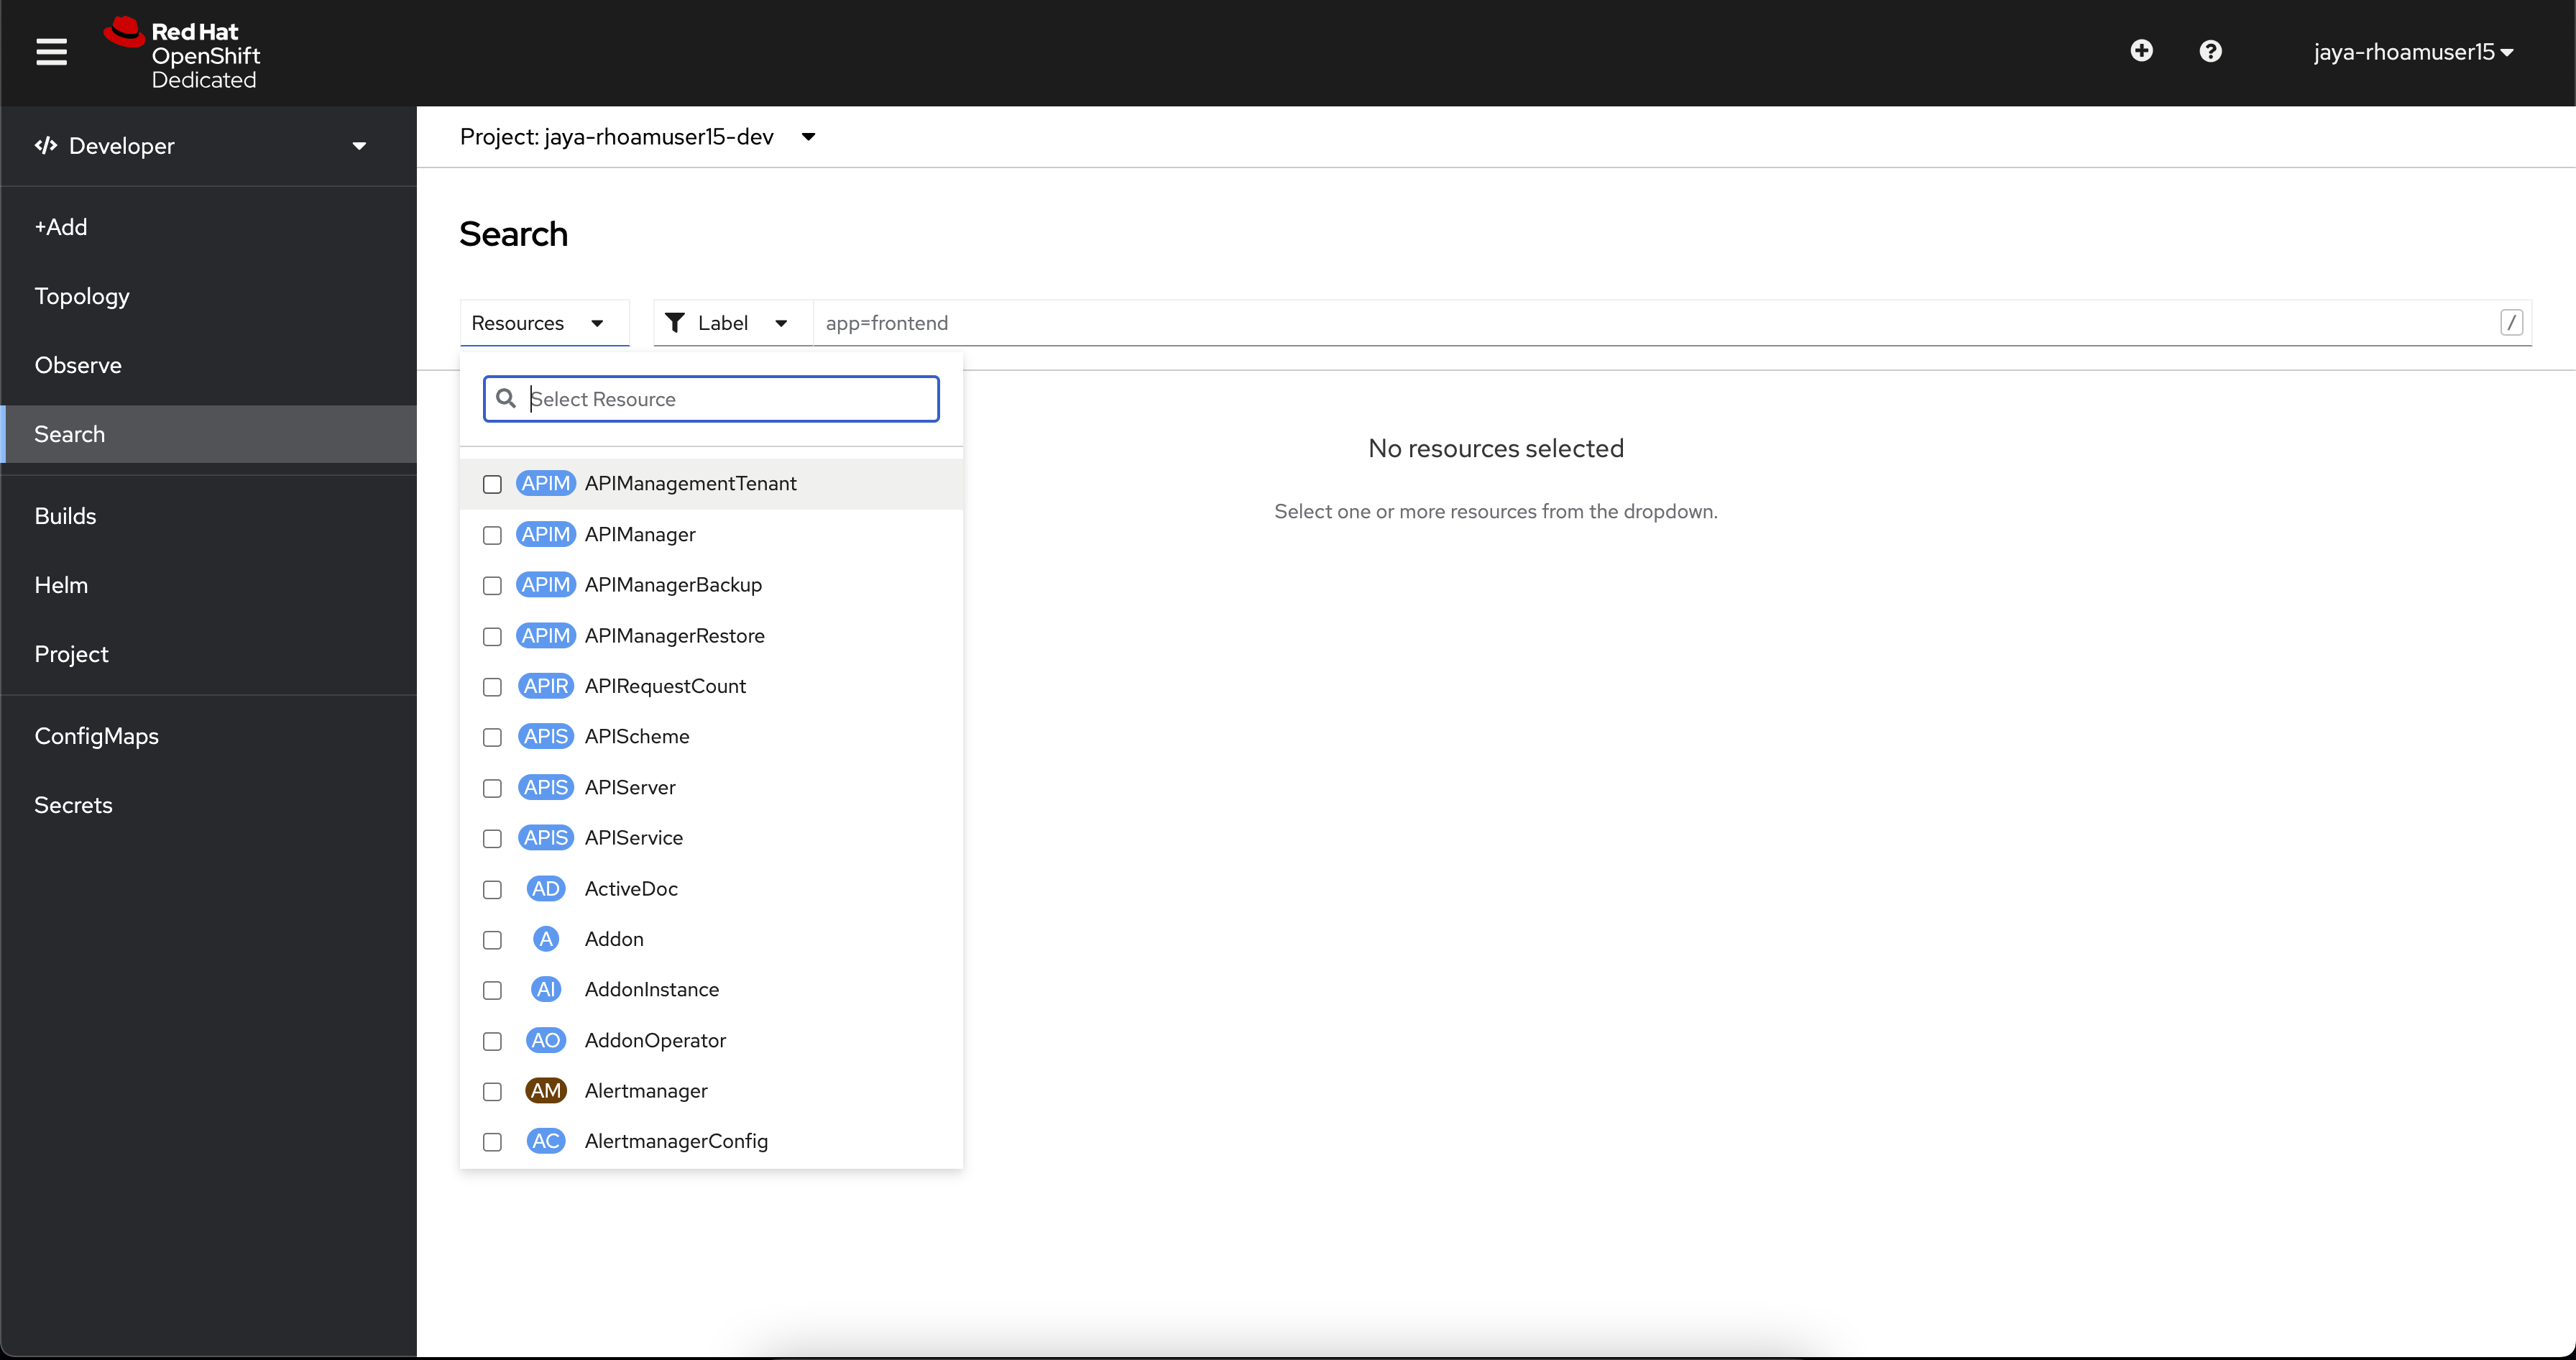
-
Select Create APIManagementTenant button
-
You will be taken to the YAML configuration of this resource. Click the Create button at the bottom of the YAML displayed.
-
You will be taken to the Details page of this resource. Click on the YAML tab to view the changes to the YAML configuration.
-
Watch for changes to the YAML of the APIManagementTenant resource, and wait for the status to be displayed at the bottom of the YAML to become
status.provisioningStatus: 3scale account ready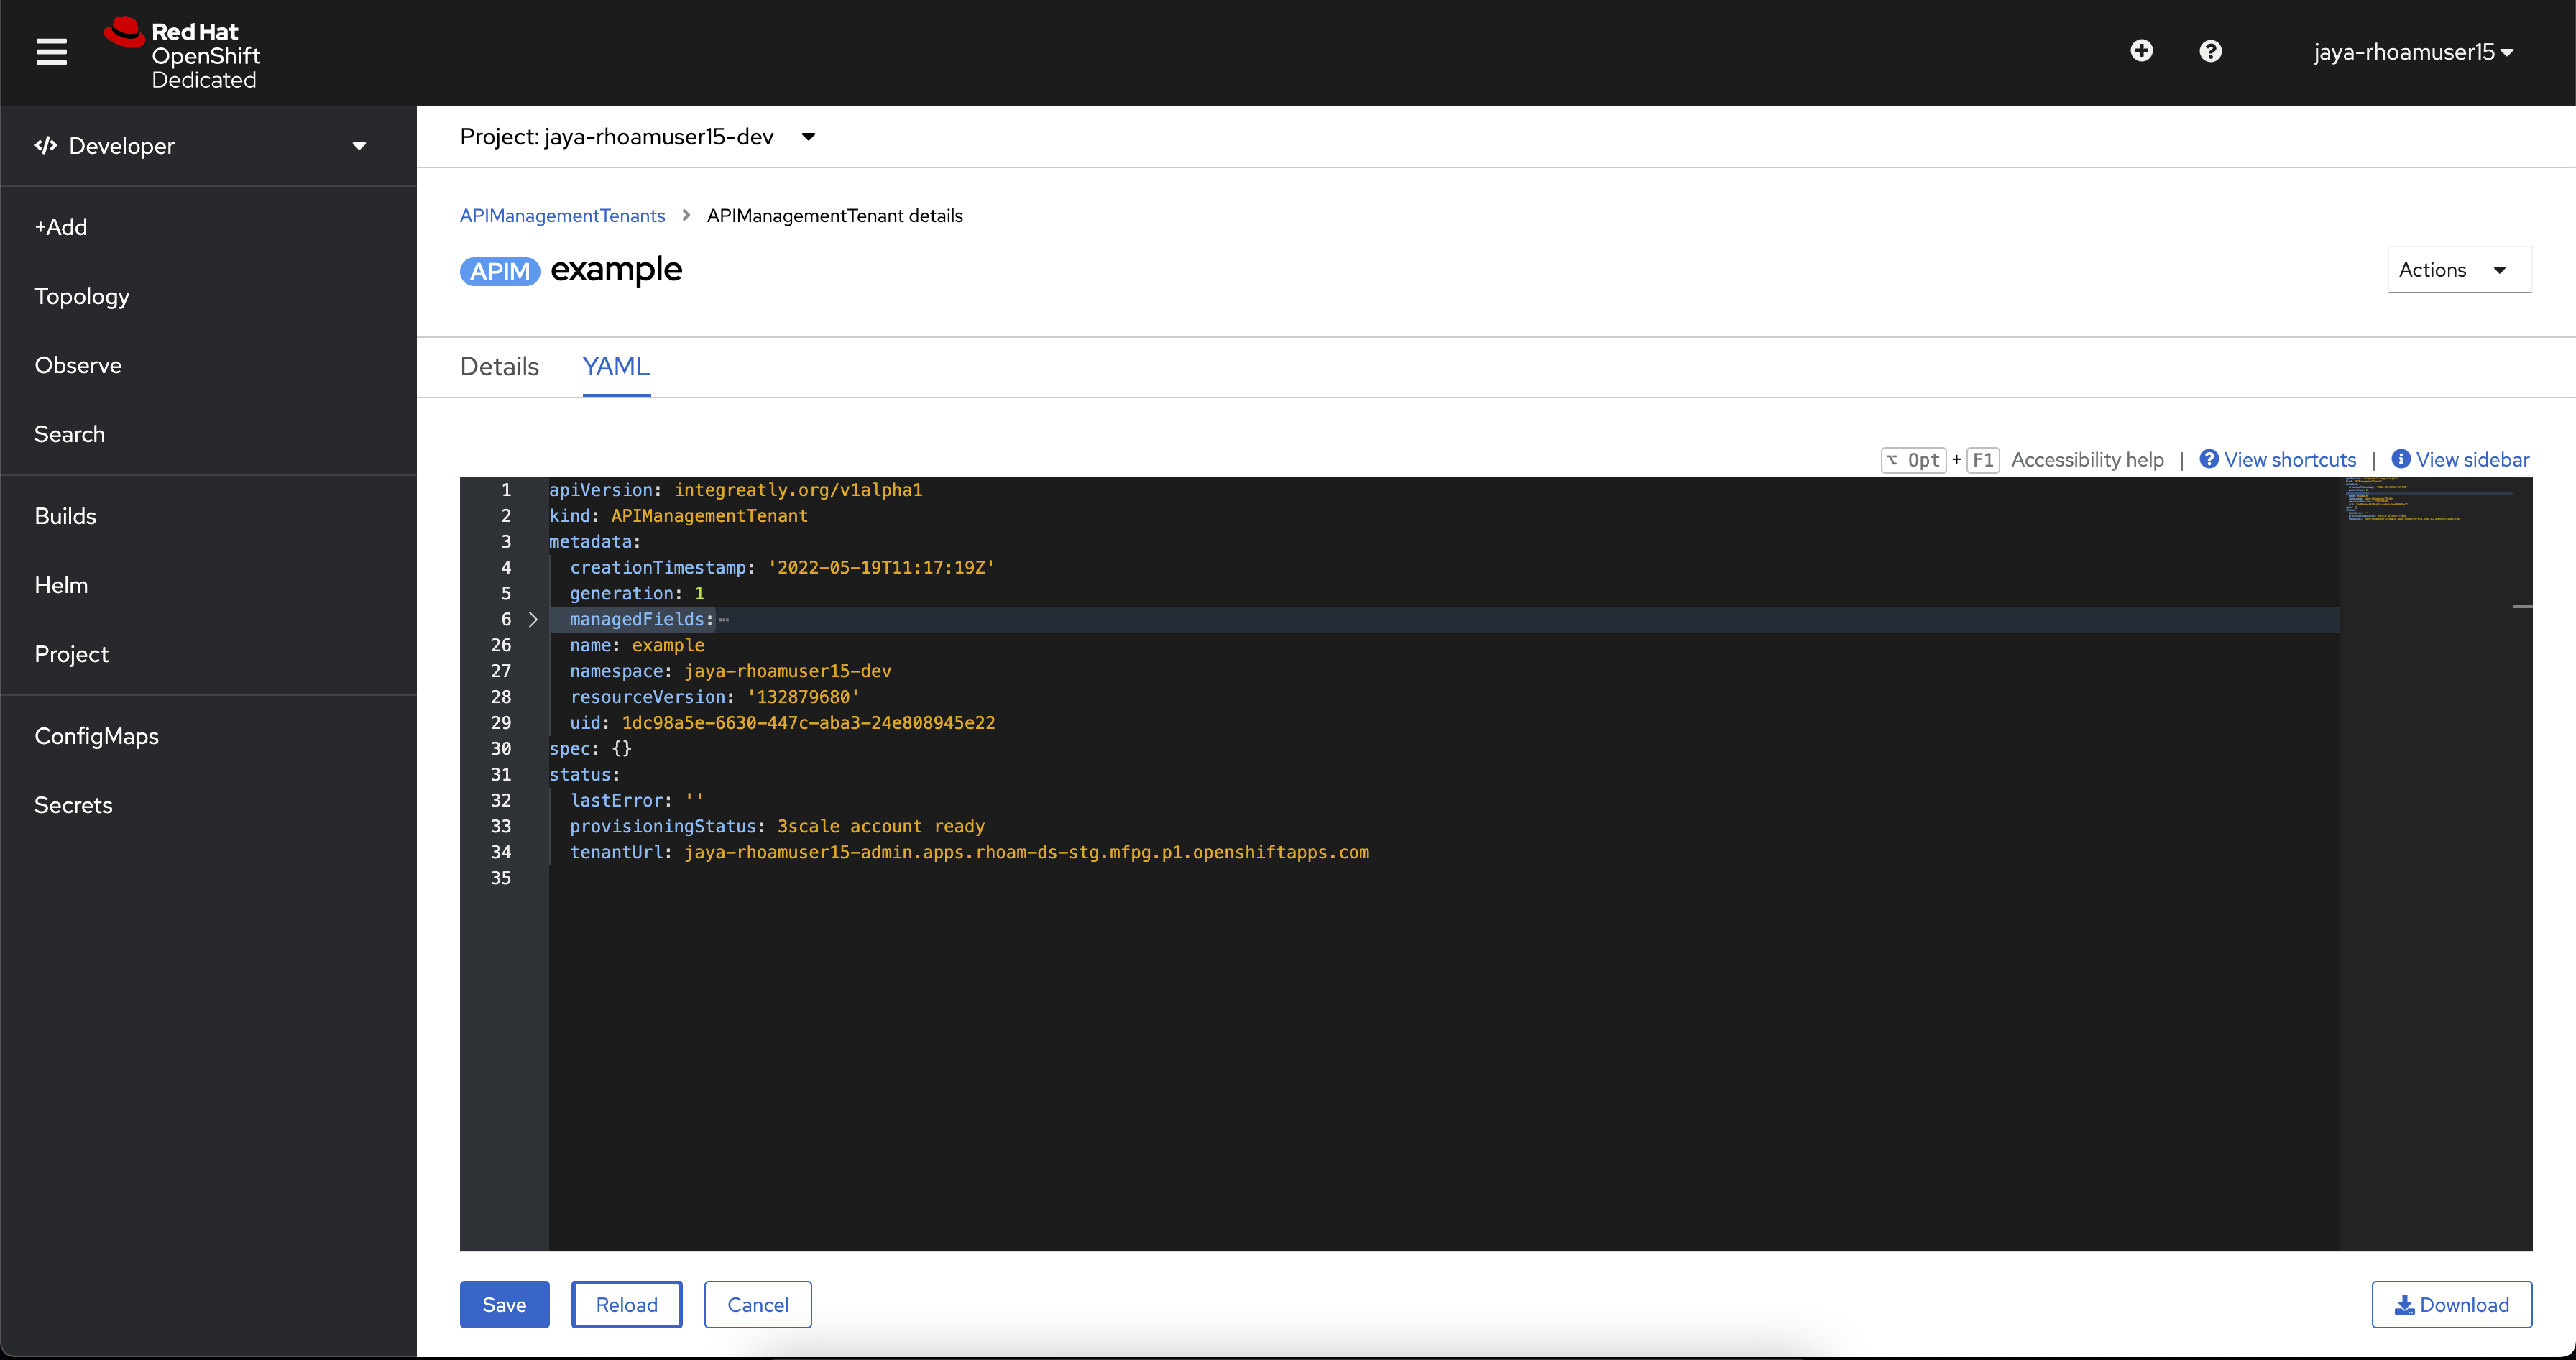
-
The API Management Tenant account is now provisioned and is ready for use. This may take a couple of minutes
-
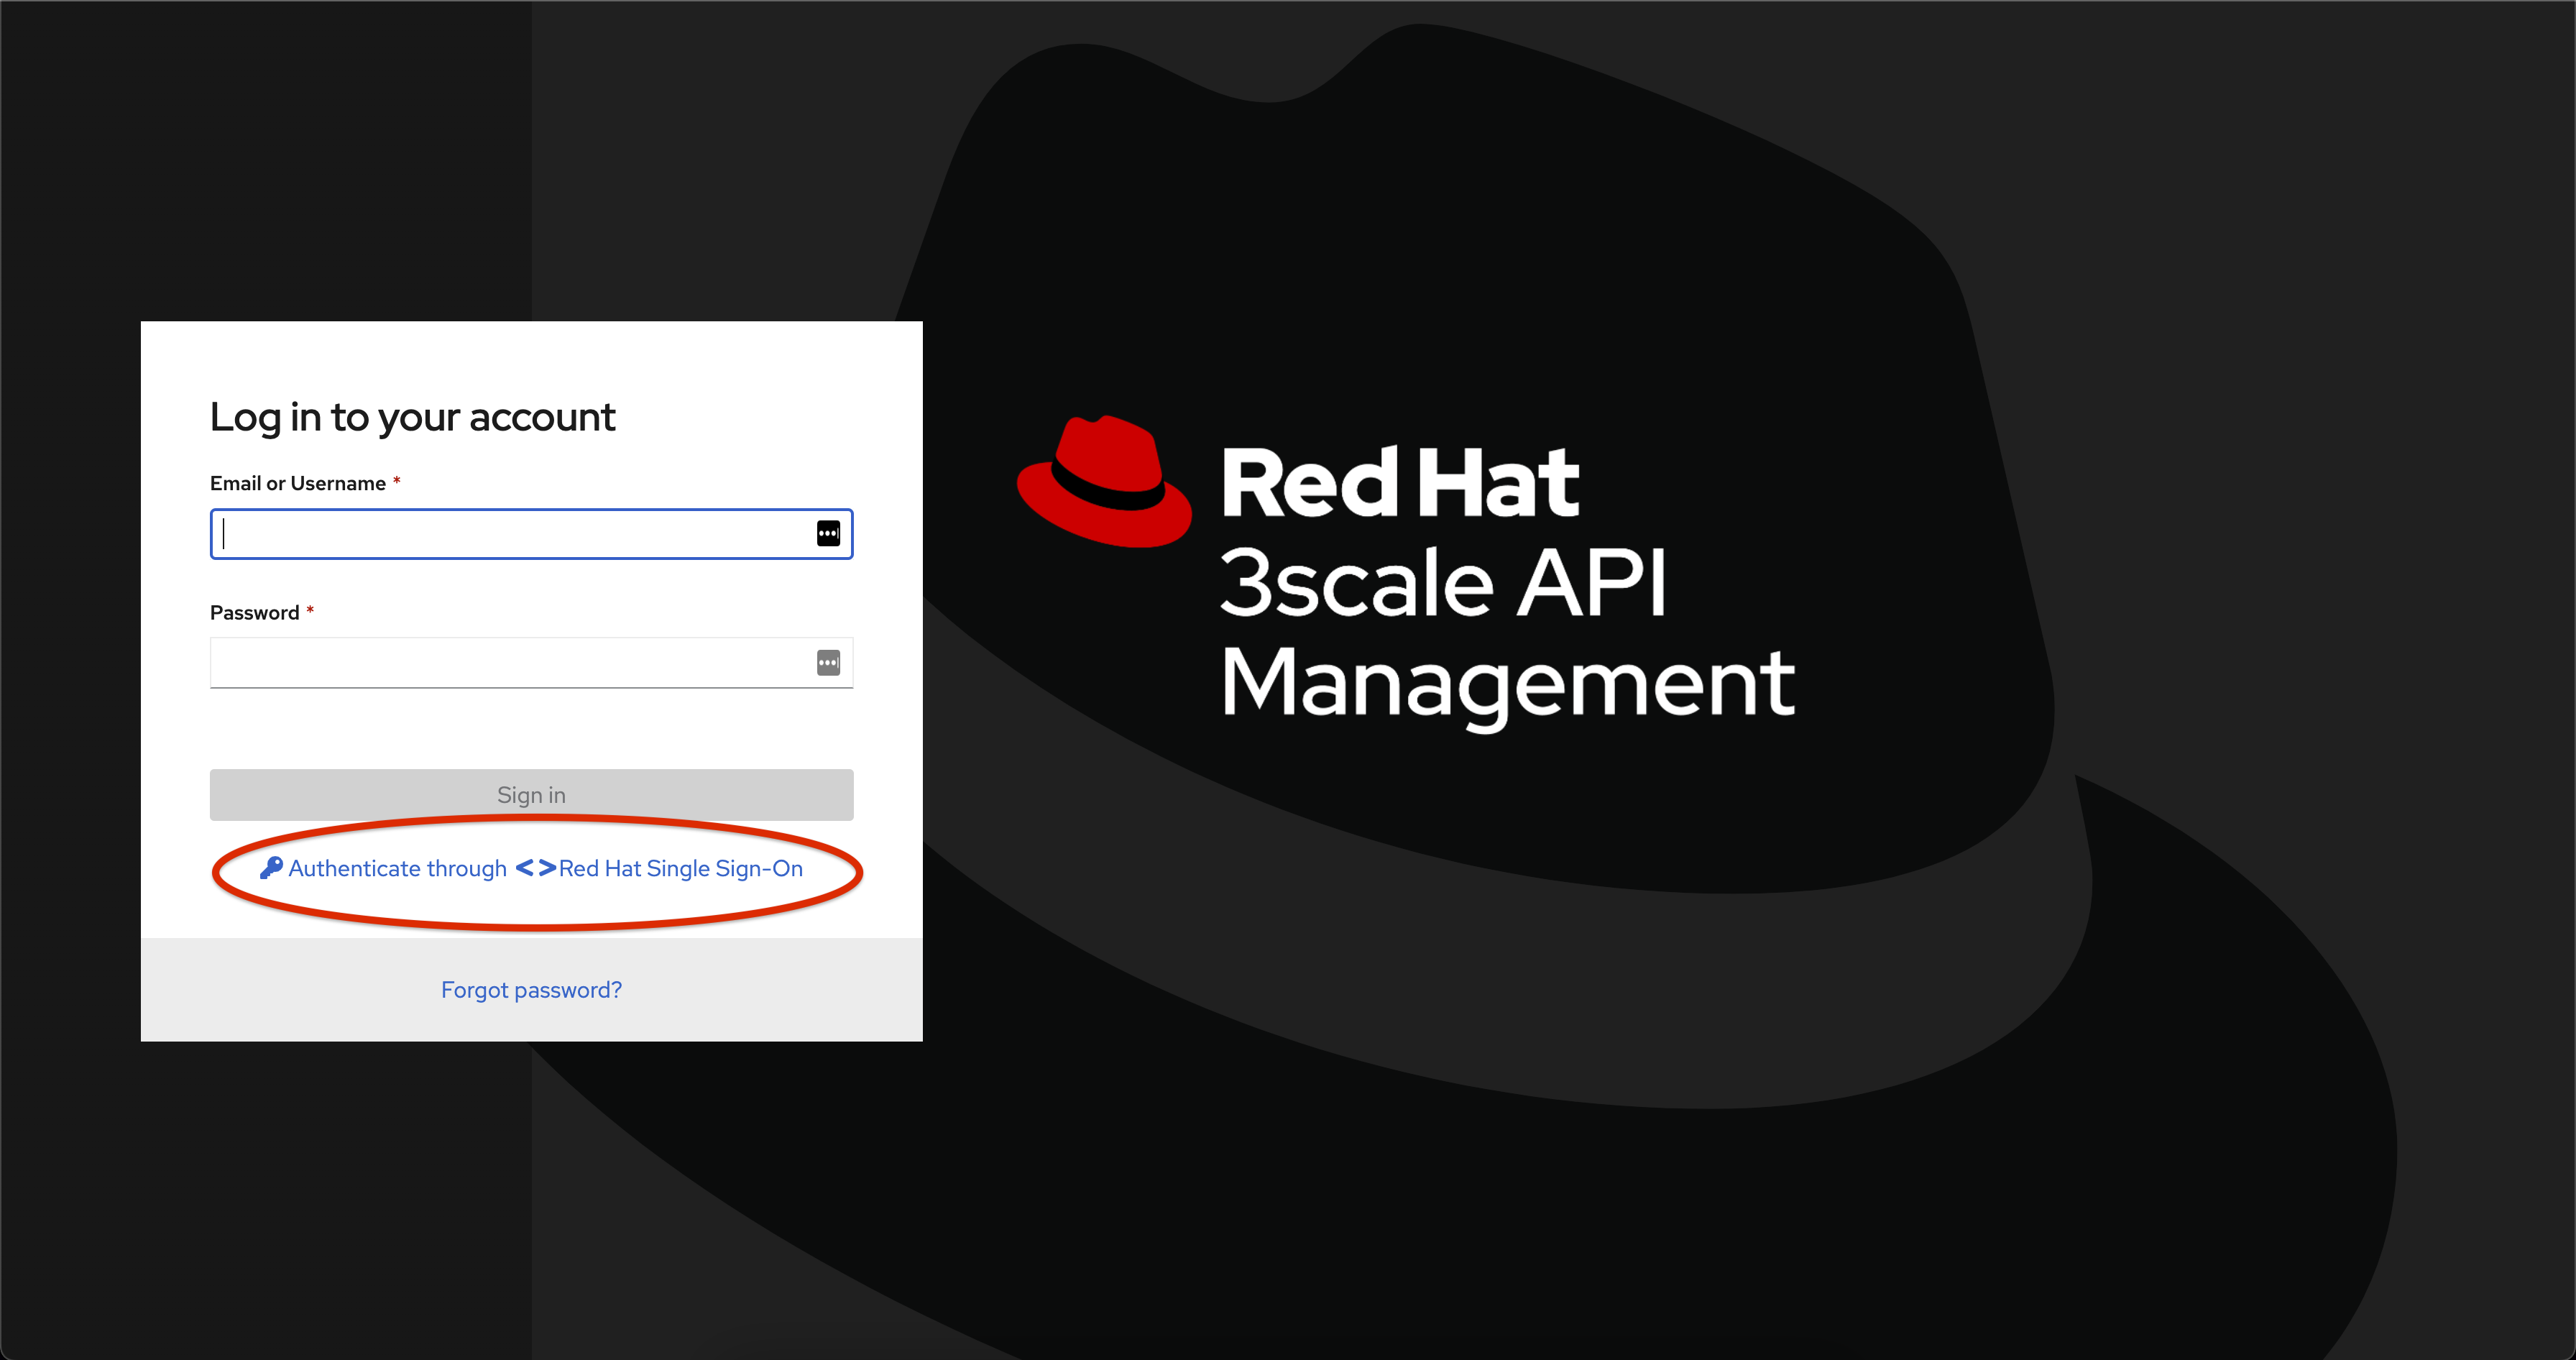
To access OpenShift API Management, navigate to the Launcher pane on the right side, select
API Management
-
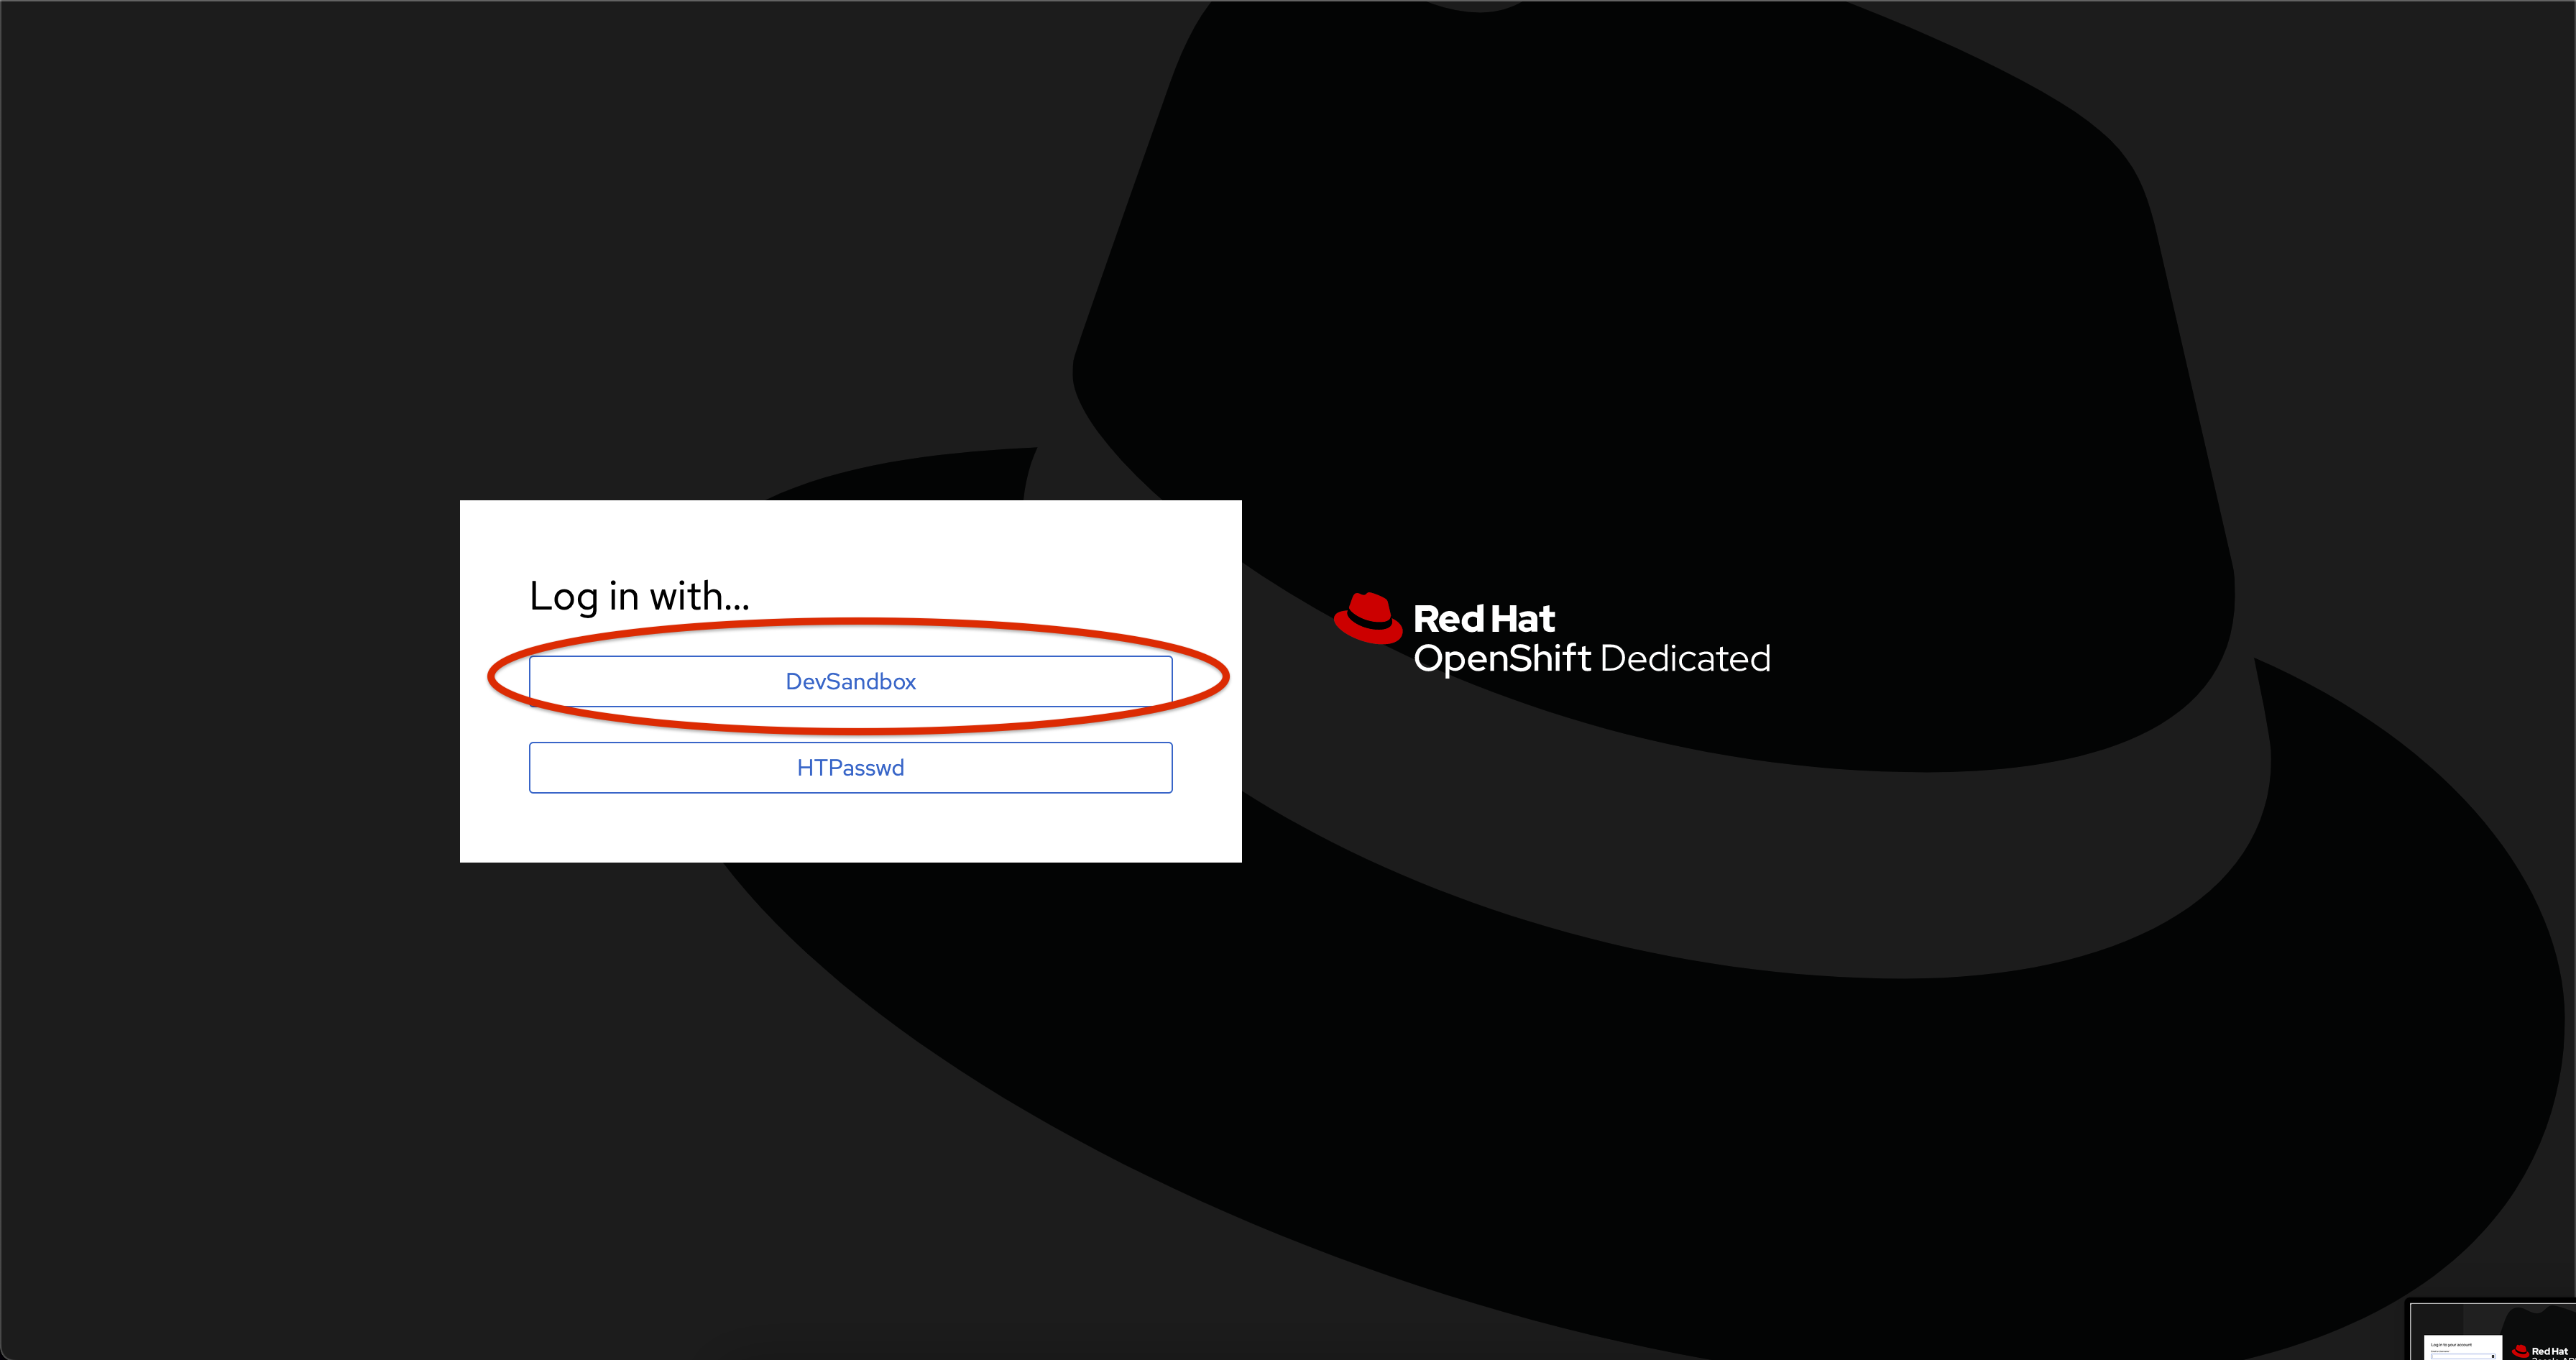
Choose to authenticate using Red Hat Single Sign-On, and login using the identity provider that applies to you, e.g DevSandbox.
5.4.2. Configure and manage your API
The following sections will guide you through
-
creating a Product
-
creating a Backend
-
defining Method, Metrics and Mapping rules
-
creating an application plans
-
creating an application for the default account/audience
5.4.3. Create an API Product
A product is a customer-facing API that packages one or more backends. You will create an API Product manually with the following instructions
-
In a browser window navigate to the Red Hat OpenShift API Management
-
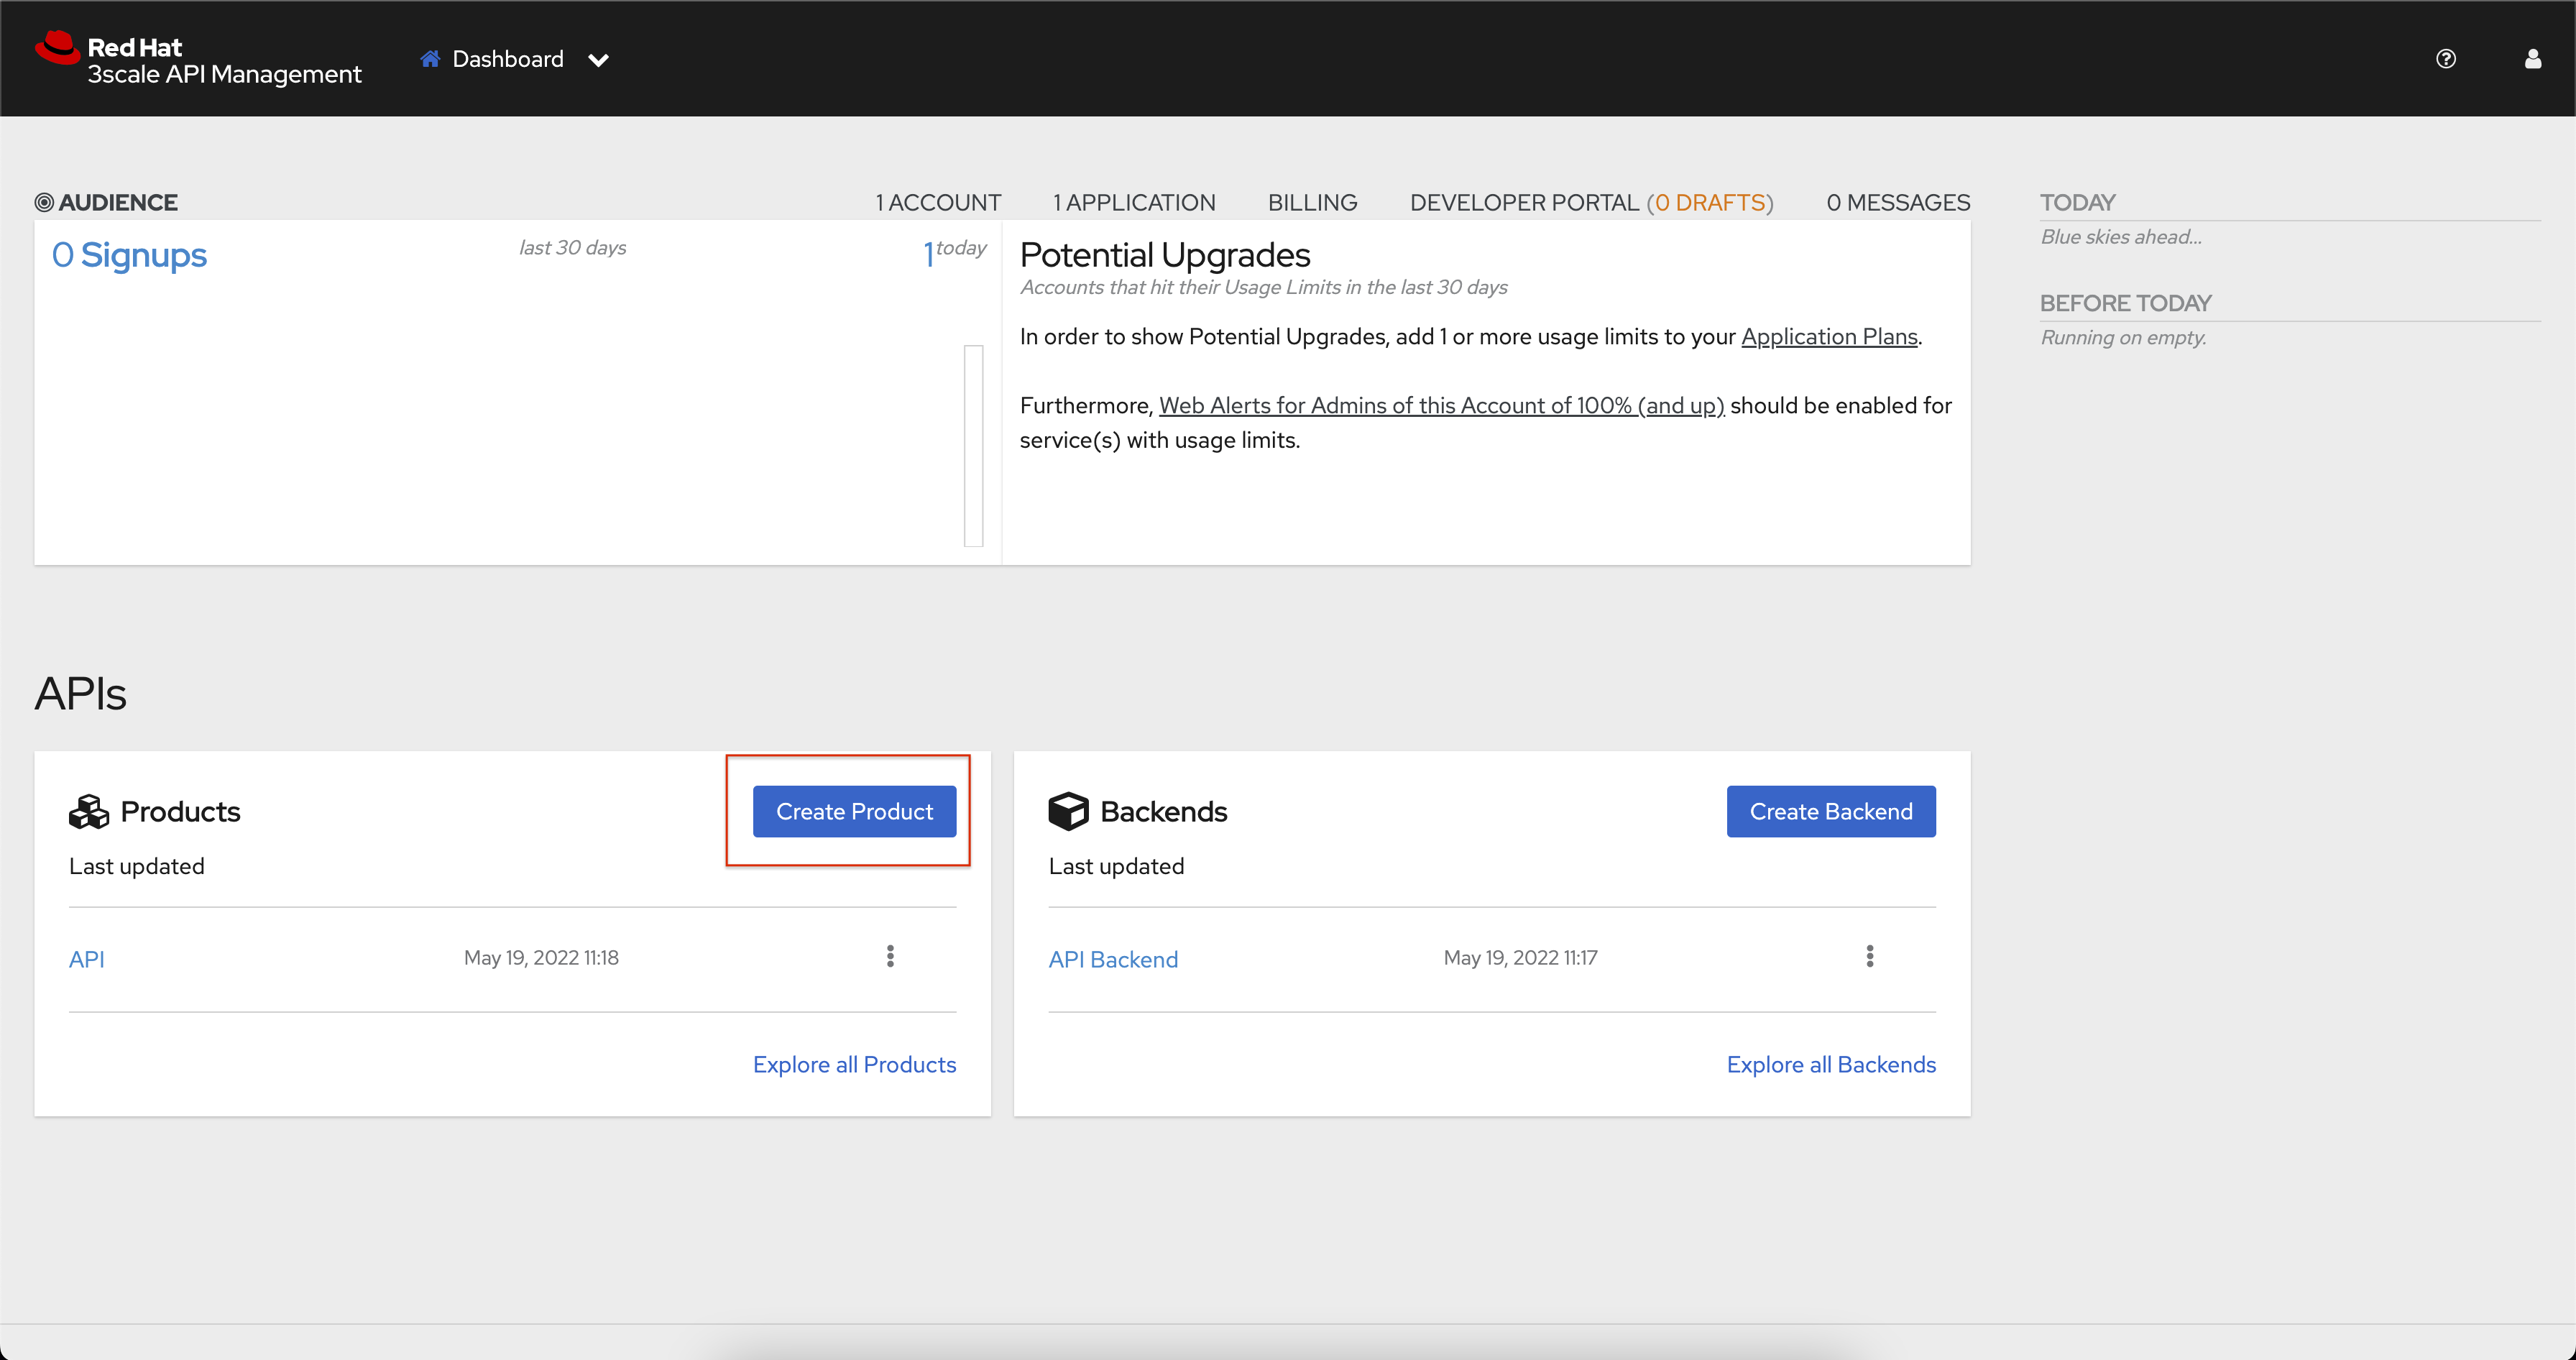
In the Dashboard, under the APIs section, click Create Product in the Products card.
-
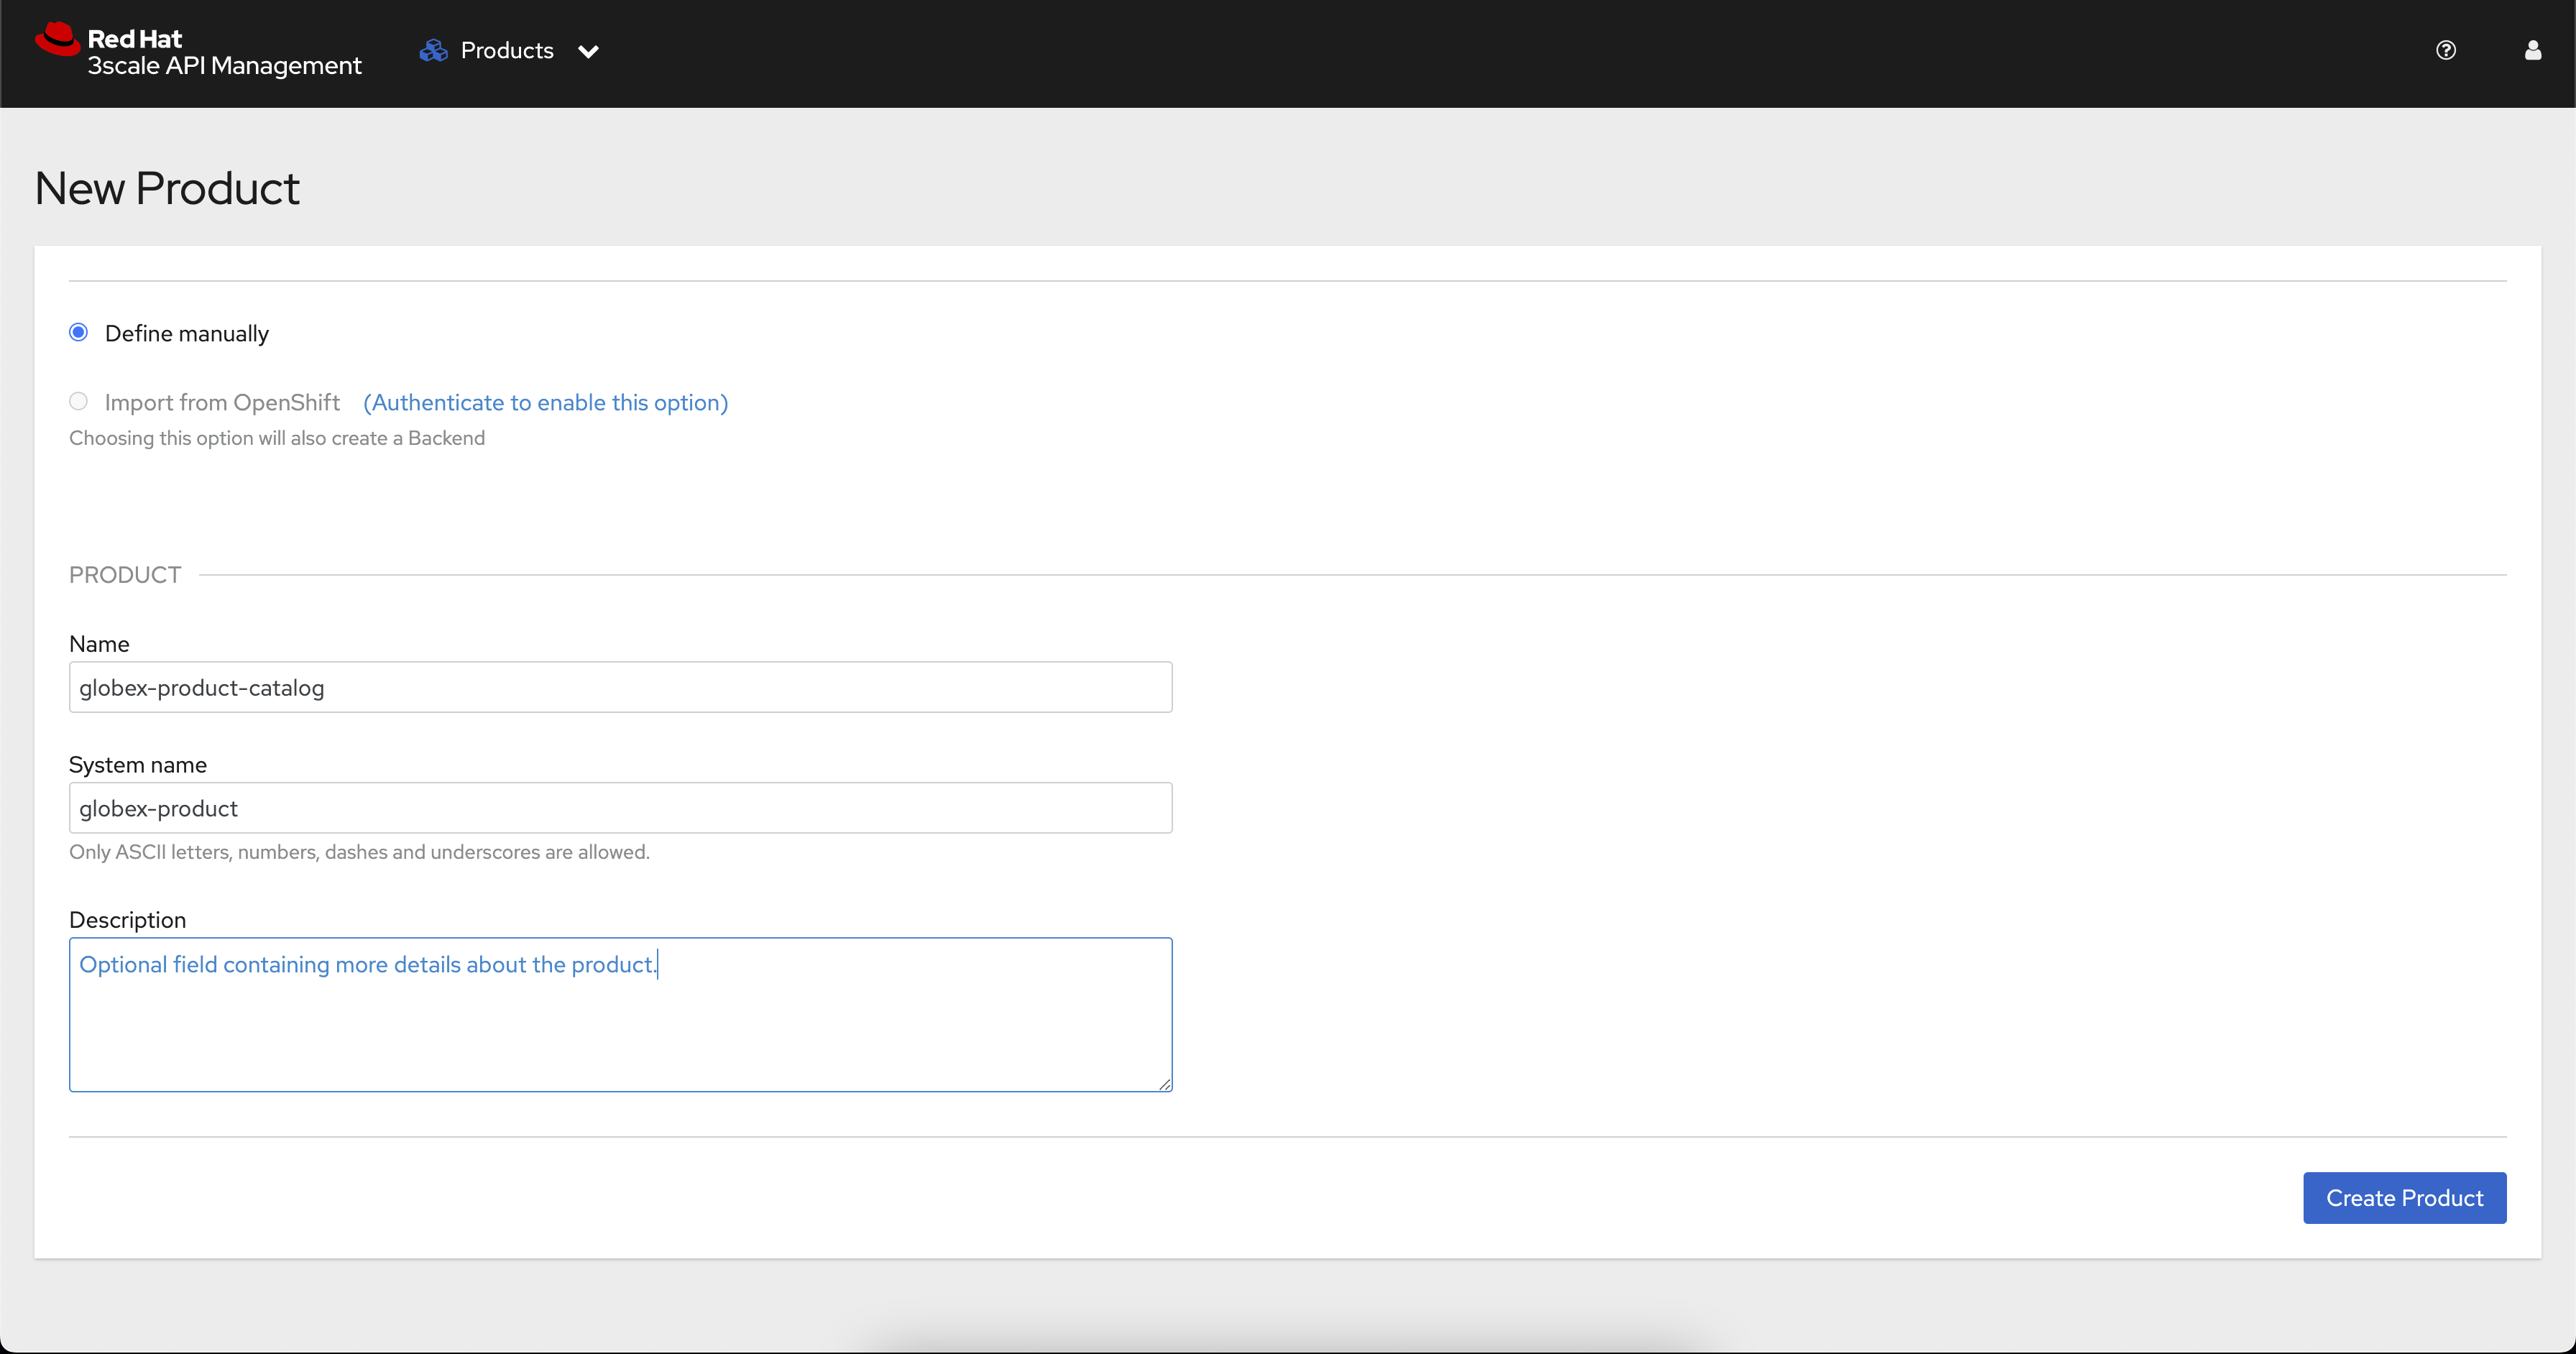
Provide the following details:
-
Name:
globex-product-catalog -
System name:
globex-product -
Description:
Optional field containing more details about the product.
-
-
Click Create Product.
-
A Product
globex-product-catalogis created and you are taken to the Product Overview page
5.4.4. Create an API Backend
The next step is to create a Backend which for the Product Catalogue API which you will then add to the Product you’ve created in the previous step
-
Go to the Dashboard.
-
Under the APIs section, click Create Backend in the Backends card.
-
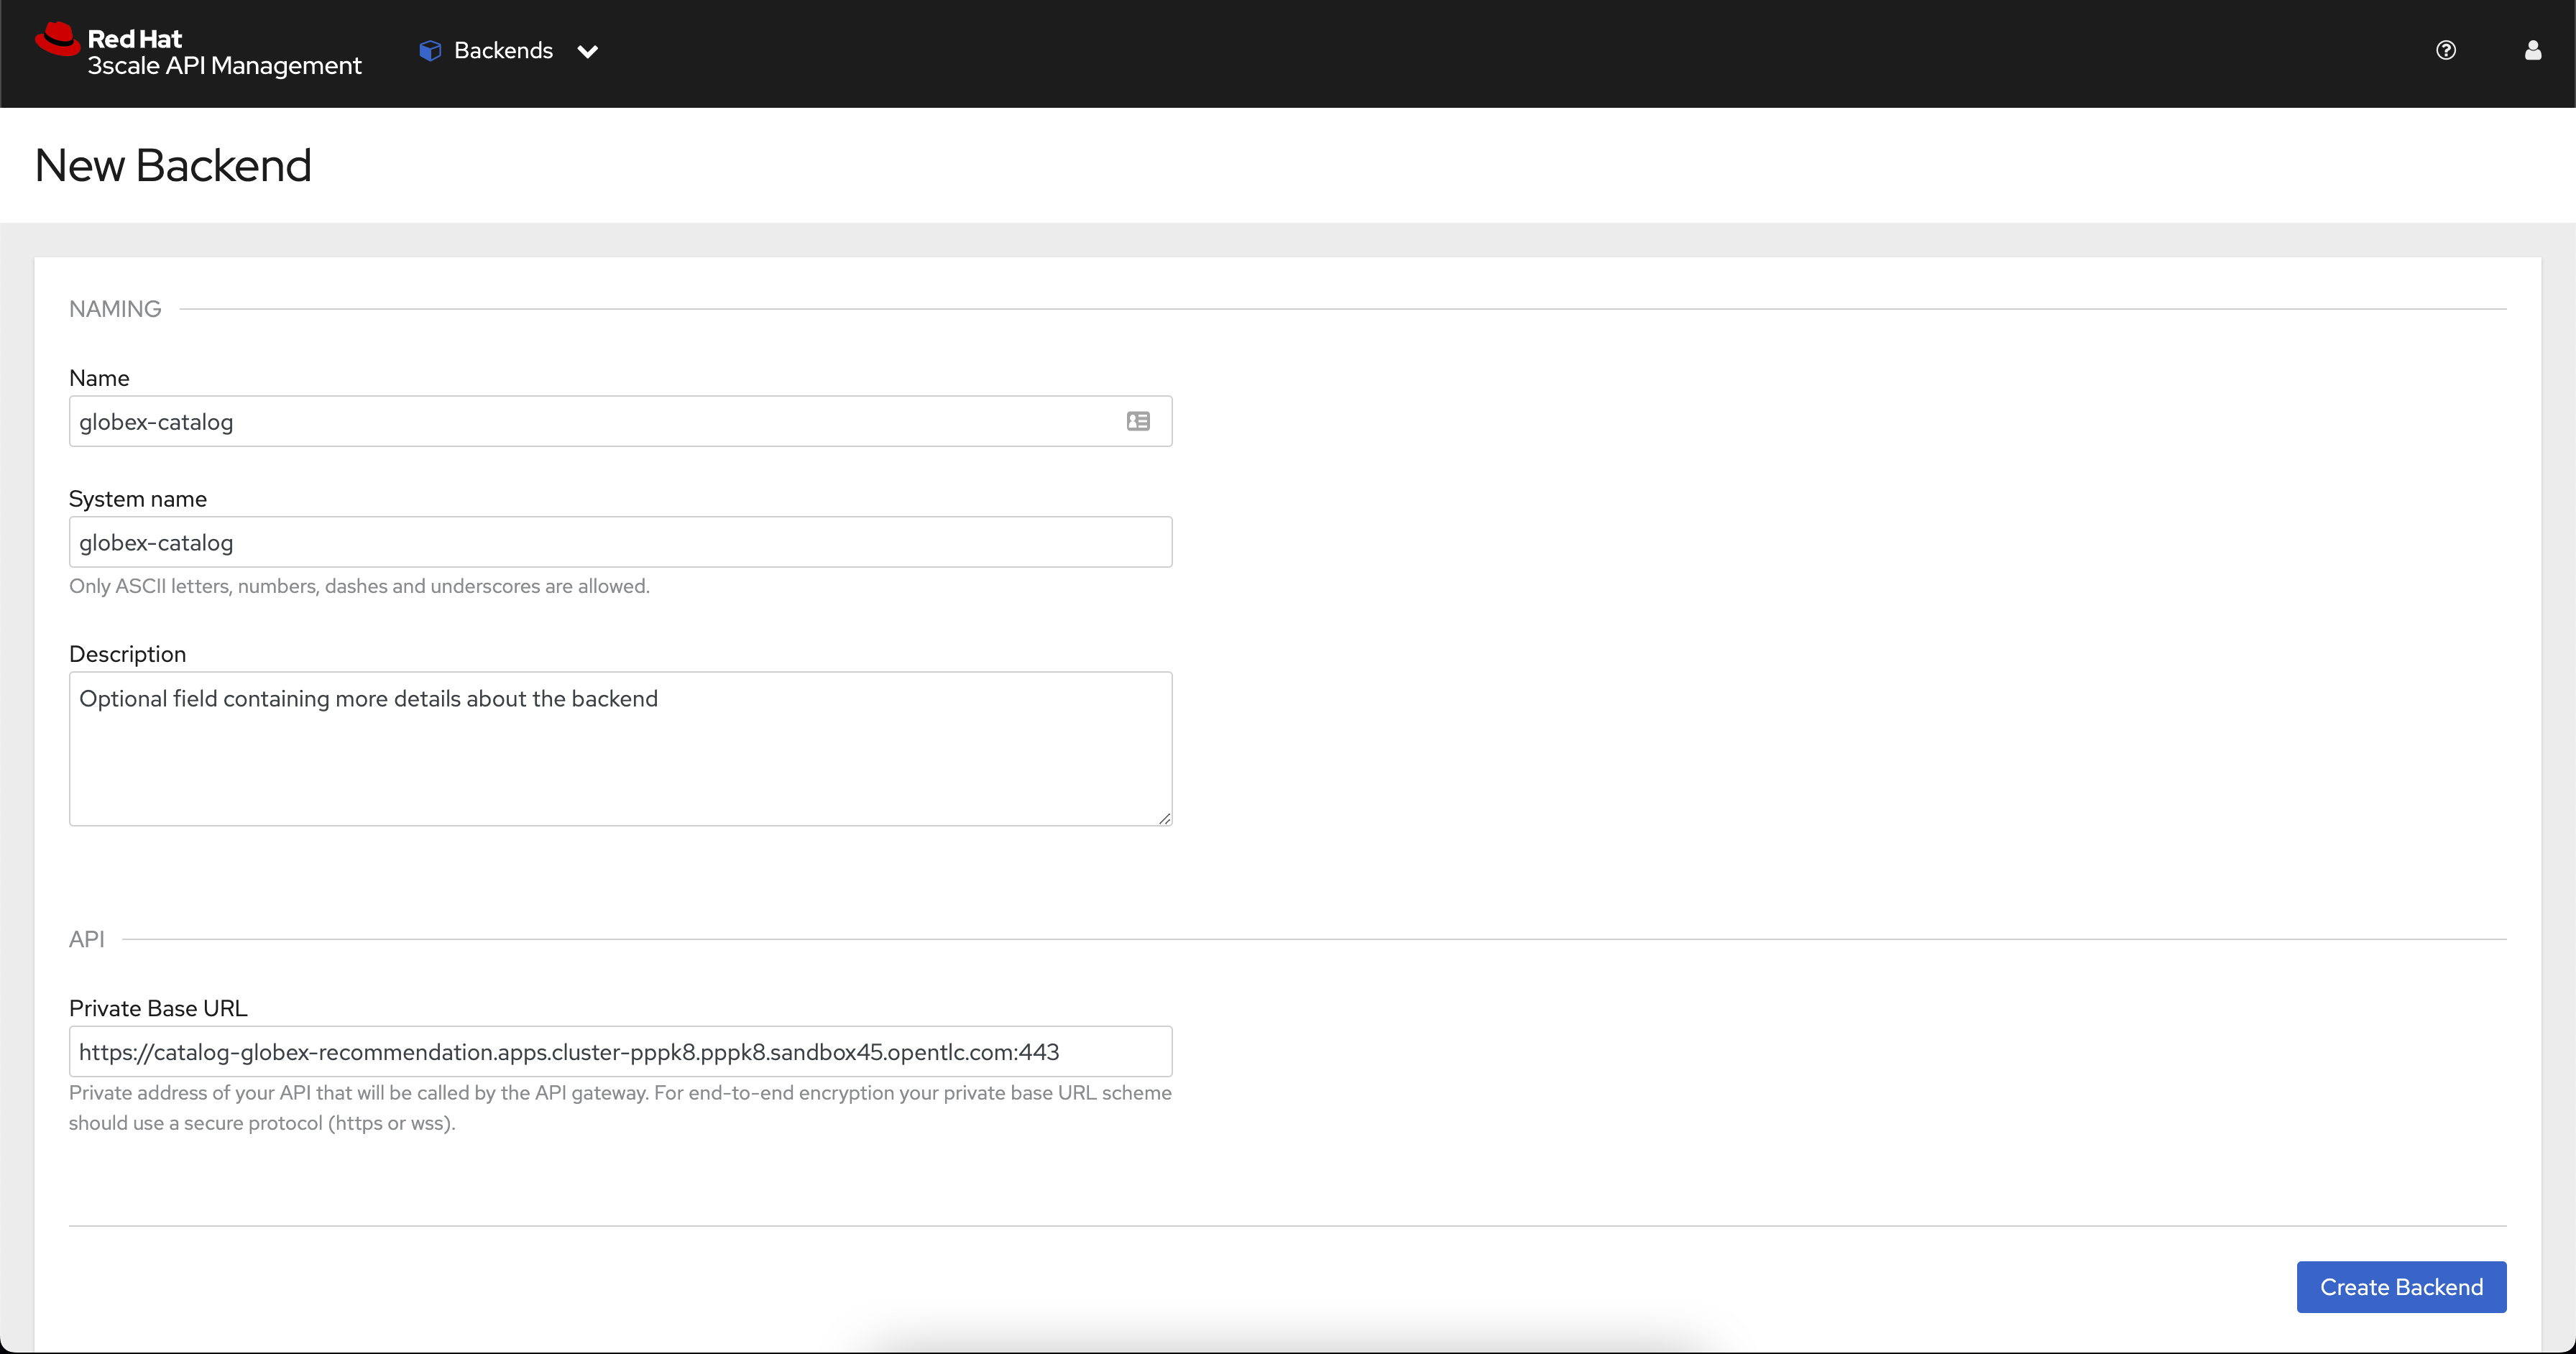
Provide the following details:
-
Name:
globex-catalog. -
System name:
globex-catalog. -
Description:
Optional field containing more details about the backend. -
Private endpoint: Base URL of the Product Catalog API.
Here are instruction how to access the Private Endpoint of the Product Catalog API.
-
Access the Developer Perspective Topology of the OpenShift environment where the Globex application has been deployed
-
Click on the catalog-service icon and you will see the deployment details popup on the right hand side
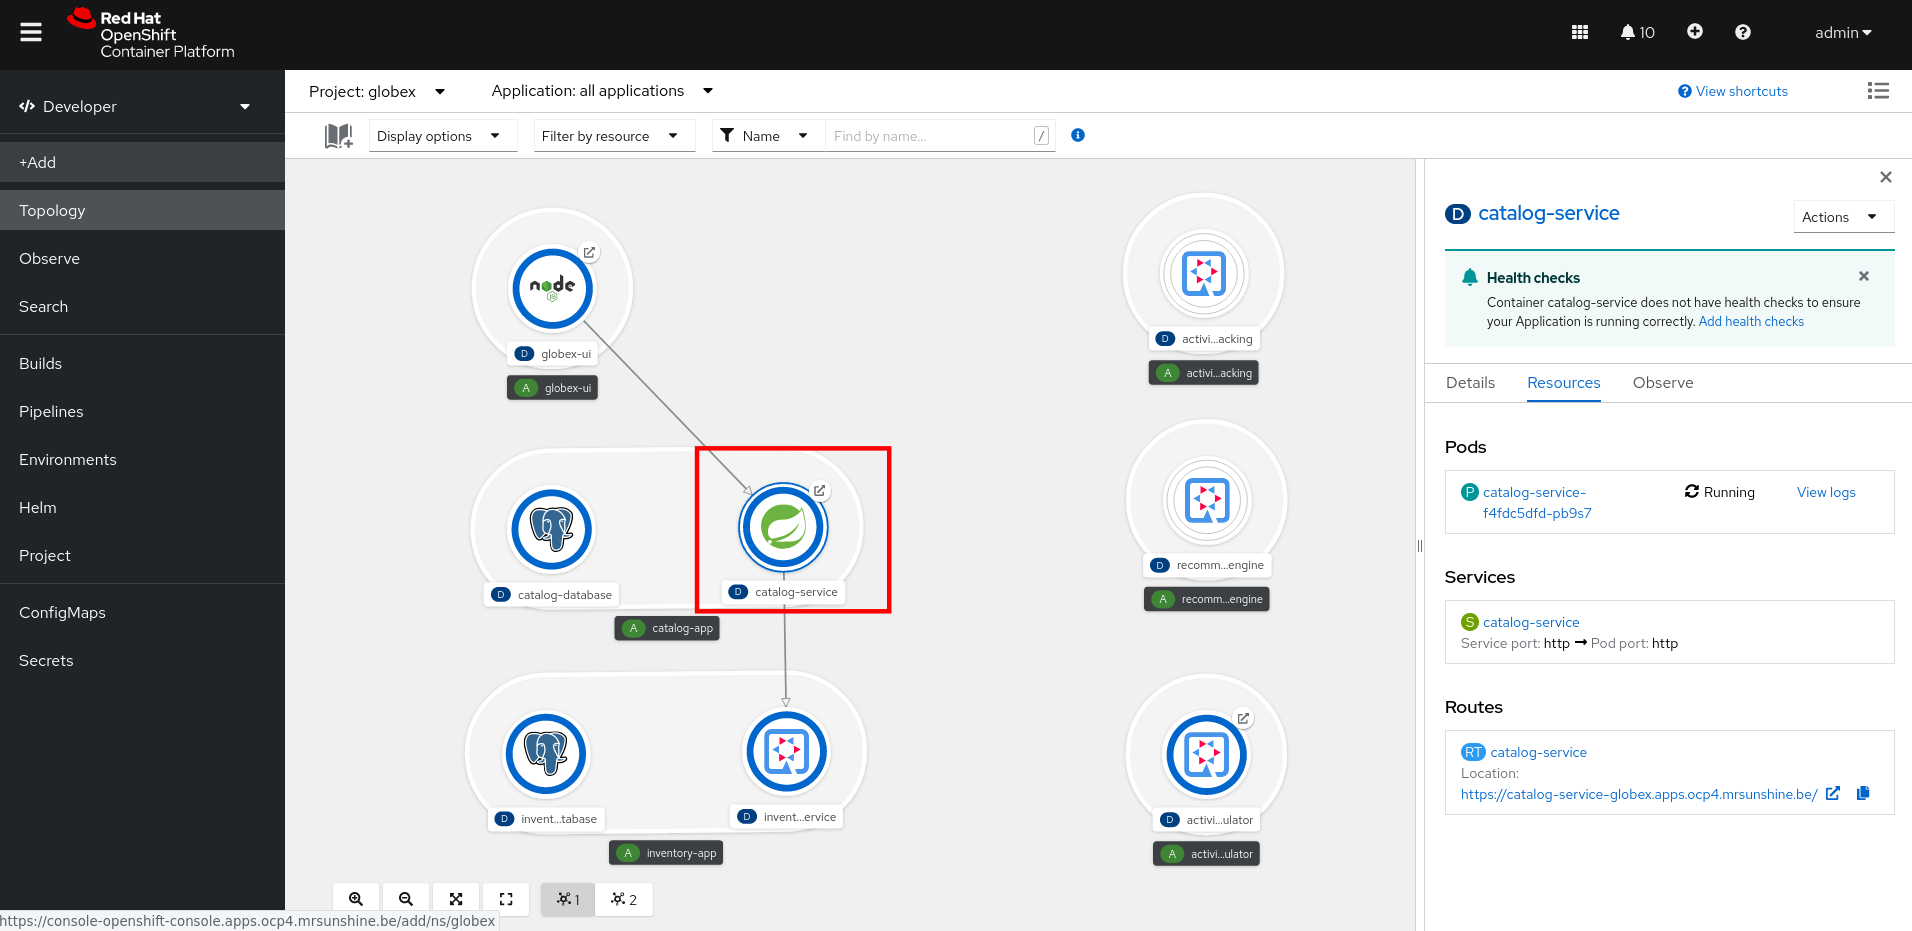
-
Copy the Location as present at the bottom of this under Routes. This would look something like this
https://catalog-globex-recommendation.apps.cluster-pppk8.pppk8.sandbox45.opentlc.com:443
-
-
-
Click Create Backend.
5.4.5. Define Method, Metrics and Mapping rules
Setup a new Method
-
Navigate to the Product > globex-catalog > Integration > Methods & Metrics
-
Click New method
-
Provide the following details:
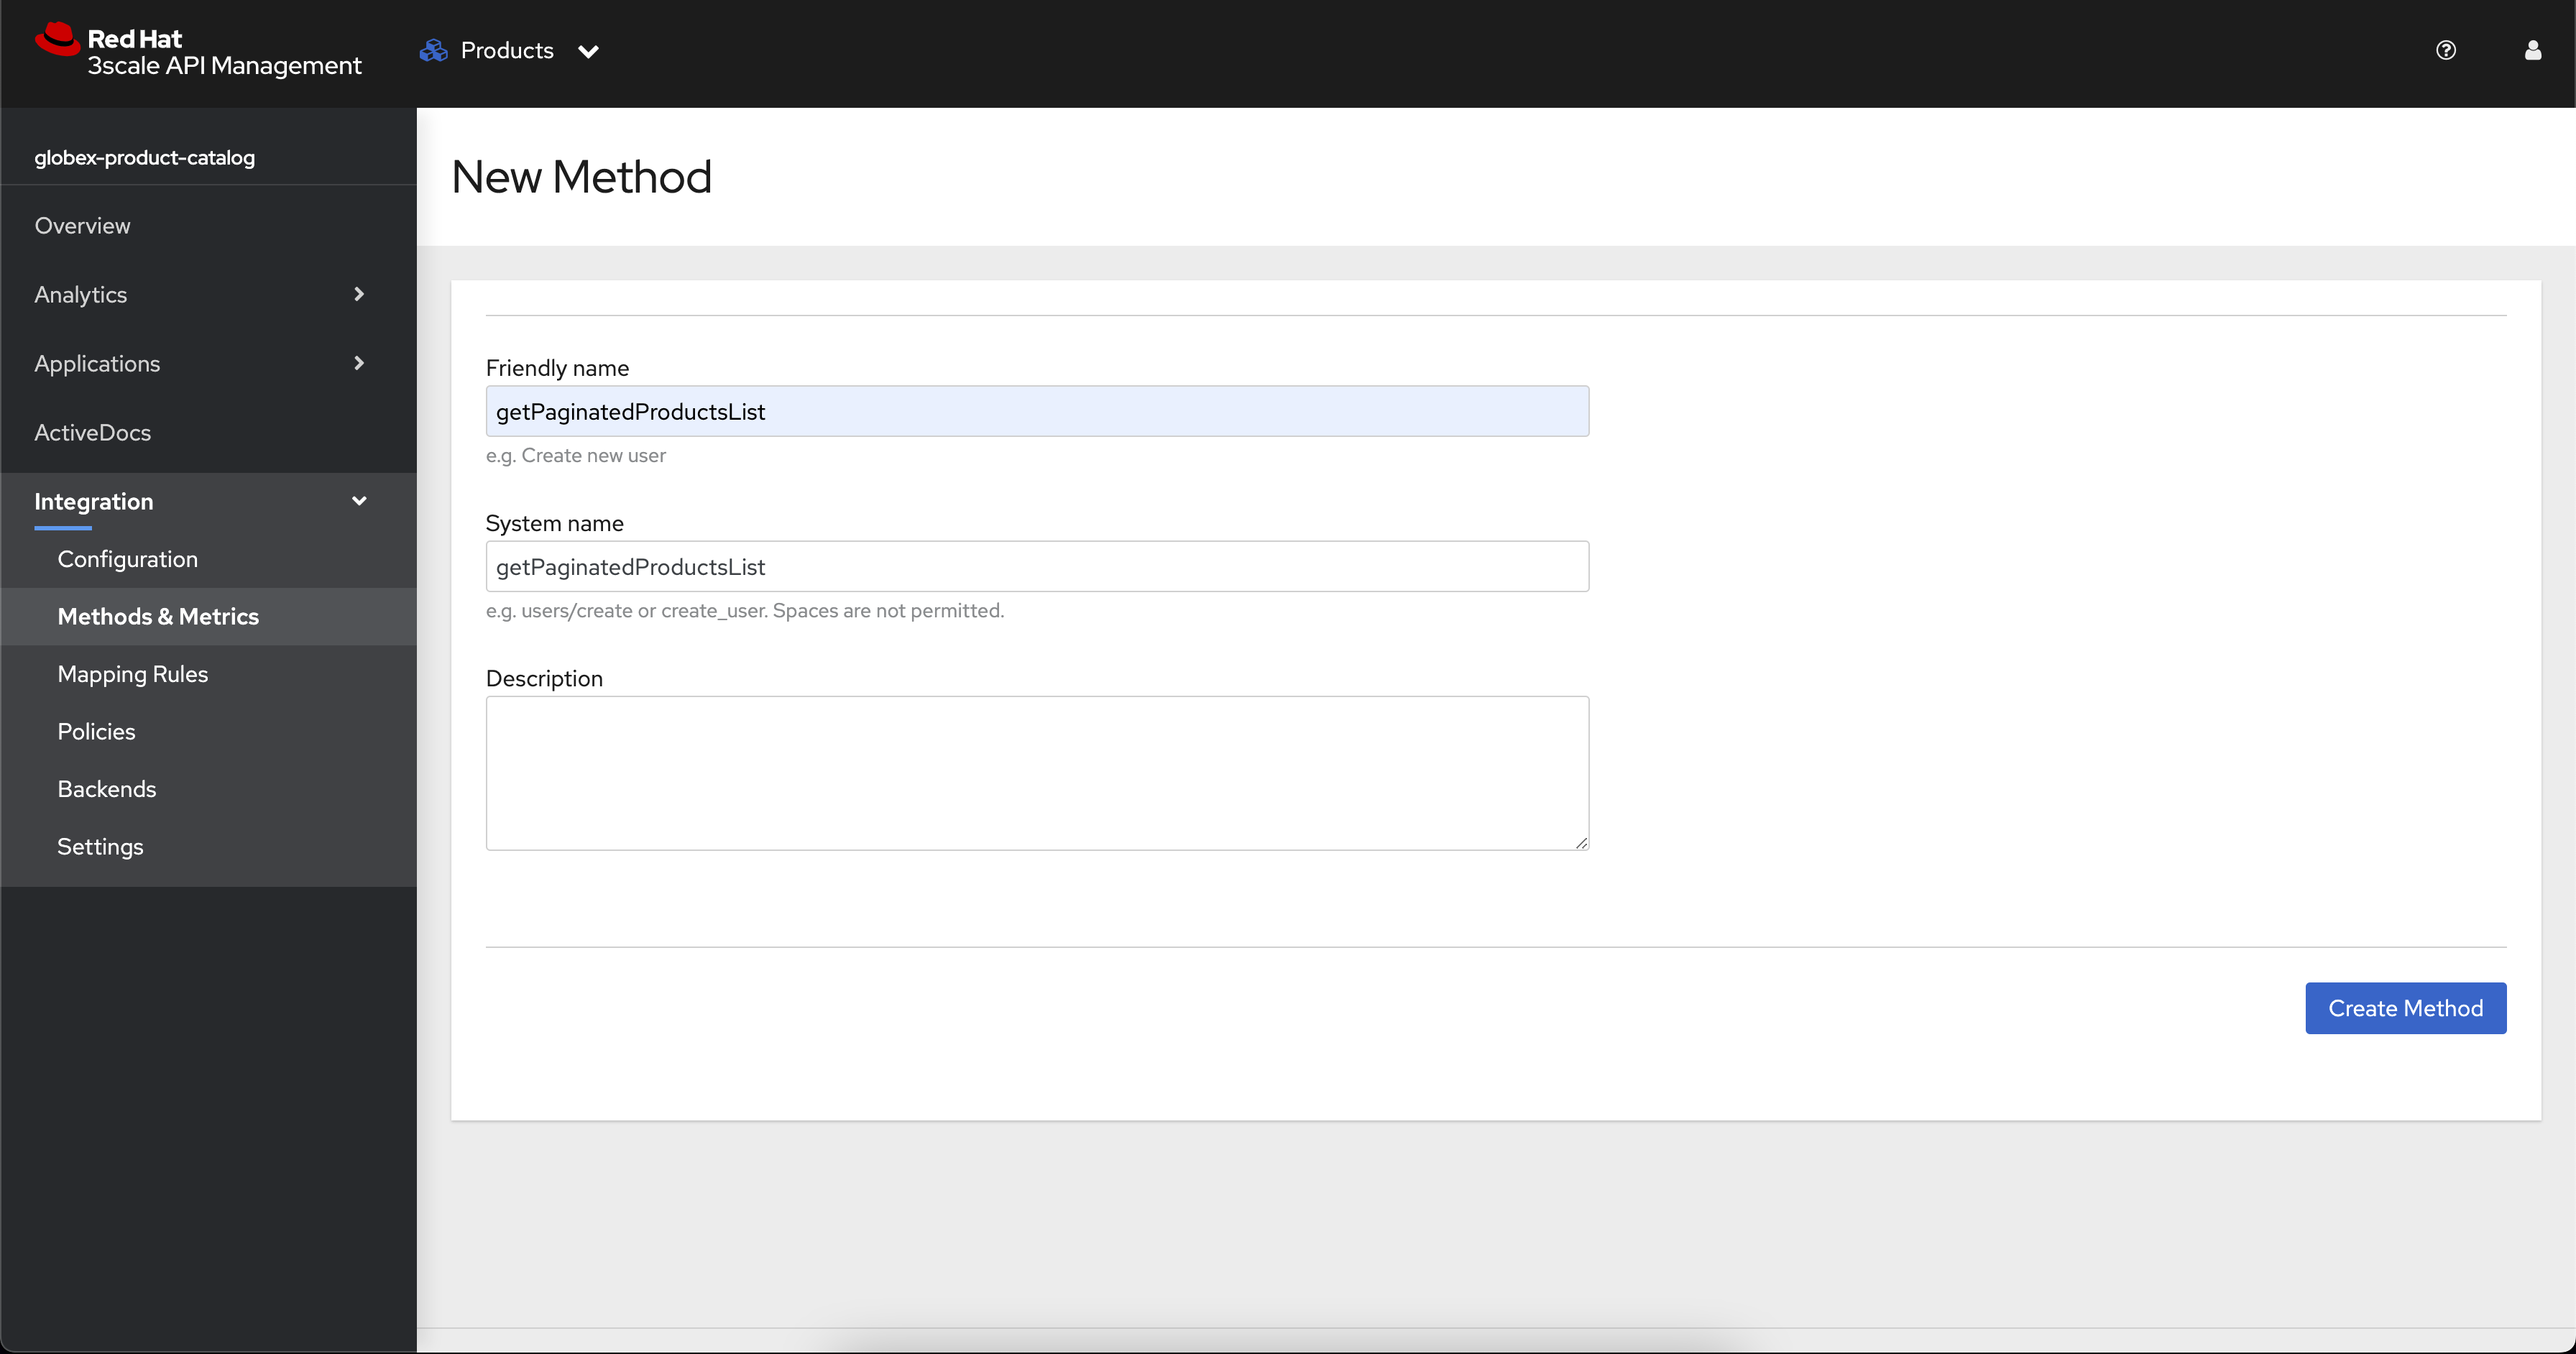
-
Friendly name:
getPaginatedProductsList -
System name:
getPaginatedProductsList
-
-
Click Create Method
Setup a new Metric
-
Navigate to the Product > globex-catalog > Integration > Methods & Metrics
-
Click New metric
-
Provide the following details:
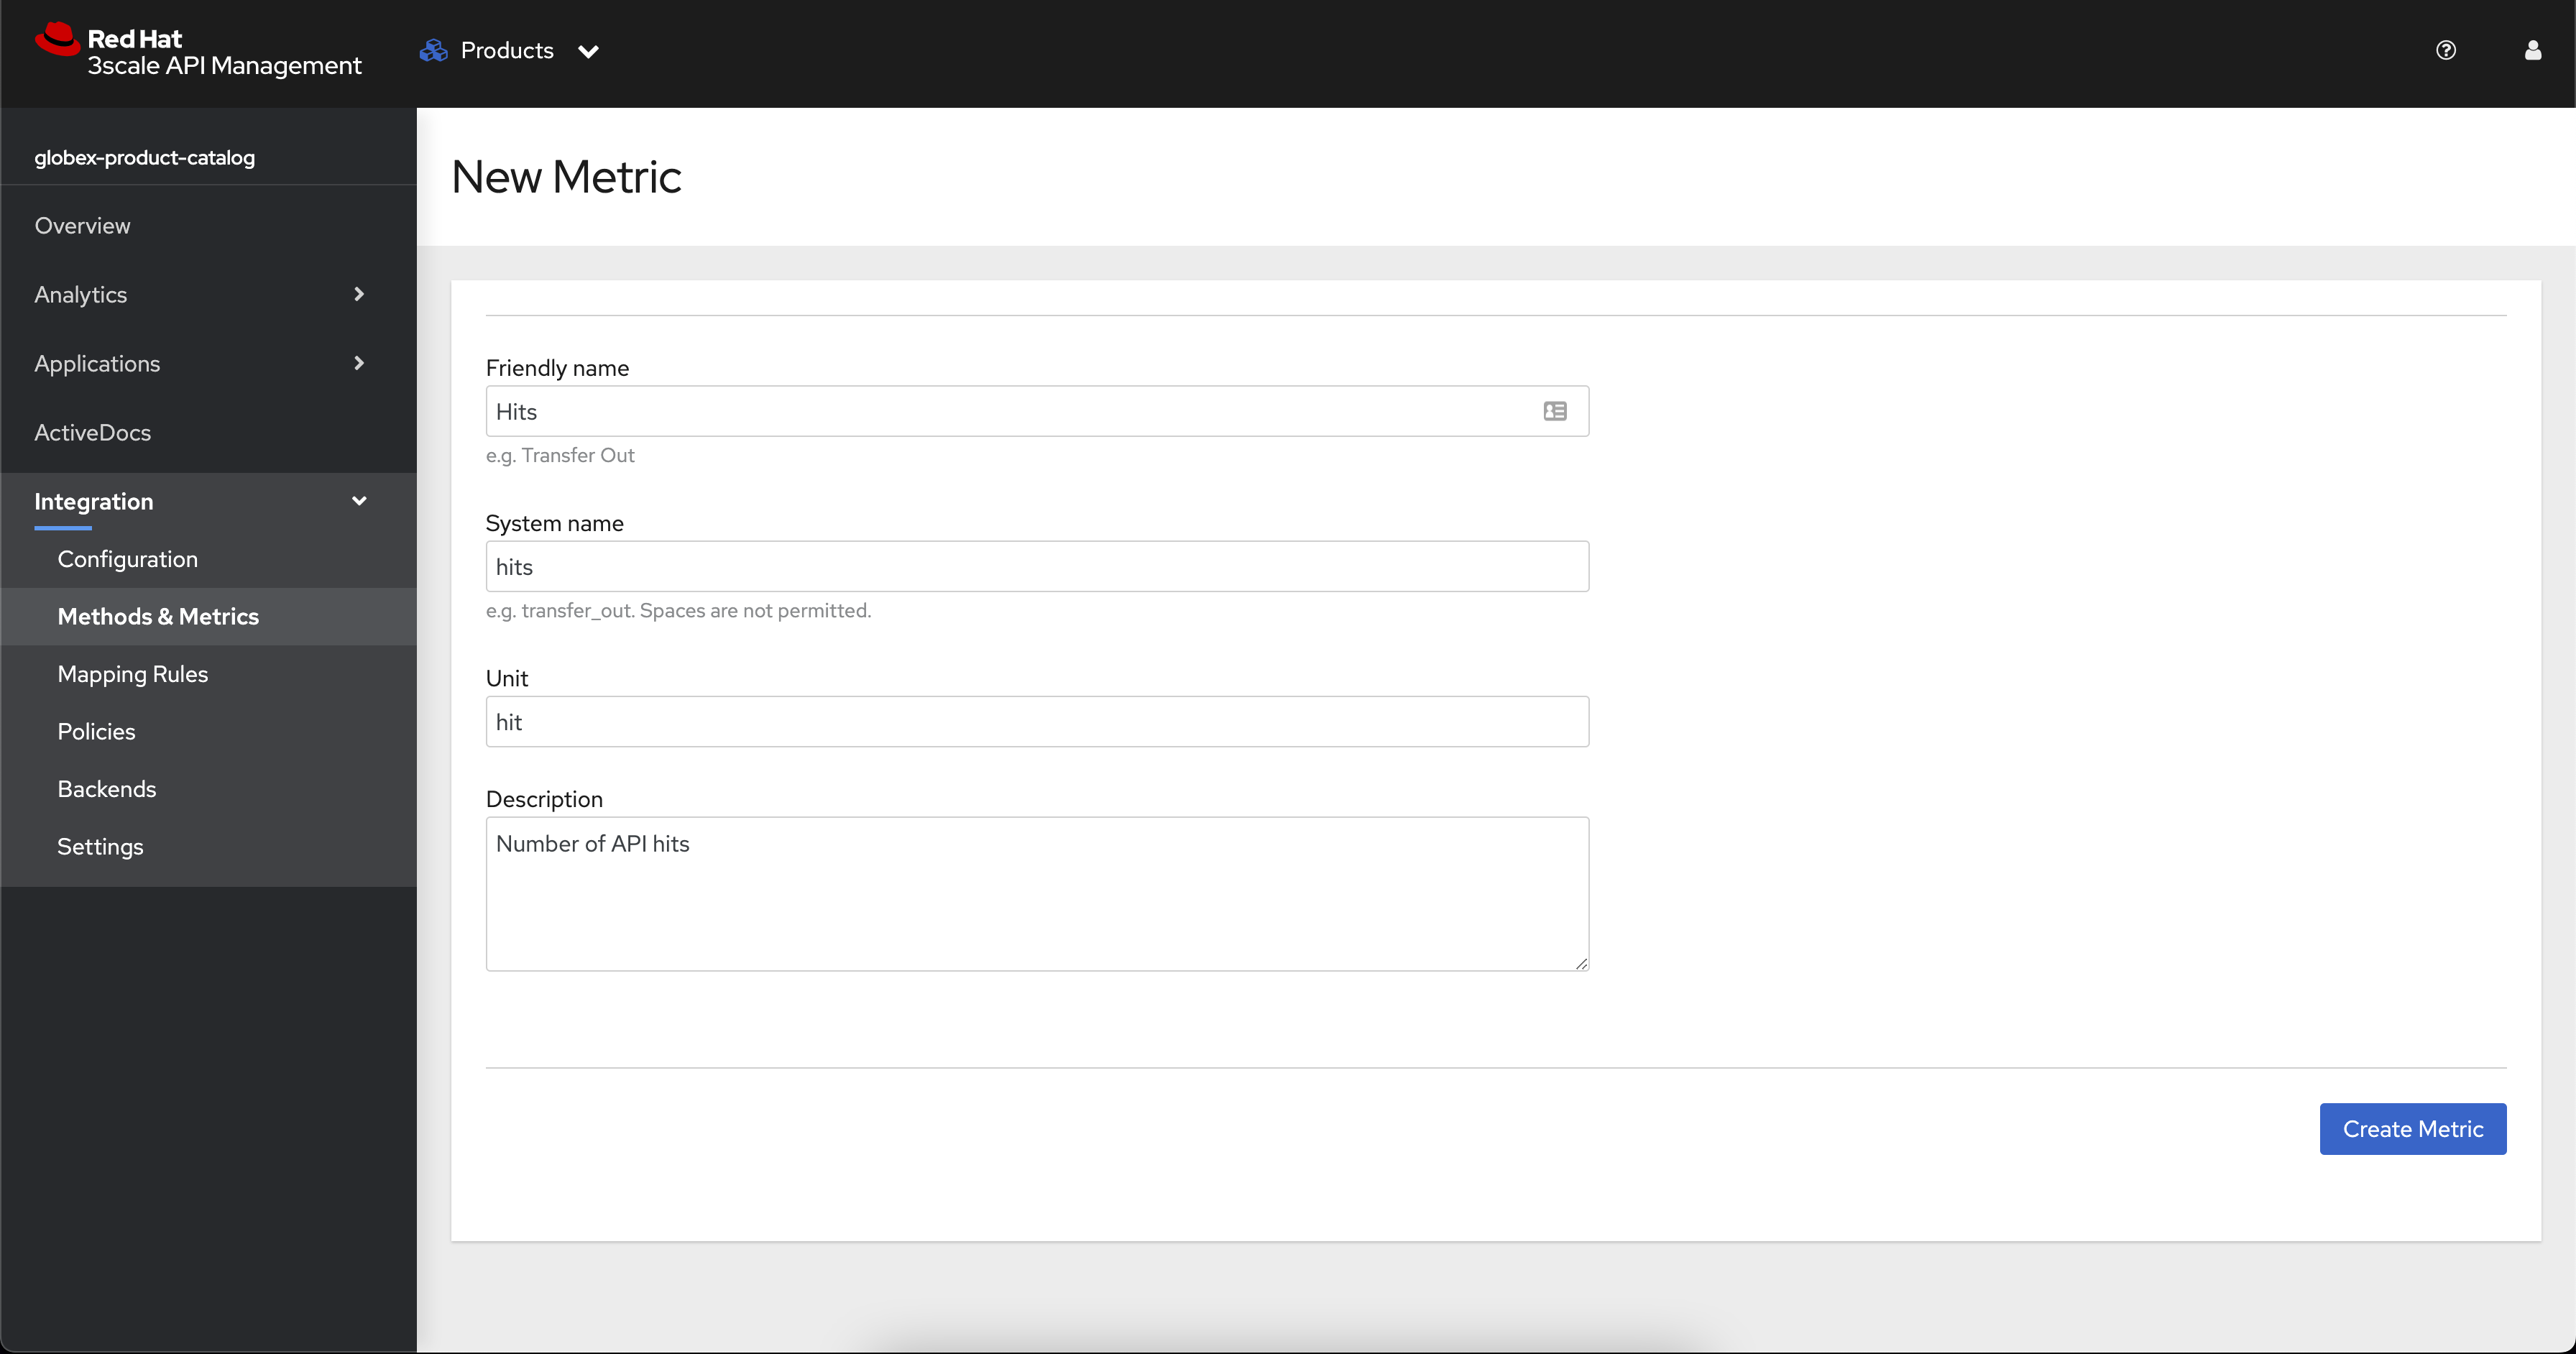
-
Friendly name:
Hits -
System name:
hits -
Unit:
hit -
Description:
Number of API hits
-
-
Click Create Metric
Setup a new Mapping Rule
-
Navigate to the Product > globex-catalog > Integration > Mapping Rules
-
Click Create Mapping Rule
-
Provide the following details:
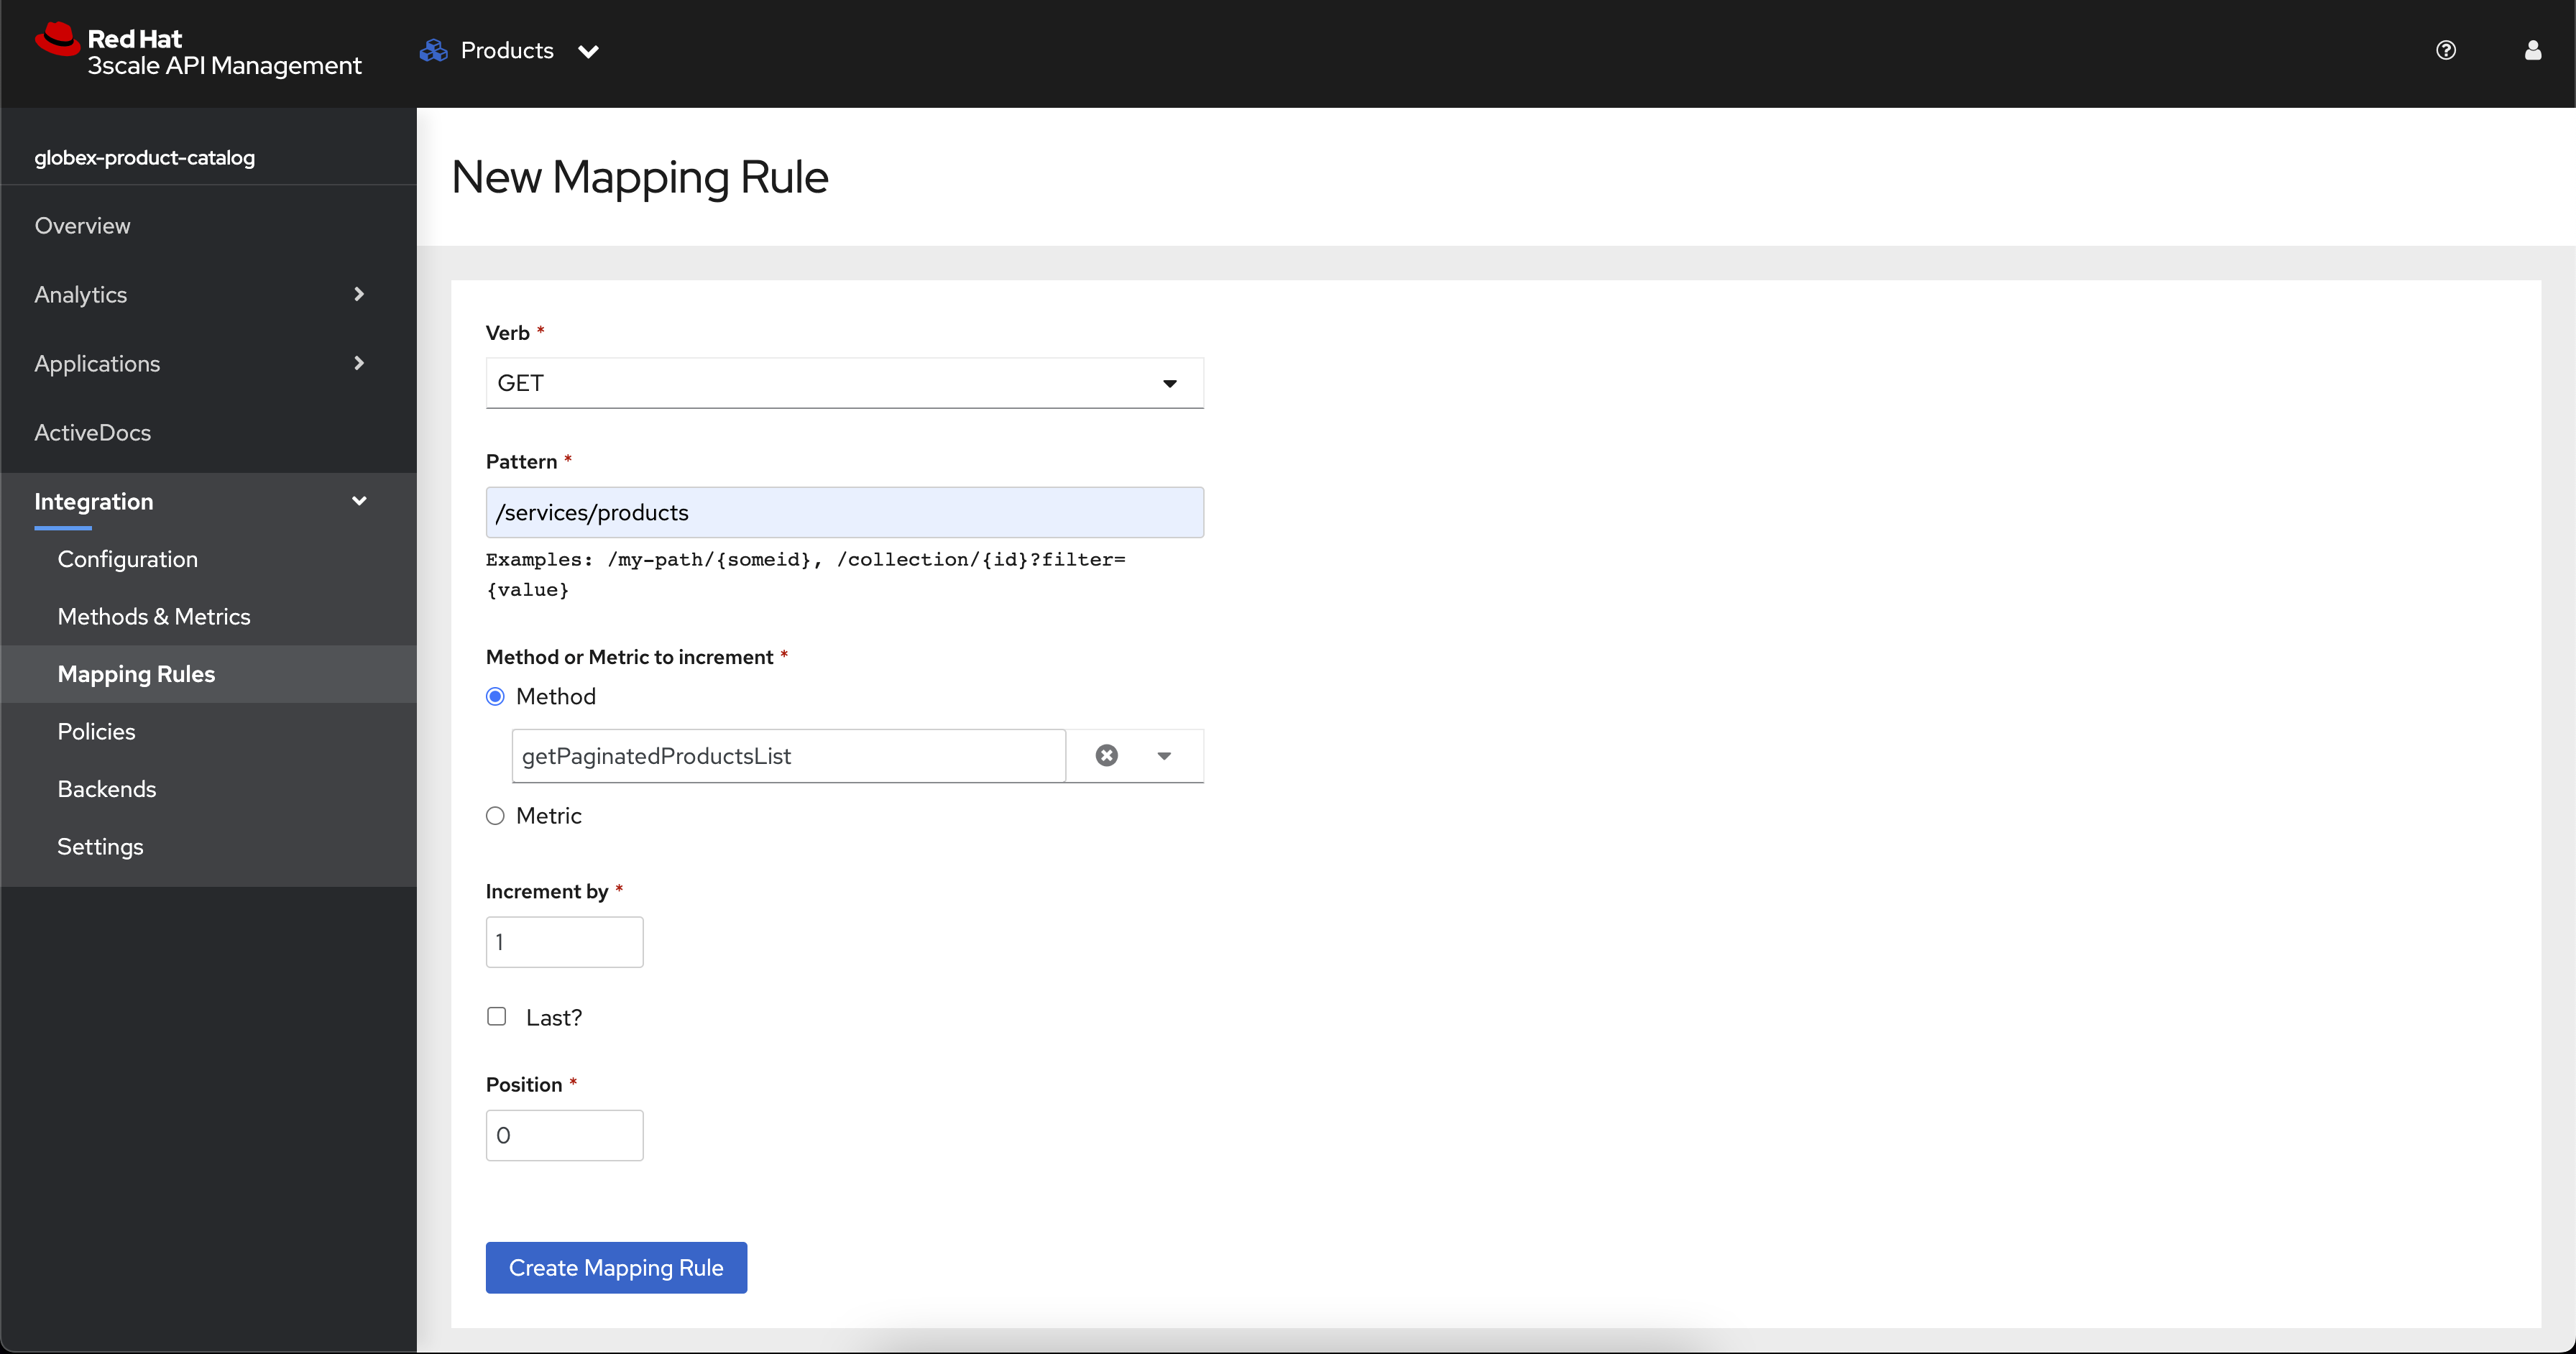
-
Verb:
GET -
Pattern:
/services/products -
Metric or Method to increment: Choose
getPaginatedProductsList -
Increment by:
1 -
Check the checkbox Last
-
Position: 0
-
-
Click Create Mapping Rule
5.4.6. Create an application plans to define a customer-facing API product
-
Go to the Dashboard
-
Under the API section, click on
globex-product-catalogunder the Product -
In Applications > Application Plans menu on the left hand side, click on Create Application Plan
-
Provide the following details:
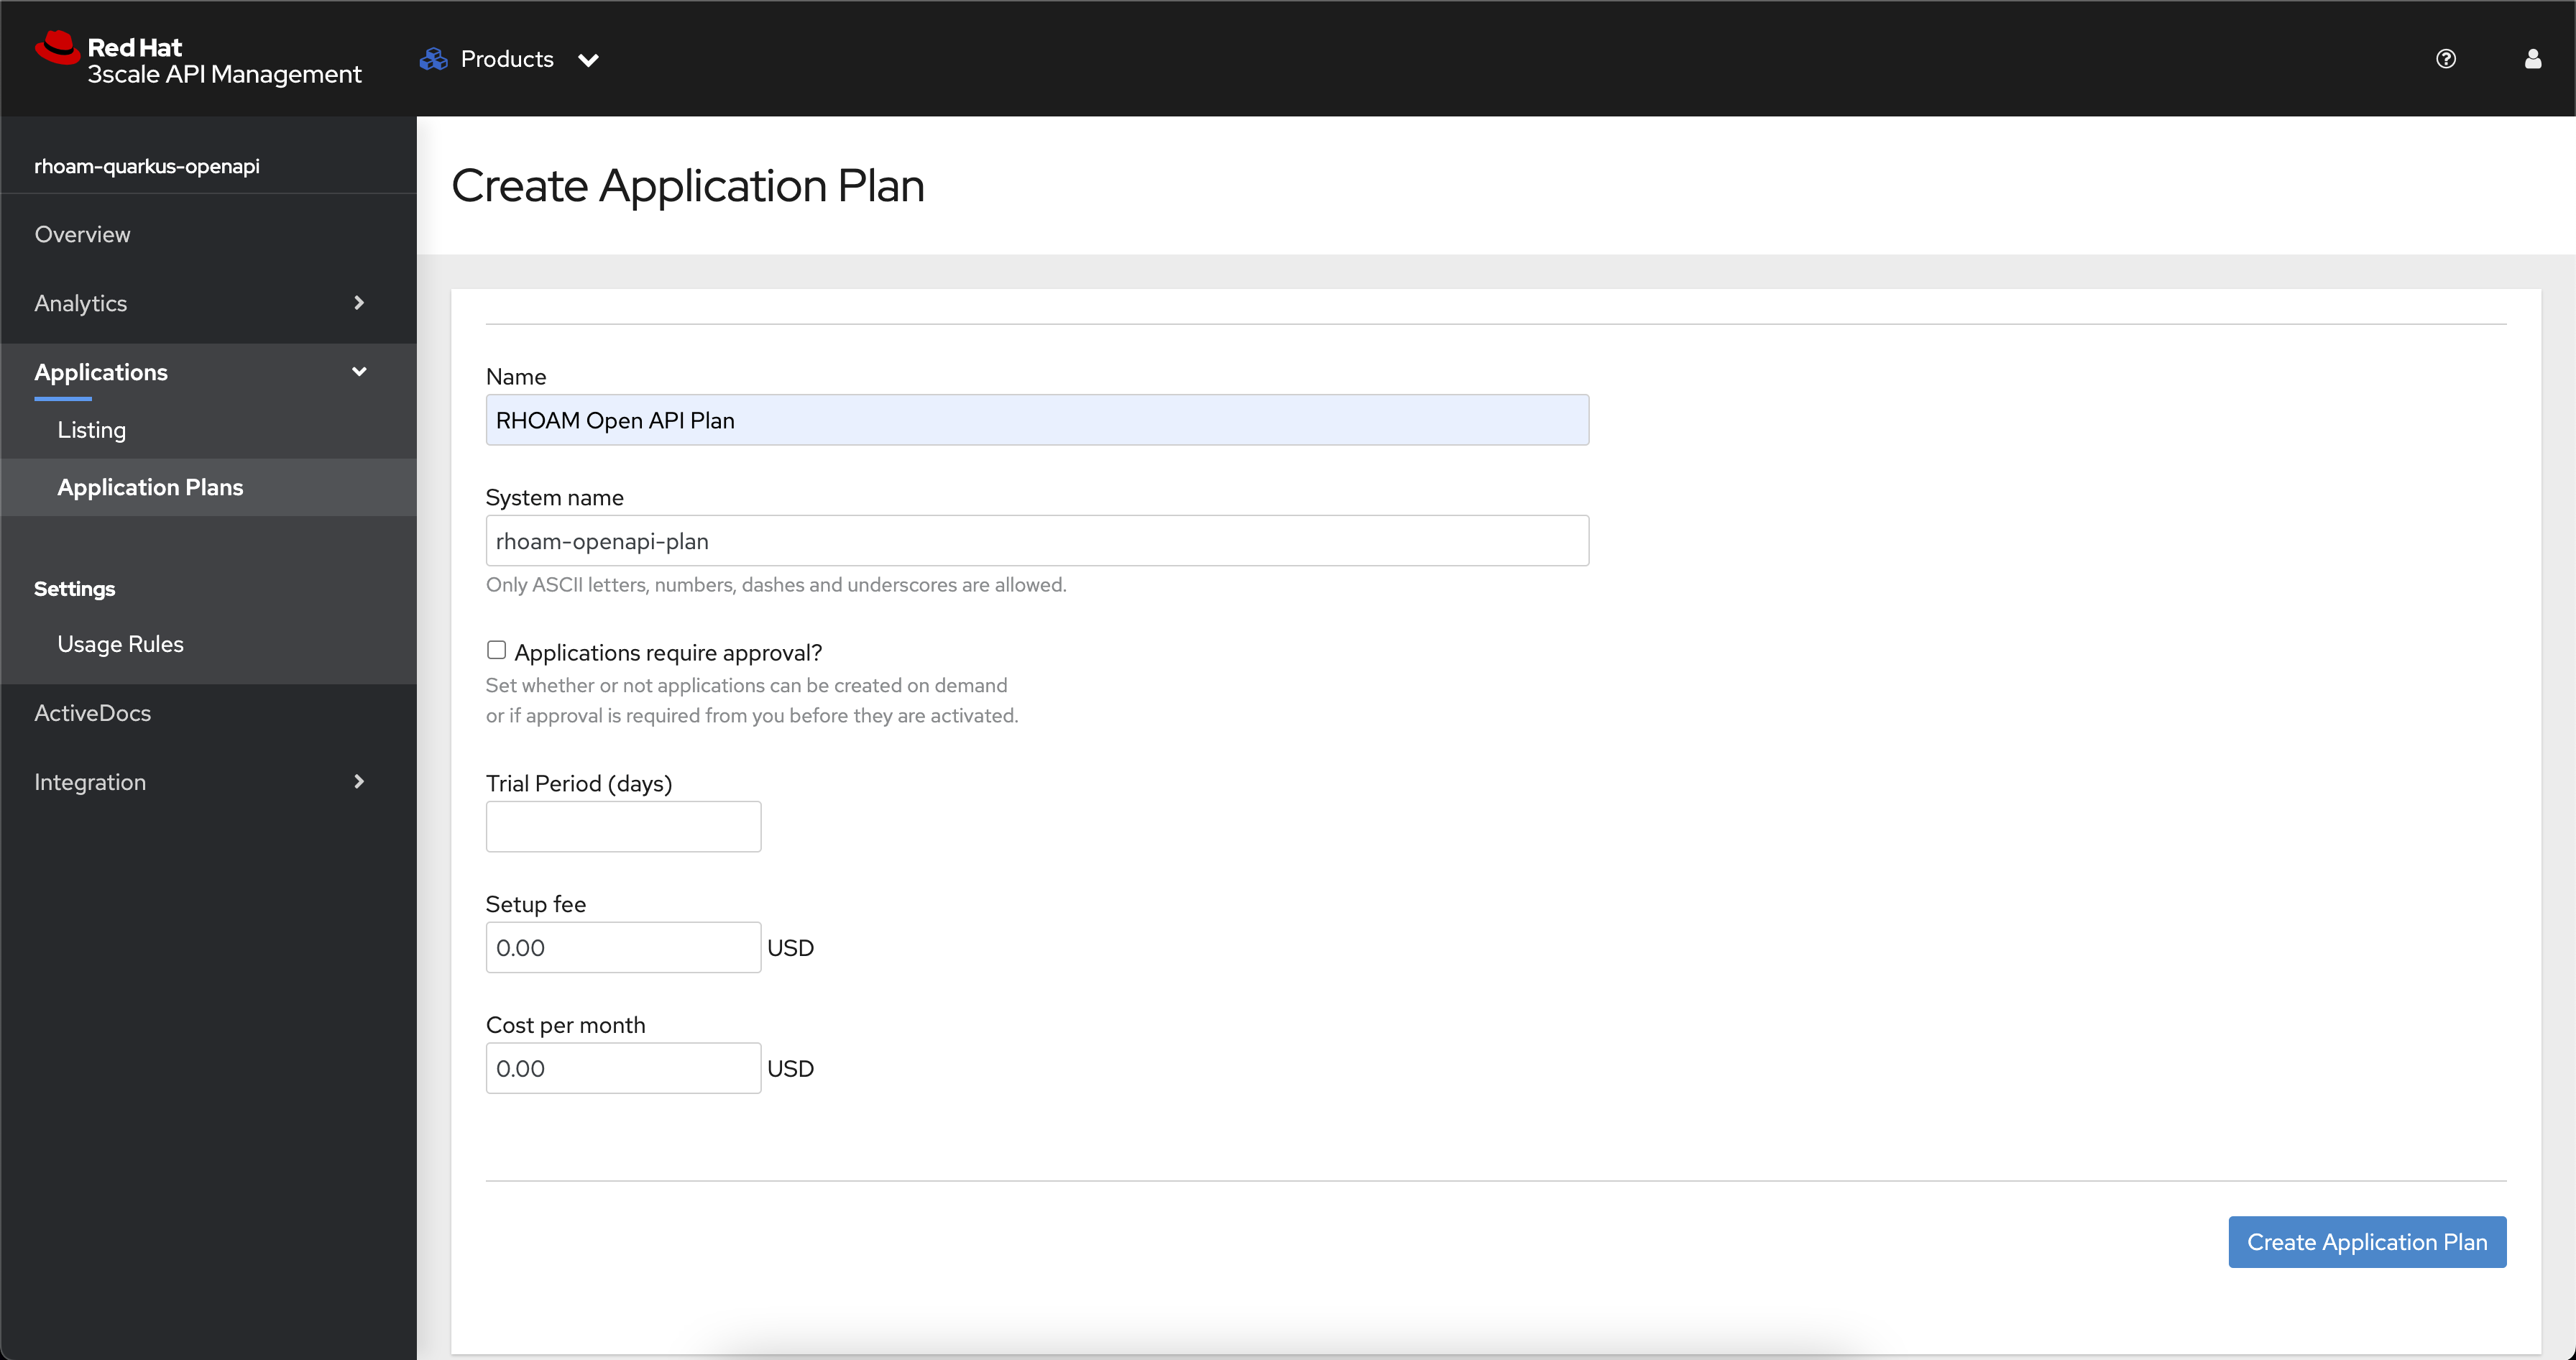
-
Name:
globex-app-plan -
System name:
globex-app-plan
-
-
Click Create Application Plan.
5.4.7. Create applications for the default account
An application is always associated with an application plan. Applications are stored within developer accounts. In basic 3scale plans only a single application is allowed. In enterprise plans, multiple applications per account are allowed.
-
Navigate to Audience > Accounts > Listing.
-
Click Create to create a new Developer account.
-
Provide the following details:
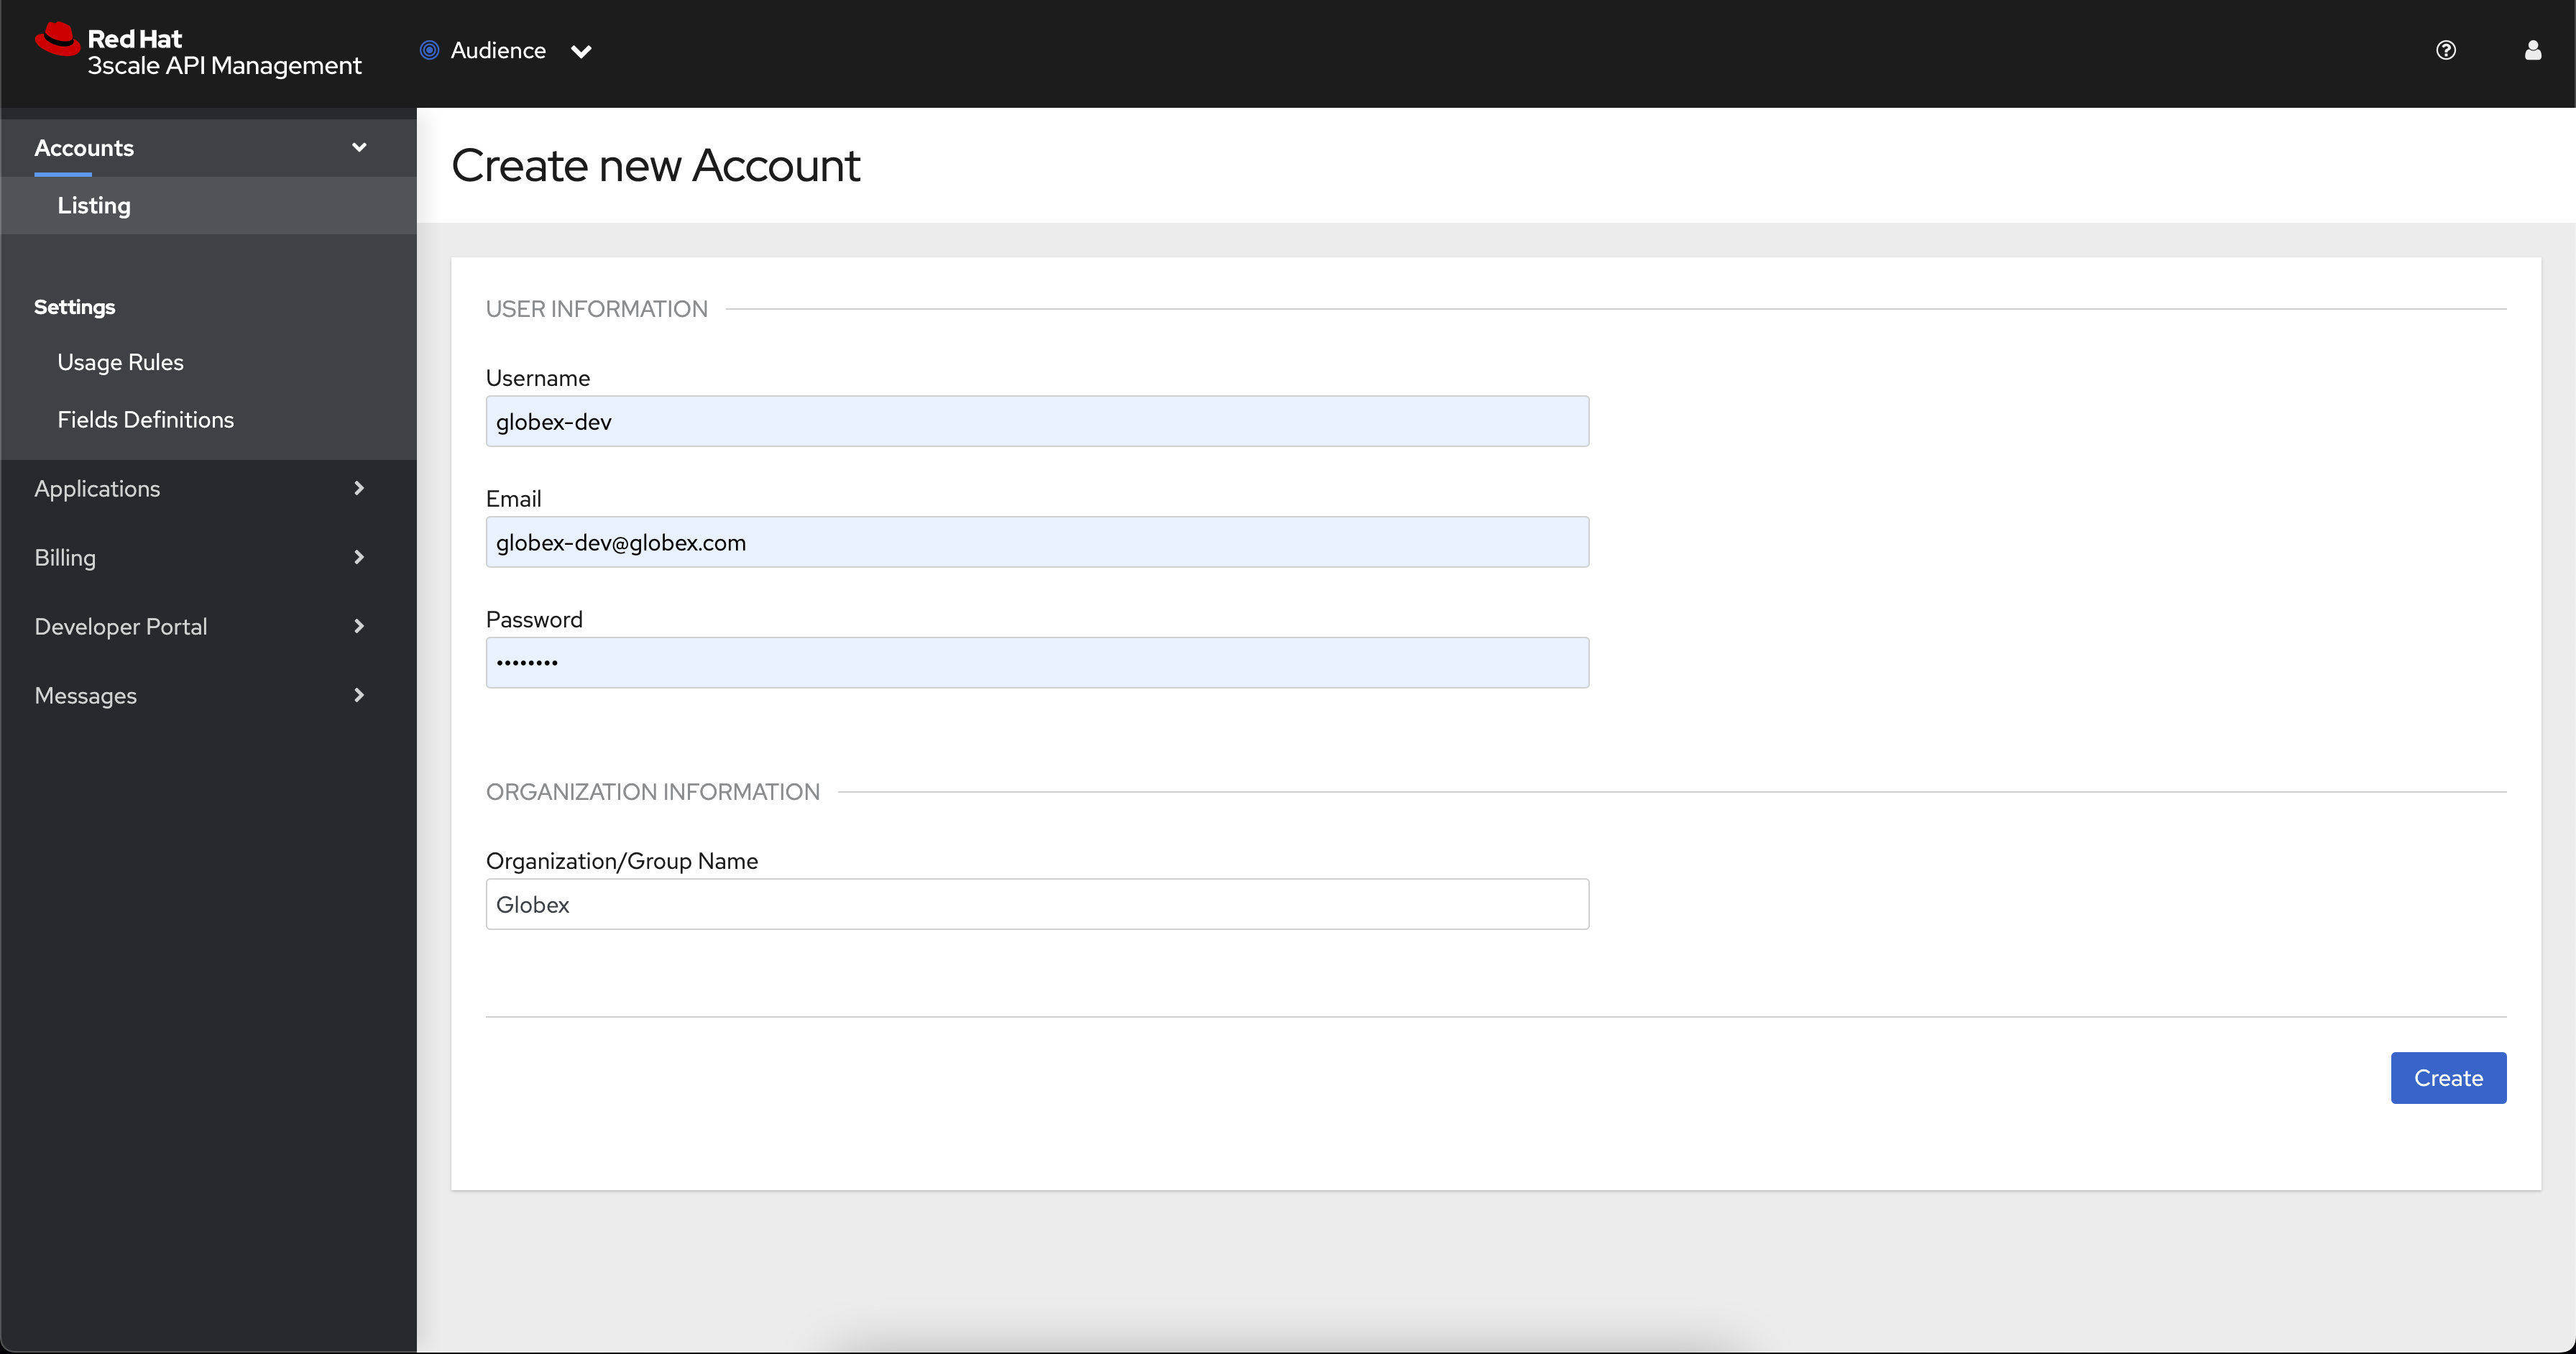
-
Username:
globex-dev -
Email: enter an email address
-
Password: enter a password
-
Organization/Group Name:
Globex
-
-
Click Create
-
Go to the Application tab of this account through the navigation on the top of the page.
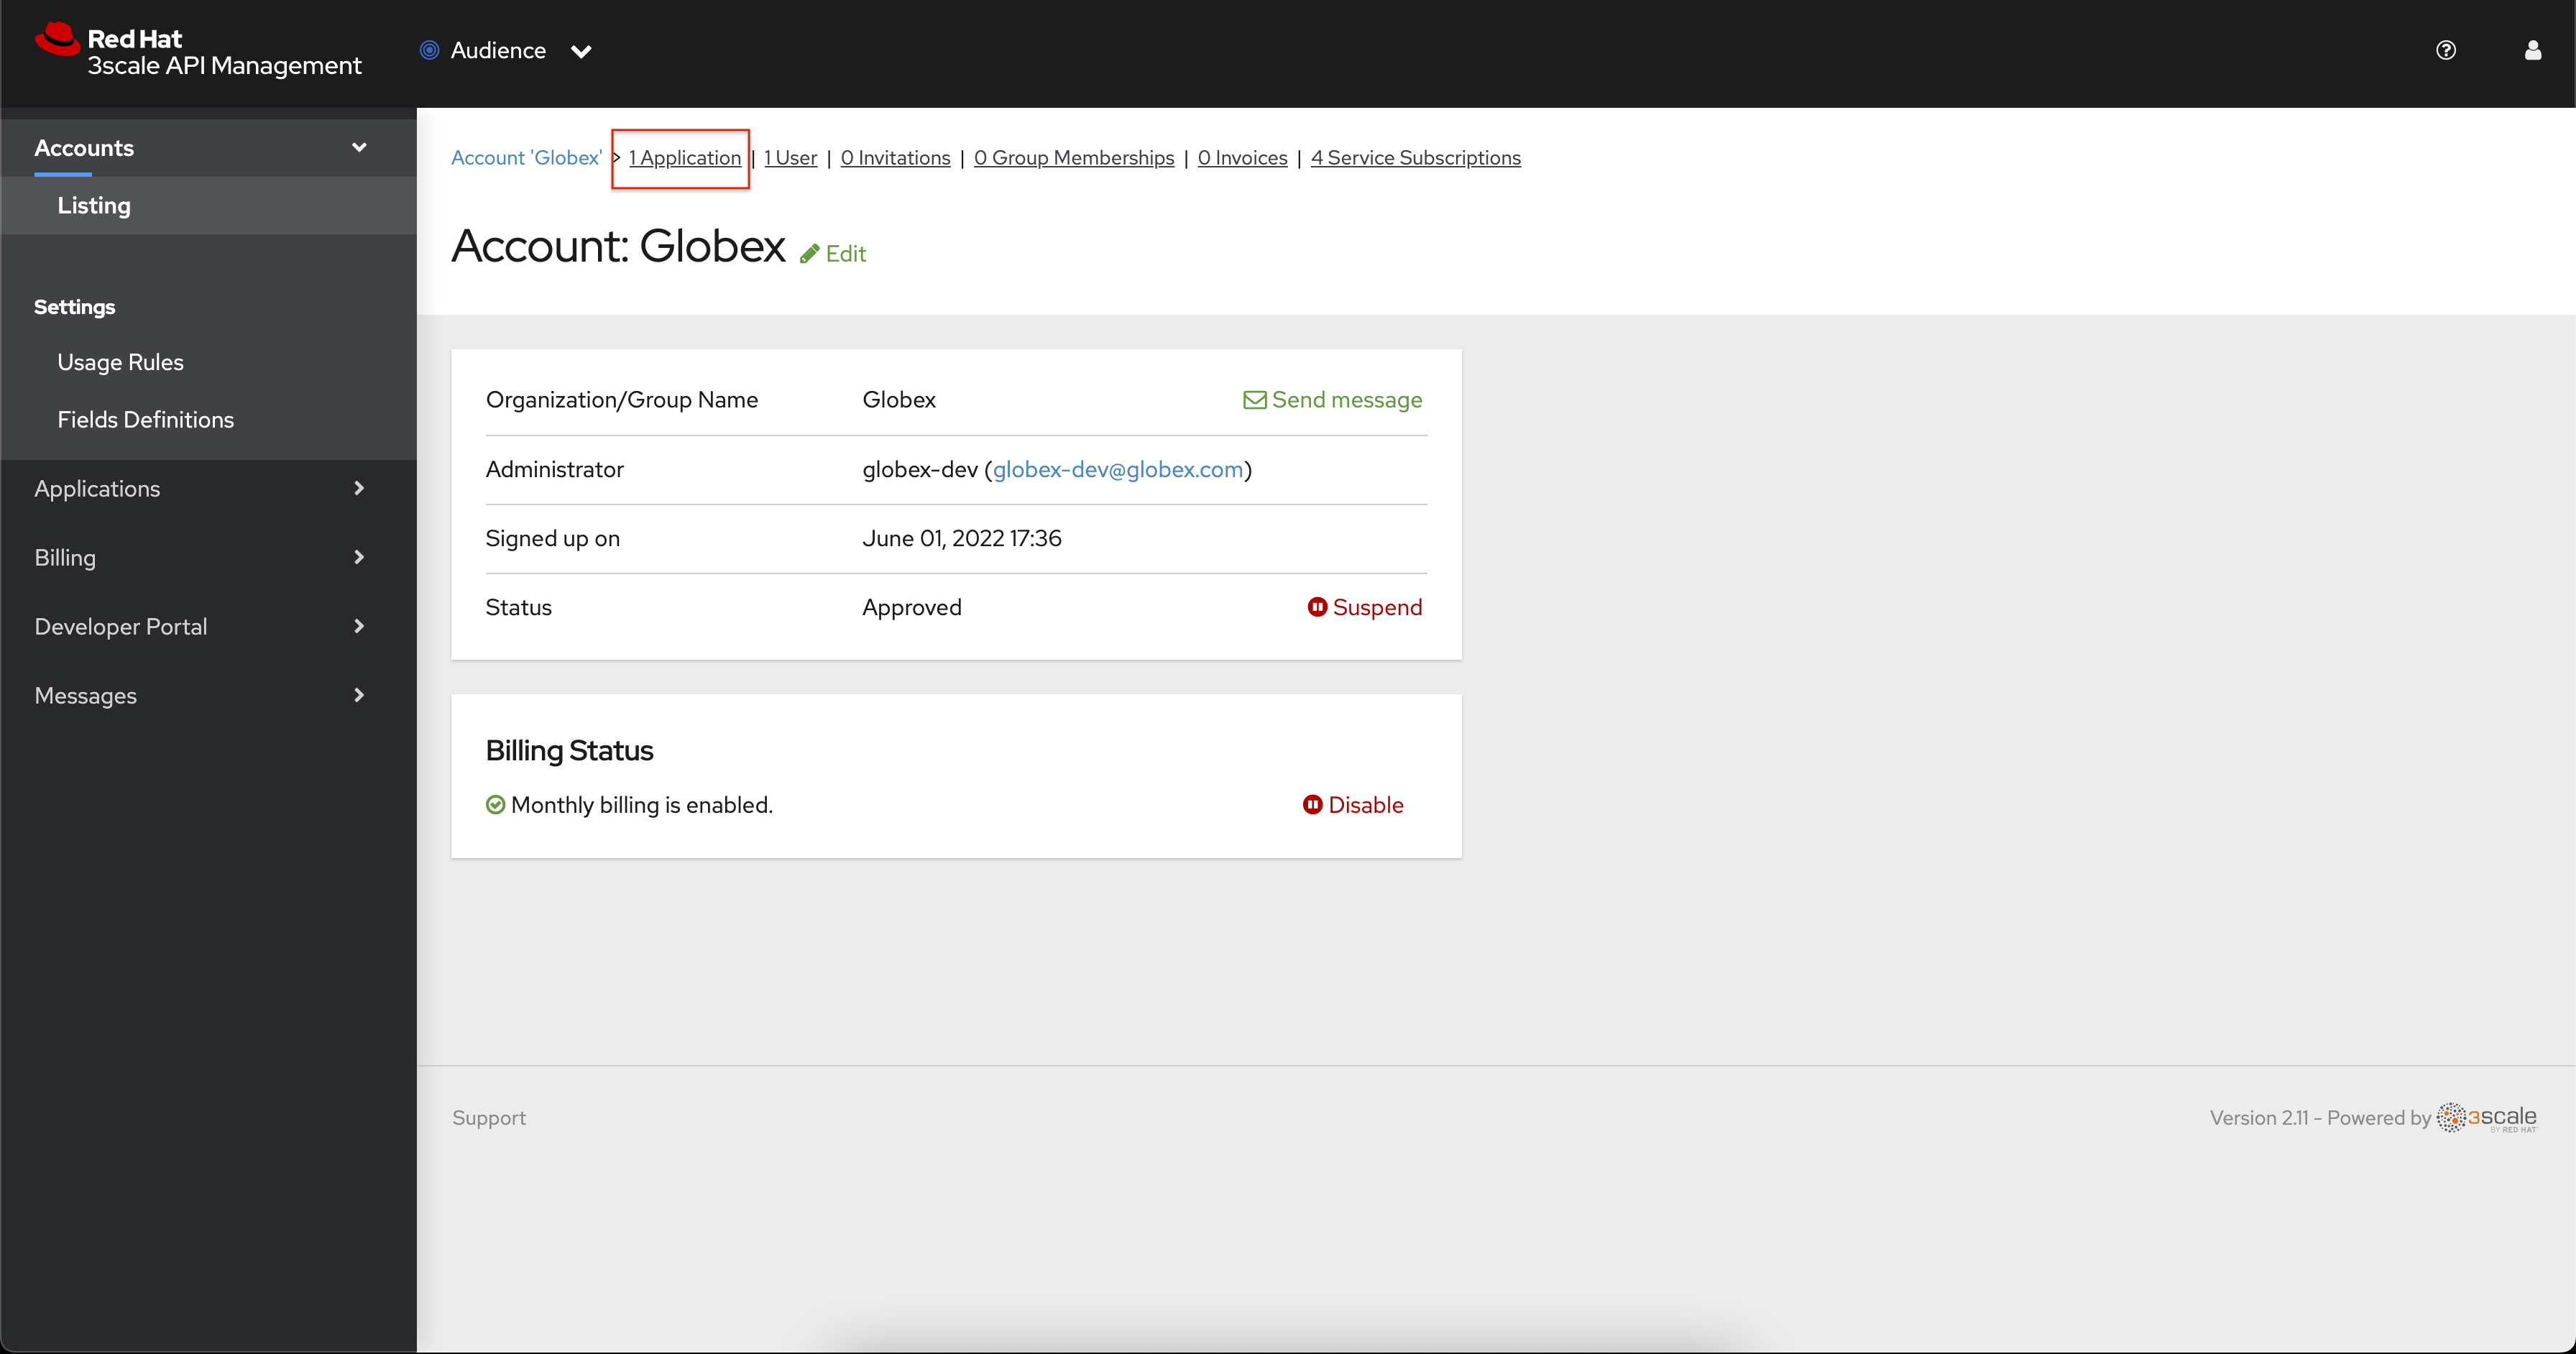
-
Click Create Application.
-
You will view the New Application page
-
Choose the following details:
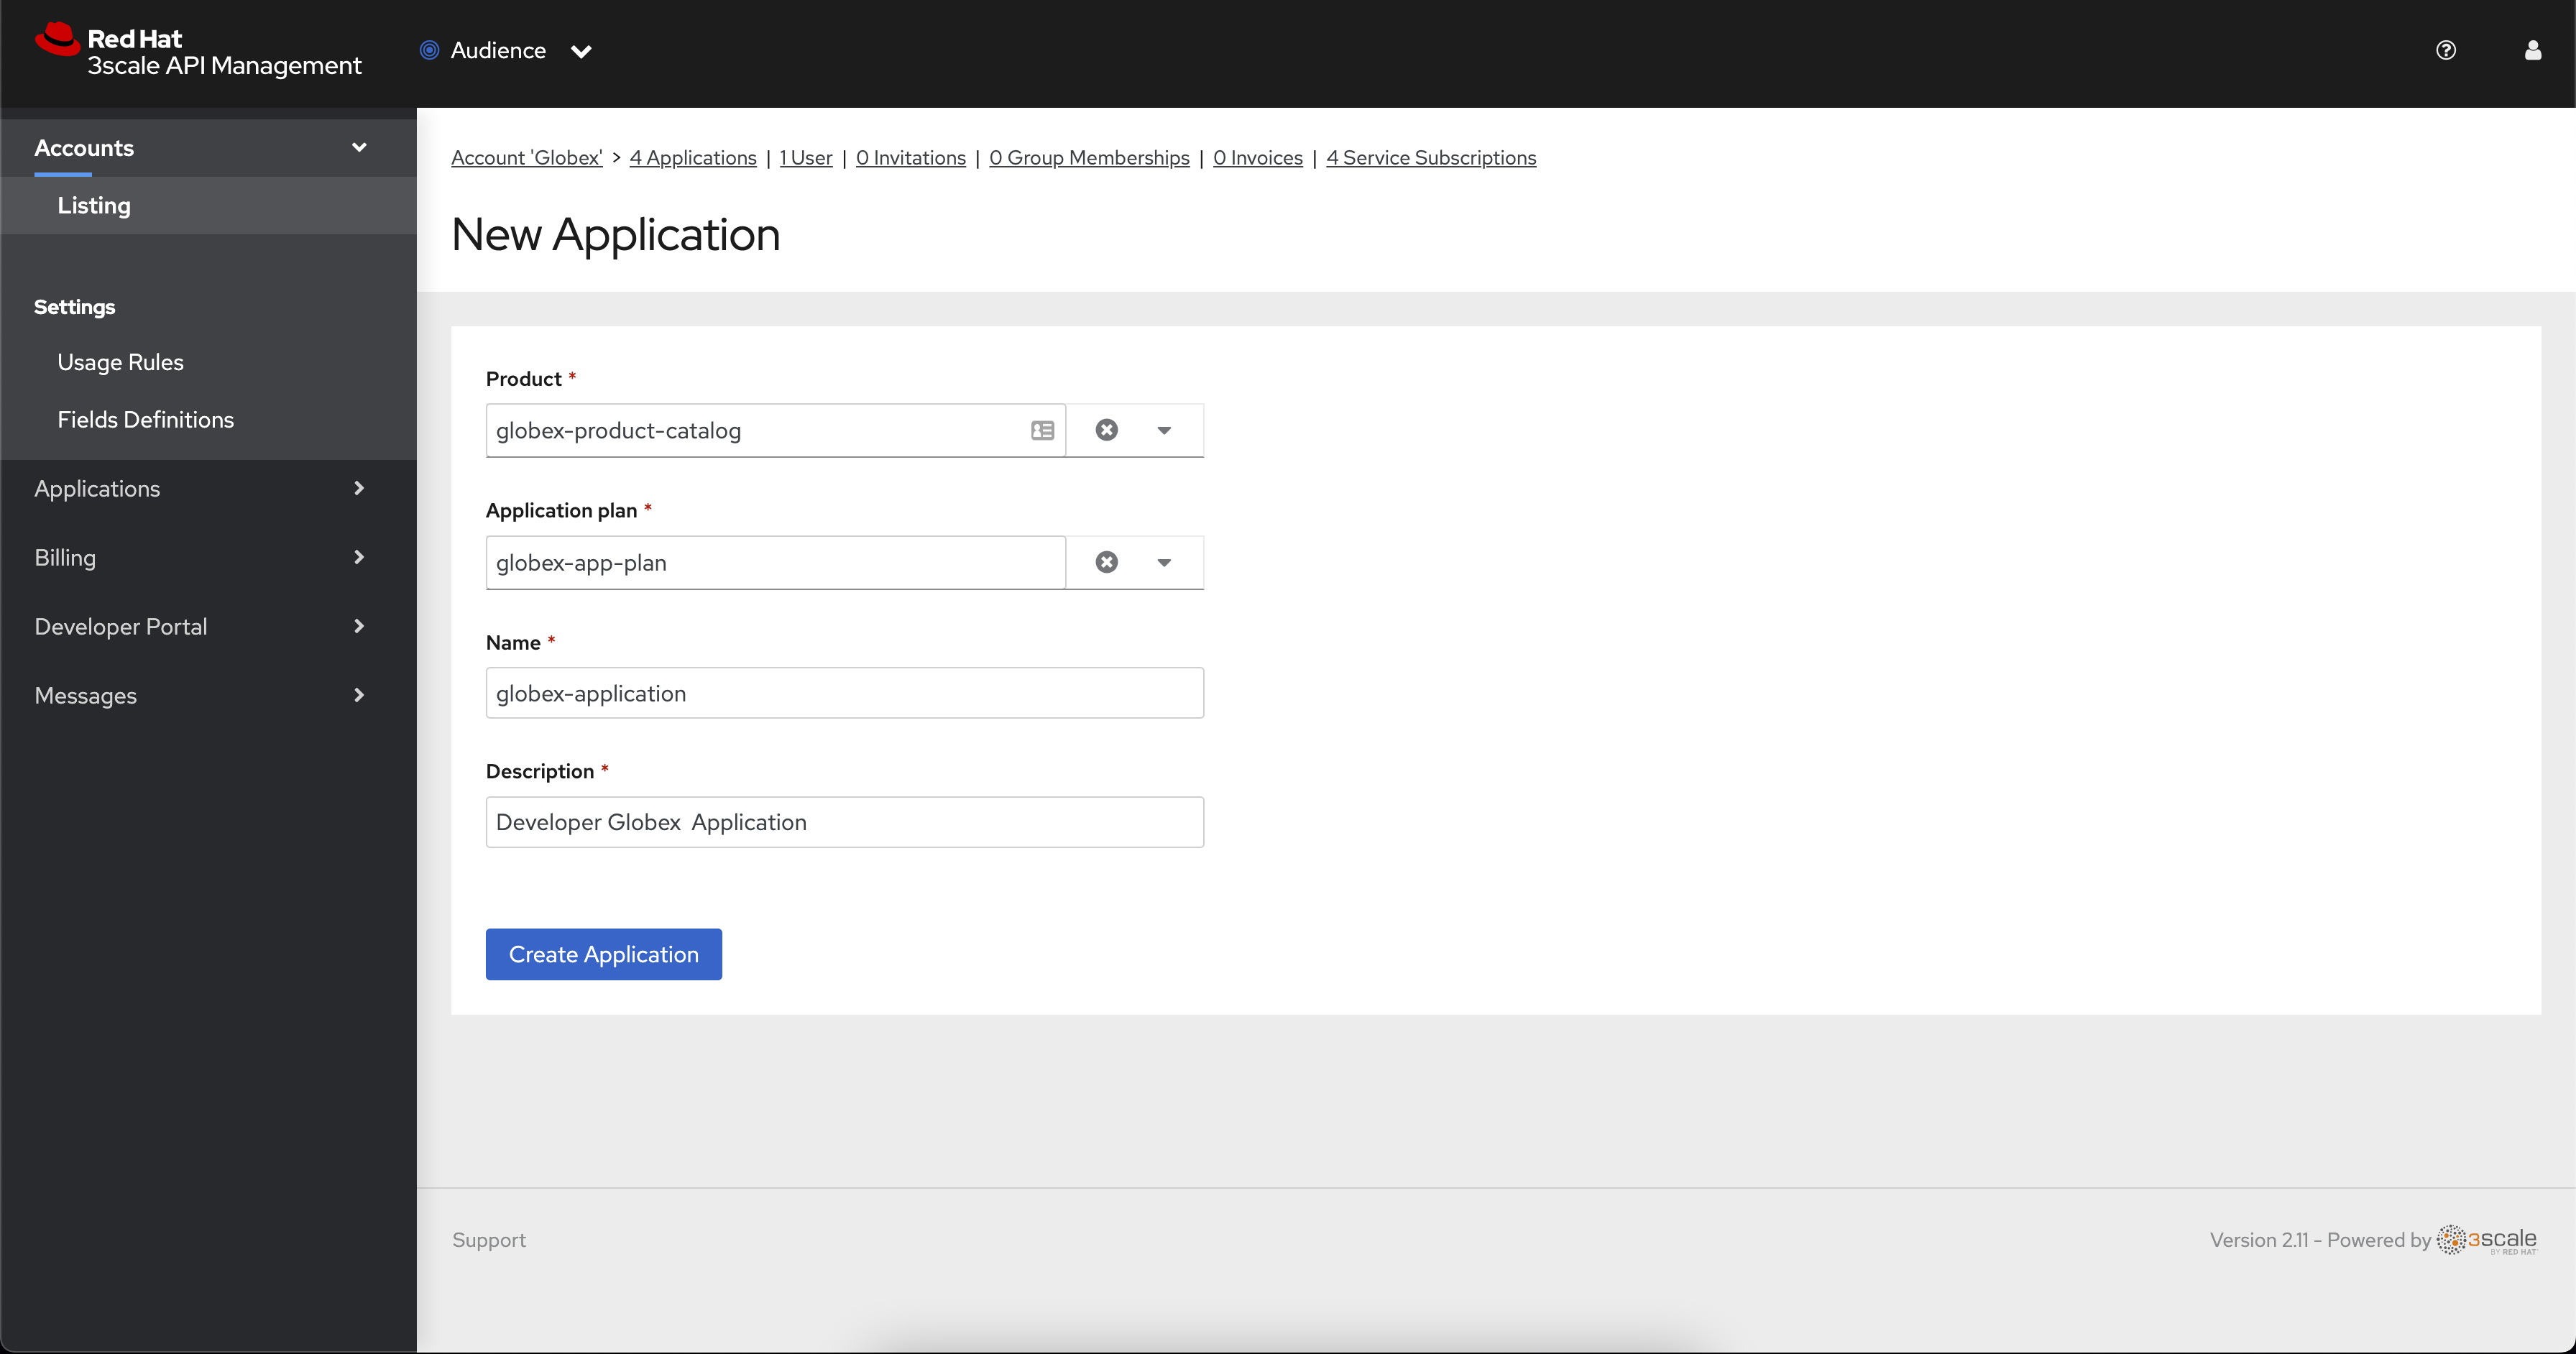
-
Product:
globex-catalog -
Application plan:
globex-app-plan -
Name:
globex-application -
Description: a suitable description
-
-
Click Create Application.
-
You can see your new application in Dashboard > Audience > Accounts > Applications > Listing
5.4.8. Testing the Globex Coolstuff application
Sending requests to your product to test the integration of a backend
-
Navigate to the Product > globex-catalog > Integration > Settings
-
Under AUTHENTICATION section, change the following
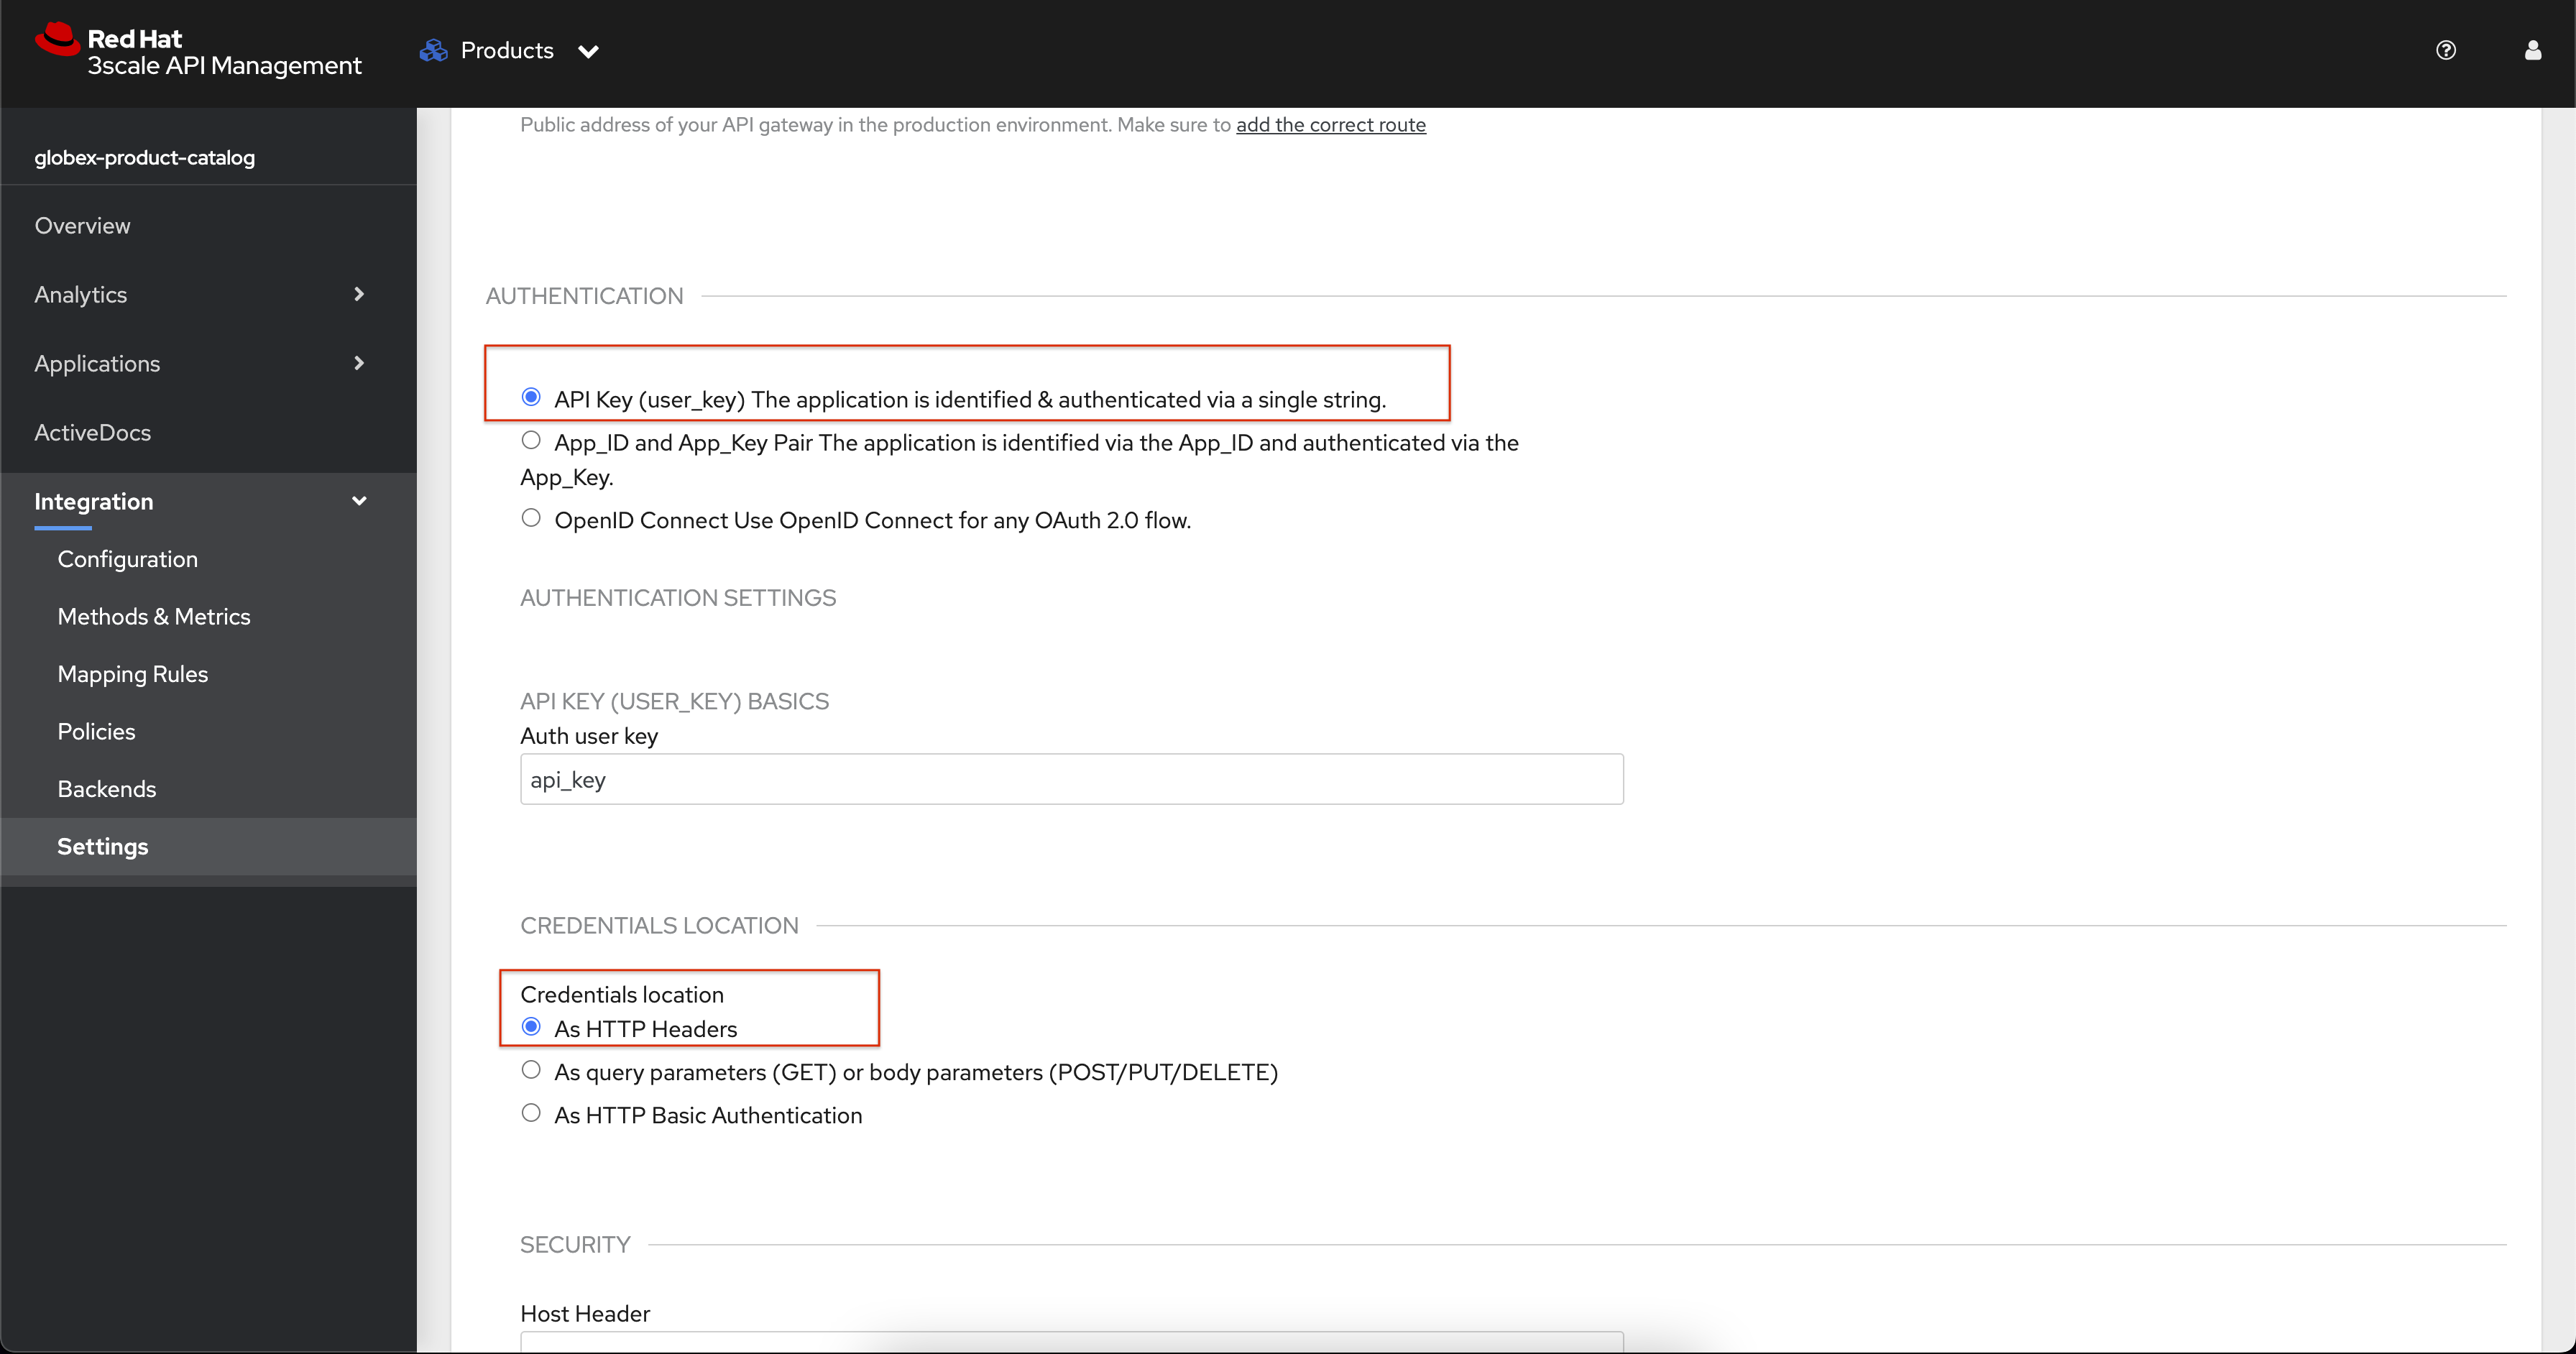
-
API KEY (USER_KEY) BASICS > Auth user key:
api_key -
CREDENTIALS LOCATION: Choose
As HTTP Headers
-
-
Next, to promote the new APIcast configuration to staging, navigate to the Products>
globex-product-catalog> Integration > Configuration. -
You will see the Mapping Rules, Credential Location and the Backend
-
Under APIcast Configuration, click Promote to Staging APIcast.
-
Under Staging APIcast, promote the APIcast configuration to production by clicking Promote to Production APIcast.
-
To test requests to your API product, copy the command provided in Example curl for testing and run it in a terminal.
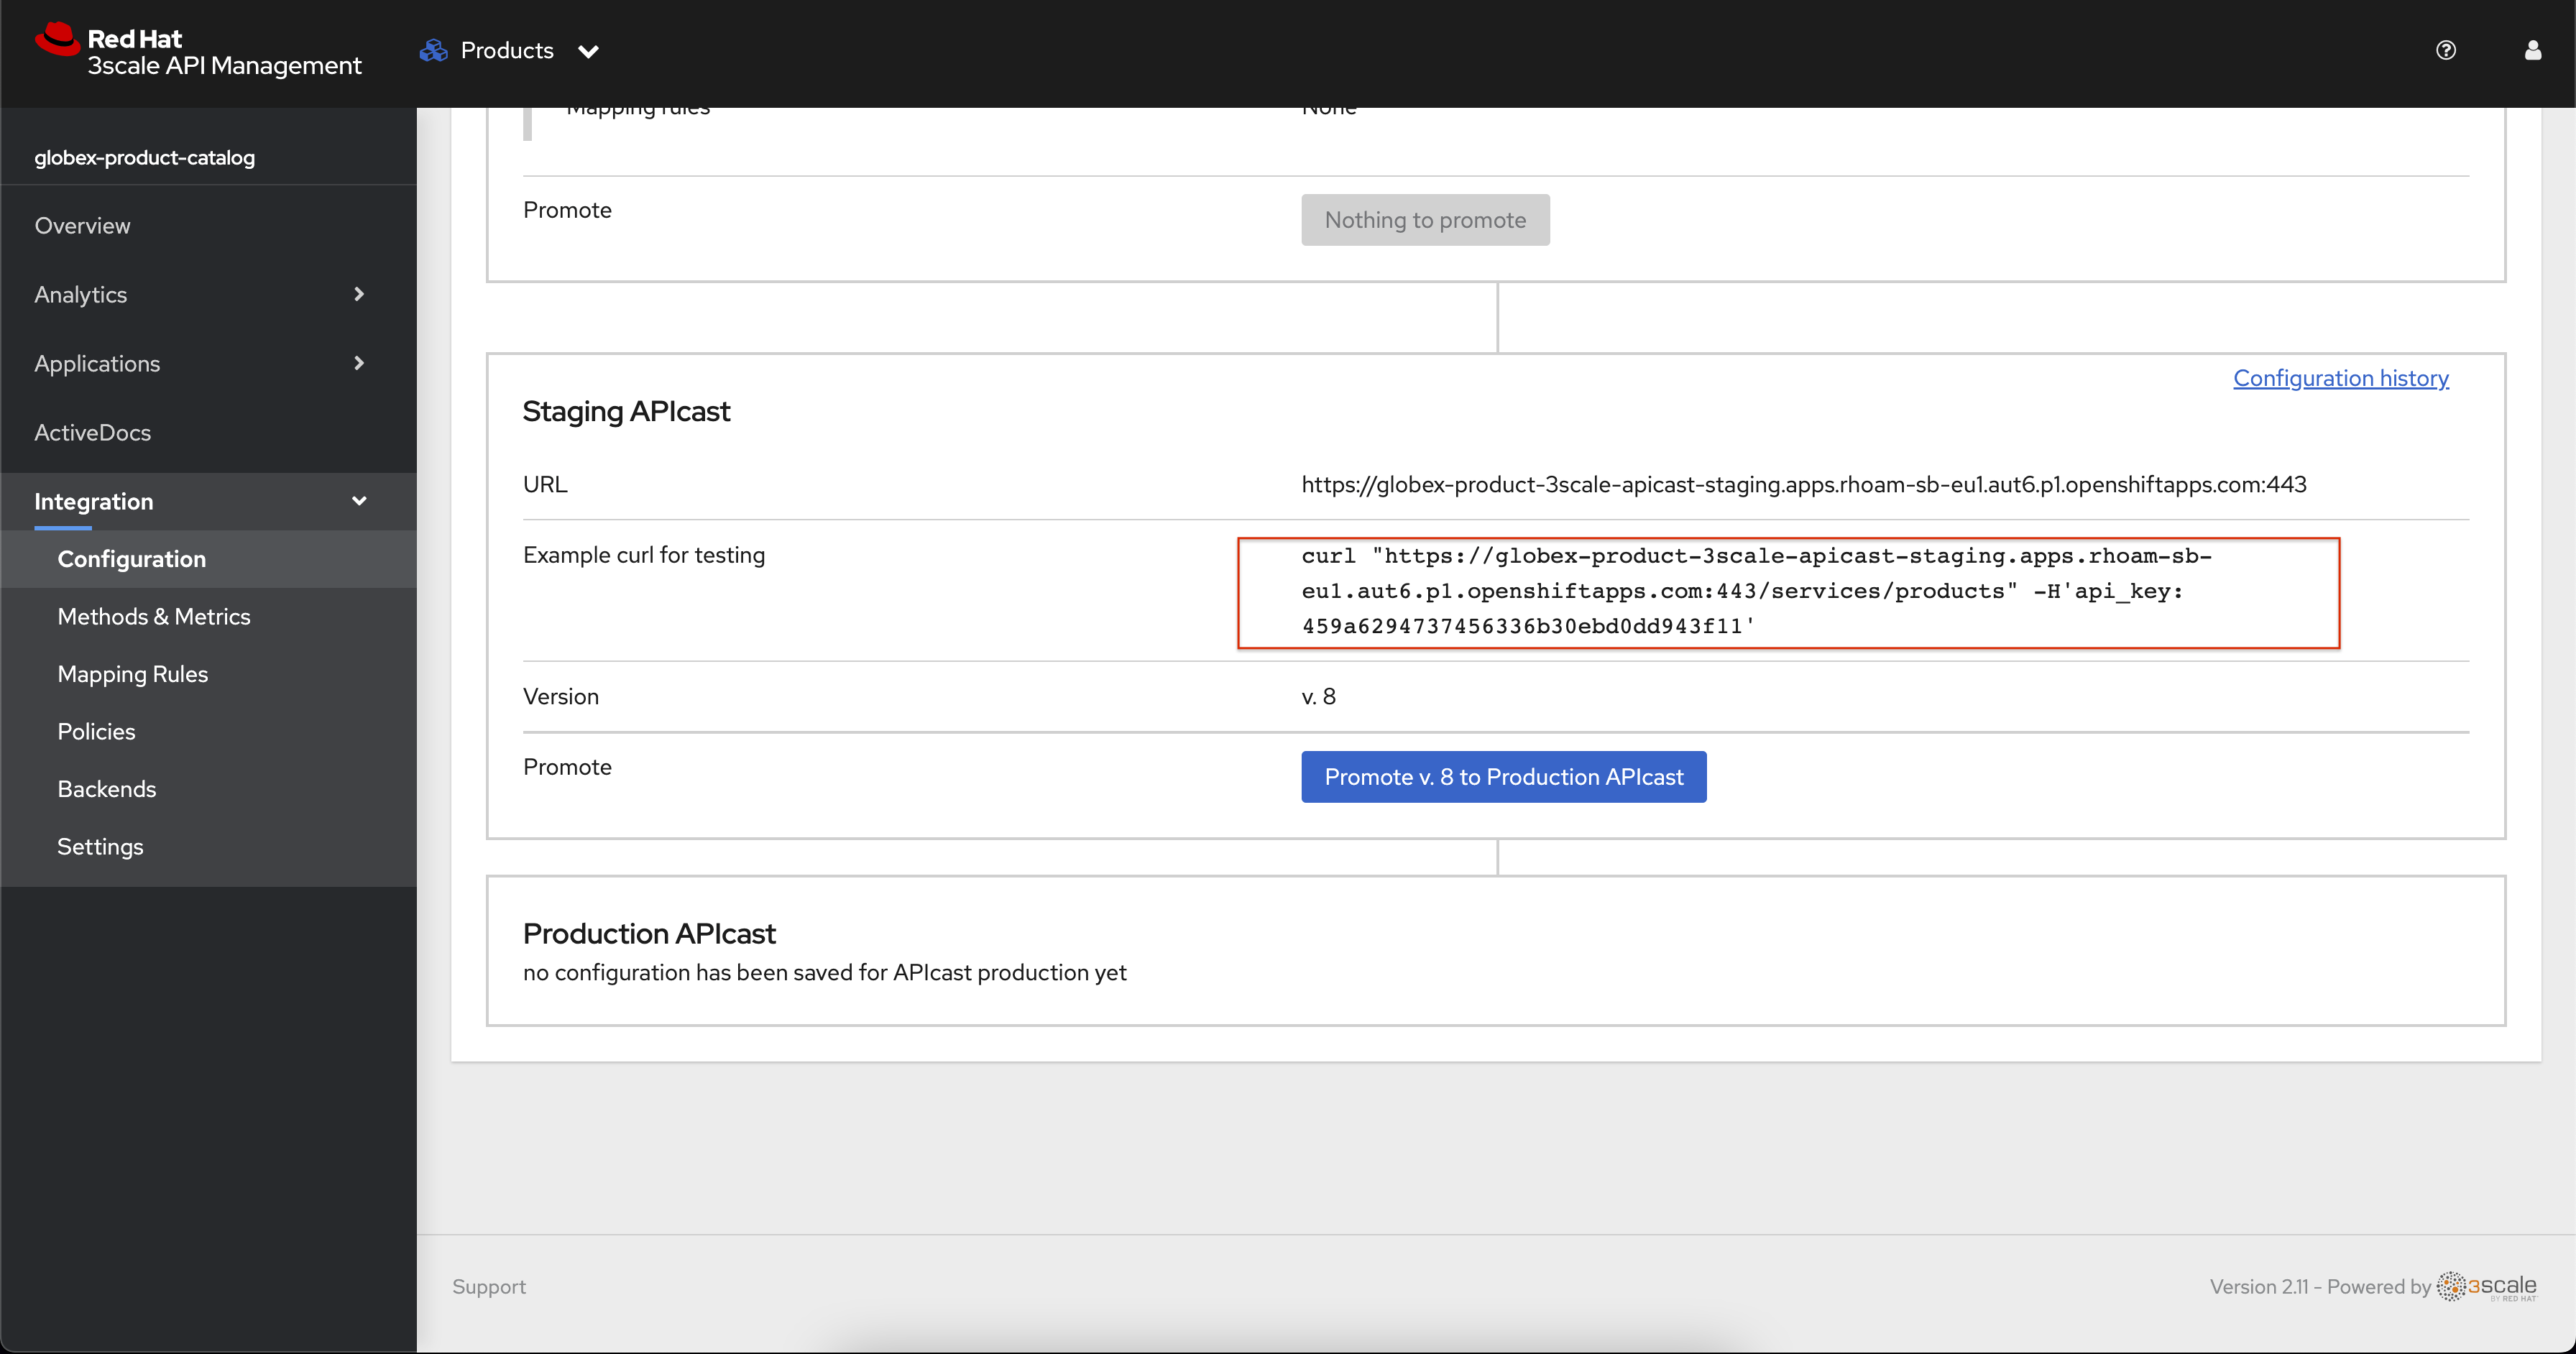
-
After you run the command, you should get a response containing results from Catalog API.
-
In real life, the mobile app would be using the staging and production API endpoints securely to access the APIs.
-
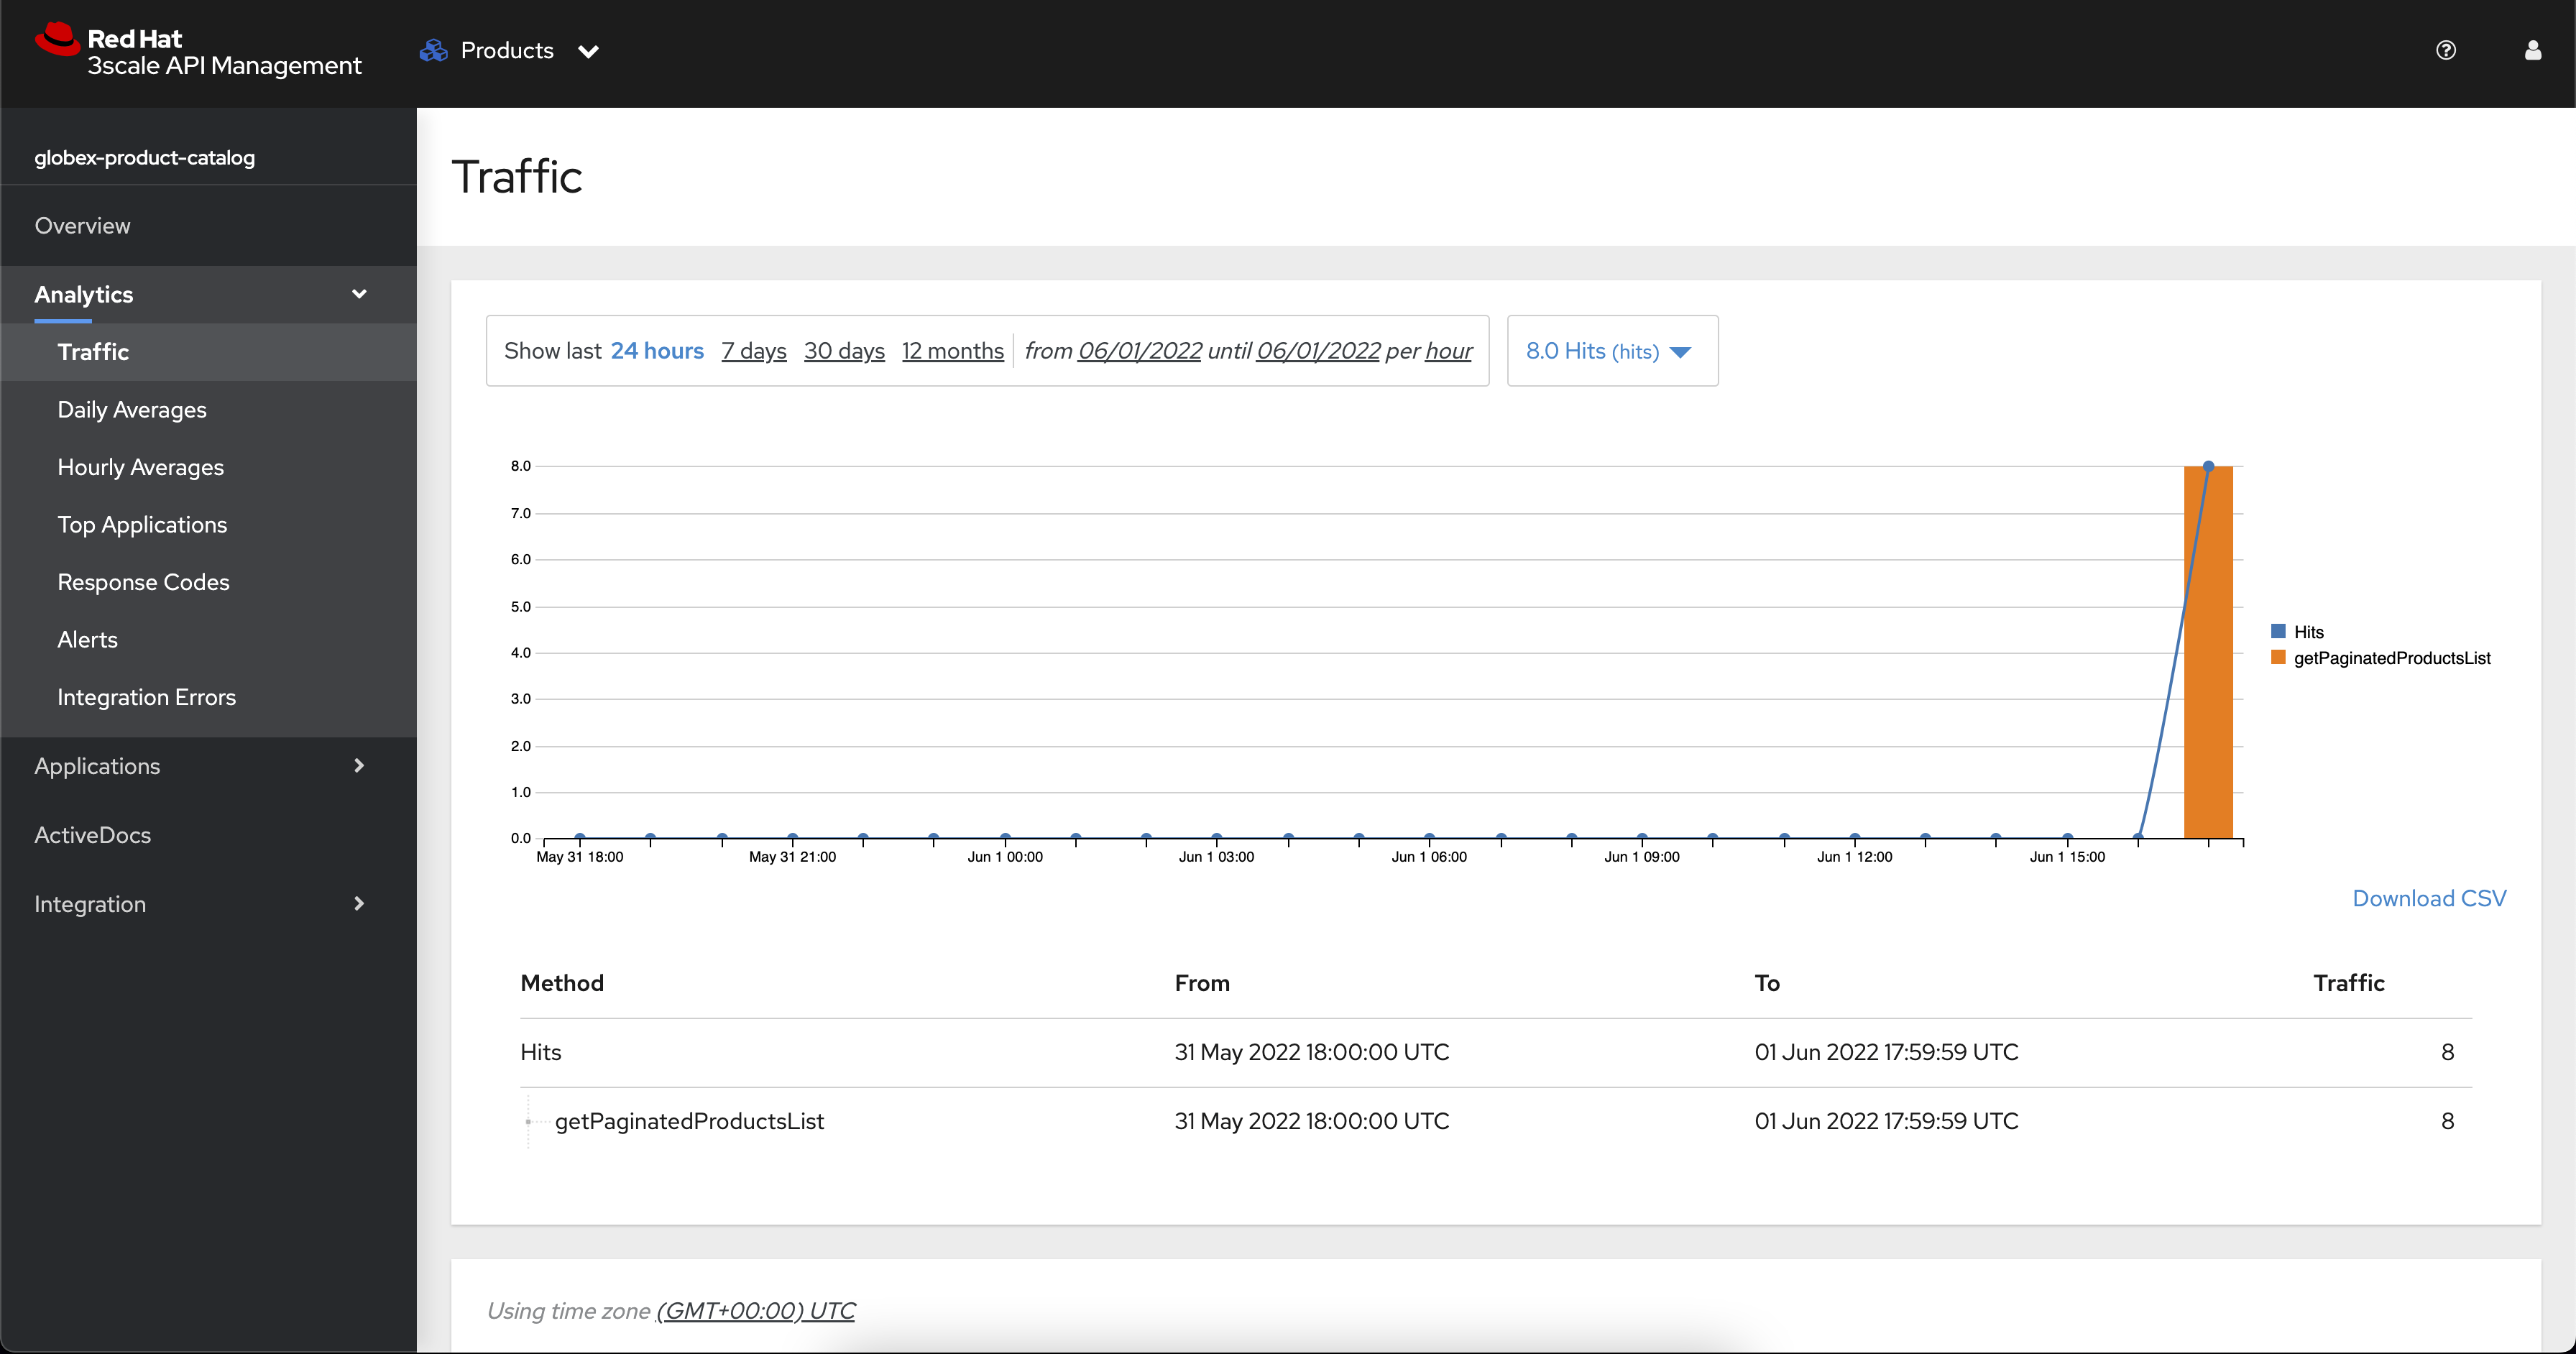
Click on the Analytics → Traffic link on the left hand side. You will see the Hits details
-